Full Disclosure: Essex Parts Services offered me a friendly discount on this AP Racing Big Brake kit in exchange for the promise of a thorough review of my experience with the product. They wanted an unbiased review, and that’s what this is.
Big brakes. Everyone loves big brakes. Everyone wants big brakes. It seems even the OEMs are fascinated with big brakes these days. The horsepower wars have been raging for several years now, and cars such as the Mustang GT350, the Challenger Hellcat, and the Camaro ZL1 are setting the power and speed bar ever higher. With these big (and in the case of the Hellcat, heavy) vehicles capable of reaching obscene speeds in hilariously short periods of time, brakes have had to evolve too… mainly by getting bigger. All of the previously mentioned vehicles have ~15.5″ diameter front brakes, which is huge!
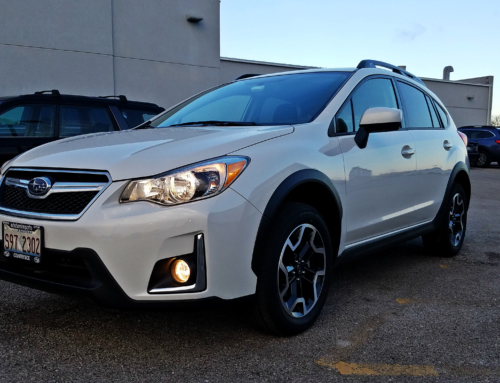
So how does my tiny little BRZ sports car stack up? Well, moving up from a 17″ to an 18″ wheel didn’t do my brakes any favors from a visual standpoint. Unlike those other muscle cars, whose brakes fill virtually the entire wheel, mine don’t even come close. The Series.Blue came with red-painted brake calipers for that “sporty” look, but they were the exact same brakes as the other trims, and if anything that just made it look like they were trying too hard, because they might have been red, but they were still small. In my mind, you don’t call attention to small brakes with bright colors.

This isn’t really a fair comparison, though. The BRZ is a budget-minded, low-horsepower, light-weight car, and all three of those criteria mean it isn’t going to come with massive brakes from the factory. The stock front brakes on all of our cars are 11.6″ diameter disks. (New for 2017 is an optional Brembo Big Brake kit which bumps that up to 12.8″ diameter front rotors.) They might be smaller, but they are adequately-sized for the task they need to perform. A Hellcat traveling at its 200 MPH top speed has more than twice the momentum of a BRZ traveling at its 140 MPH top speed. So why, then, upgrade my brakes at all? Well let’s discuss a few of the benefits of a Big Brake Kit:
- Thermal Capacity
Many people mistakenly assume that the primary function of a Big Brake Kit (BBK) is to improve (reduce) your braking distance. This is incorrect. The primary function of a BBK, above all else, is to provide increased thermal capacity. The bigger your brakes are, the more heat they can absorb and distribute, and the more quickly they can radiate that heat out. Remember, brakes function by essentially converting your car’s momentum directly into heat through friction. Continued, repeated braking dumps more and more heat into your rotors, pads, calipers, and fluid. Push your brakes hard enough (on a track, for example) and eventually you will reach a point where something gives. Your stock brake fluid might boil, or your pads might glaze over. In either case, you’re going to have a bad time. By increasing the size of your brakes, you’re providing a larger heatsink with which to absorb and distribute that heat. You’re also providing a larger surface area with which to radiate that heat out to the environment. Factory cars (by and large) come with brakes that are really only designed for daily driving (light braking) and maybe one or two panic stops. Even more performance-oriented cars don’t come, from the factory, with brakes designed to be hammered around a track. Do I hammer my car around a track? Well, I haven’t participated in a track day yet, but it’s on the list of things I want to start doing in the long run, and while the OEM brakes should be sufficient so long as I have the proper fluids and pads (designed to cope with higher temperatures), a good BBK up front will provide me with the added peace of mind to know that I don’t have to worry about cooking anything on the track. Oh, and even though autocross only has me hammering on the brakes for 60 seconds at a time, I’ve still managed to dump enough heat into them in those short periods to turn the rotors blue. That’s not an immediate issue, but eventually those heat cycles will take their toll on those rotors and they will need to be replaced. Larger rotors deal with heat better, and will last longer because the heat cycles won’t be as extreme. - Weight Savings
It might sound counter-intuitive, but BBKs often save weight. Two-piece rotors with aluminum hats can be larger, but still weigh less than smaller, one-piece, steel rotors. A better-designed caliper can also weigh less than the mass-produced factory design. A few pounds might not sound like much, but this is also un-sprung mass (and in the case of the rotors, rotating un-sprung mass), which more significantly impacts handling. At the end of the day, any weight you can save is a good thing, so being able to shave 10 or 15 lb off of the front of your car doesn’t hurt (especially when the BRZ already has a front-heavy weight distribution.) - Convenience
One of the benefits to a BBK is that they are easier to work with. First of all, a BBK will require less maintenance than the stock brakes, simply as a result of being better-suited to the job. They aren’t pushed as hard, relative to their size, and therefore components last longer. Additionally, most BBKs (at least the ones I’ve looked at) offer the convenience of a greatly simplified method of swapping brake pads. This means I could show up to an autocross, or a track day, and quickly swap in the appropriate pads for the job, and then swap back again at the conclusion of the event, all without needing to half-disassemble the caliper the way you would have to with the OEM brakes. - Style
Yes, let’s address the elephant in the room. A lot of the people reading this are only interested in a BBK for looks. Is that wrong? Certainly not. I’m a big fan of function over form, but I’m also a big fan of form that’s also functional. Unlike many other modifications you can do to your car in the name of style that negatively impact performance, this is a win-win type of modification. I’ve been lusting after a BBK for a while, and one of the main reasons was simply because my stock brakes look a bit small behind my 18″ summer wheels. Having said that, it’s certainly possible to screw everything up by installing the wrong kind of BBK on your car (my friend Mike has an entire write-up about this over on his blog.) This BBK improves performance, and looks good while doing so.
AP Racing Kits
There are quite a few Big Brake Kits on the market these days, with brands such as Wilwood, Stoptech, and AP Racing being among the most popular. I had originally honed in on AP Racing’s Competition kits. They offer two such kits: Sprint, and Endurance. The Sprint kit has a smaller rotor, and weighs less, while the Endurance kit has a larger rotor, but weighs more (both weigh less than the factory setup.) However, after a bit of back-and-forth with the folks at Essex Parts Services, I began to understand that those kits are not really meant for my use case (year-round, daily driving on salty roads.) They then pointed me to AP Racing’s Factory kits as one potential alternative. These kits are considerably more expensive than the Competition kits, but while they are more than capable of handling occasional track use, they are also designed as OEM-quality replacements that can be used year-round in all conditions. Here’s a quick comparison of the three kits’ major features:
| AP Racing Sprint | AP Racing Endurance | AP Racing Factory | |
|---|---|---|---|
| Price | $2,099 | $2,599 | $3,599 |
| Weight Savings | 10 lb / corner (20 lb total) | 5 lb / corner (10 lb total) | 5 lb / corner (10 lb total) |
| Rotors | 299mm x 32mm | 325mm x 32mm | 332mm x 26 mm |
| Dust Boots | No | No | Yes |
| High Temp Piston Seals | Yes | Yes | Yes |
| Piston Material | Stainless Steel | Stainless Steel | Aluminum |
| Anti-Knockback Springs | Yes | Yes | No |
| Quick Pad Swap | Yes | Yes | Yes |
| Finish | Unpainted (Anodized) | Unpainted (Anodized) | Painted (Red) |
| Fits Stock Wheels | No (requires spacer) | No (requires spacer) | Yes |
| Pads and Fluid Included | No | No | Yes |
| Product Link | Link | Link | Link |
A few things become apparent when looking at this table. First off, no, the Factory kit, despite being the most expensive kit by far, is not necessarily the “best” kit available. That depends entirely on your use case. For a hardcore track, or autocross machine, it would make no sense to go with the factory kit, which lacks the anti-knockback springs, and only saves half as much weight as the Sprint kit. However, the Factory kit makes more sense for a daily driver that is occasionally tracked or autocrossed (in other words, my exact use case.) It trades some of the hardcore optimizations, and instead balances performance, user-friendliness, and looks.
These different priorities are perhaps most apparent when you compare the rotor sizes. The Sprint kit has a smaller diameter to keep weight down, but is also rather fat at 32mm. The Endurance kit keeps the same thickness, but bumps the rotor size up considerably to better handle heat over a longer period of time. By comparison, the Factory kit has the largest diameter, but is noticeably thinner (but still thicker than OEM.) The thinner profile is a trade-off meant to allow this setup to fit behind the OEM wheels without the use of spacers (which means I can still use my stock STi wheels in the winter.) The larger diameter is also an intentional style choice to allow it to fill the wheel a bit more. I’m not a huge fan of style for style’s sake, but they can still handle much more heat than the stock rotors, and are lighter, so it’s a style upgrade with a performance upgrade to boot!
The Factory kits use a separate caliper design from the competition kits, and added parts like dust boots and high quality paint are part of the reason they cost more. Speaking of costing more, the Factory kits come with two bottles of AP Racing DOT 5.1 brake fluid, and a set of APF404 brake pads, unlike the competition kits, which do not include those items. All three kits come with stainless steel brake lines, caliper brackets, and all the additional hardware needed for installation.
It’s also worth mentioning that there are two versions of the AP Racing Factory BBK for our cars. There is the 4-piston kit which is what you see in this review, and there is also a massive 6-piston kit, which I did not purchase because that’s a bit too much of the “style for style’s sake” as far as I’m concerned, and that size starts to look a bit silly. It also wouldn’t fit under a 17″ wheel, which is what I use for autocross, and during the winter. There are also matching rear Factory BBKs available, but I’m not made of money, so those probably won’t happen (I still need a header, a tune, new tires, etc… for autocross!)
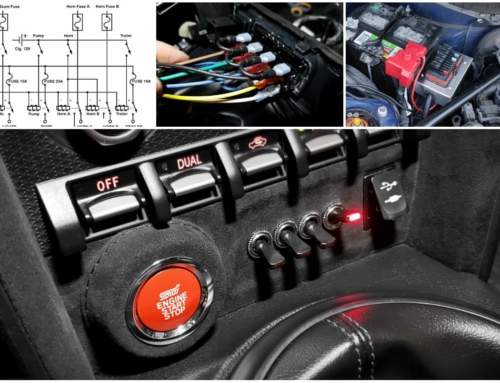
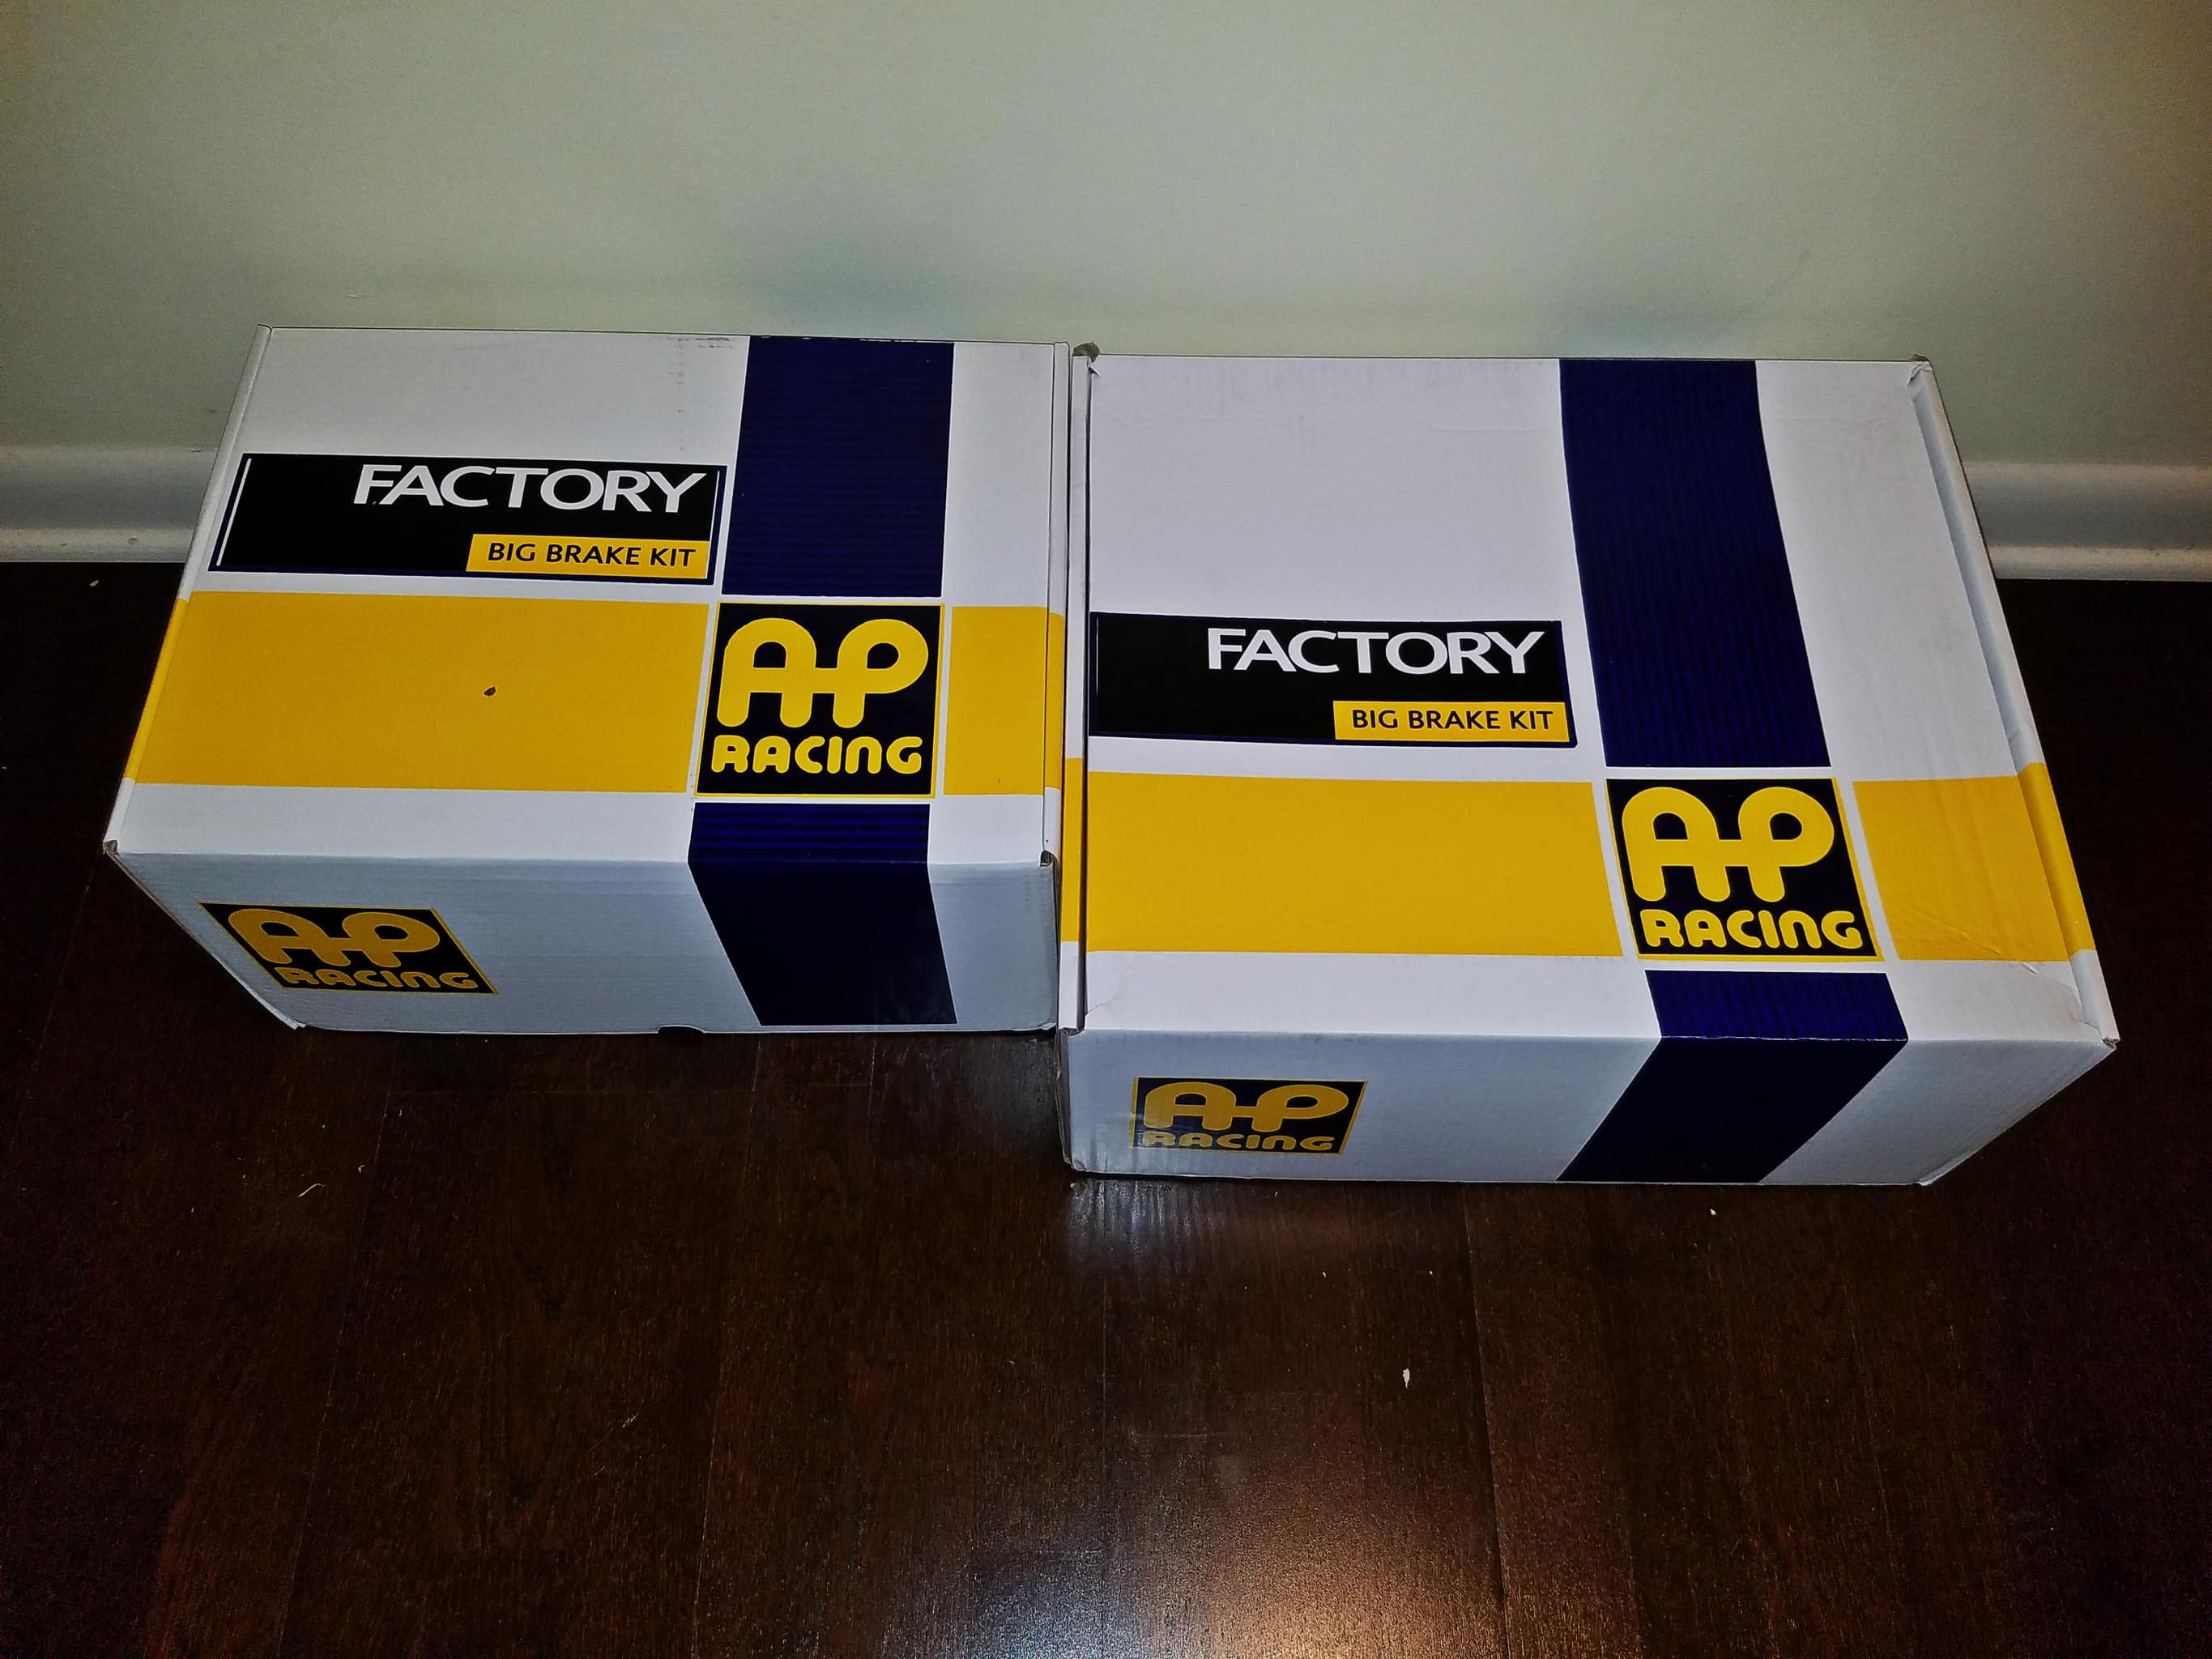
So, having decided on the 4-pot Factory kit with a little bit of guidance from the experts at Essex Parts Services (who, by the way, are very active on the FT86Club forums, which is really nice to see), I placed my order. They inspect every BBK kit before shipping it out to ensure that everything is in order, which provides some added peace of mind, and I received it three days later. Shipping was less than $50, despite this being two separate packages weighing a total of 60 LBS!
Arrival and Unboxing
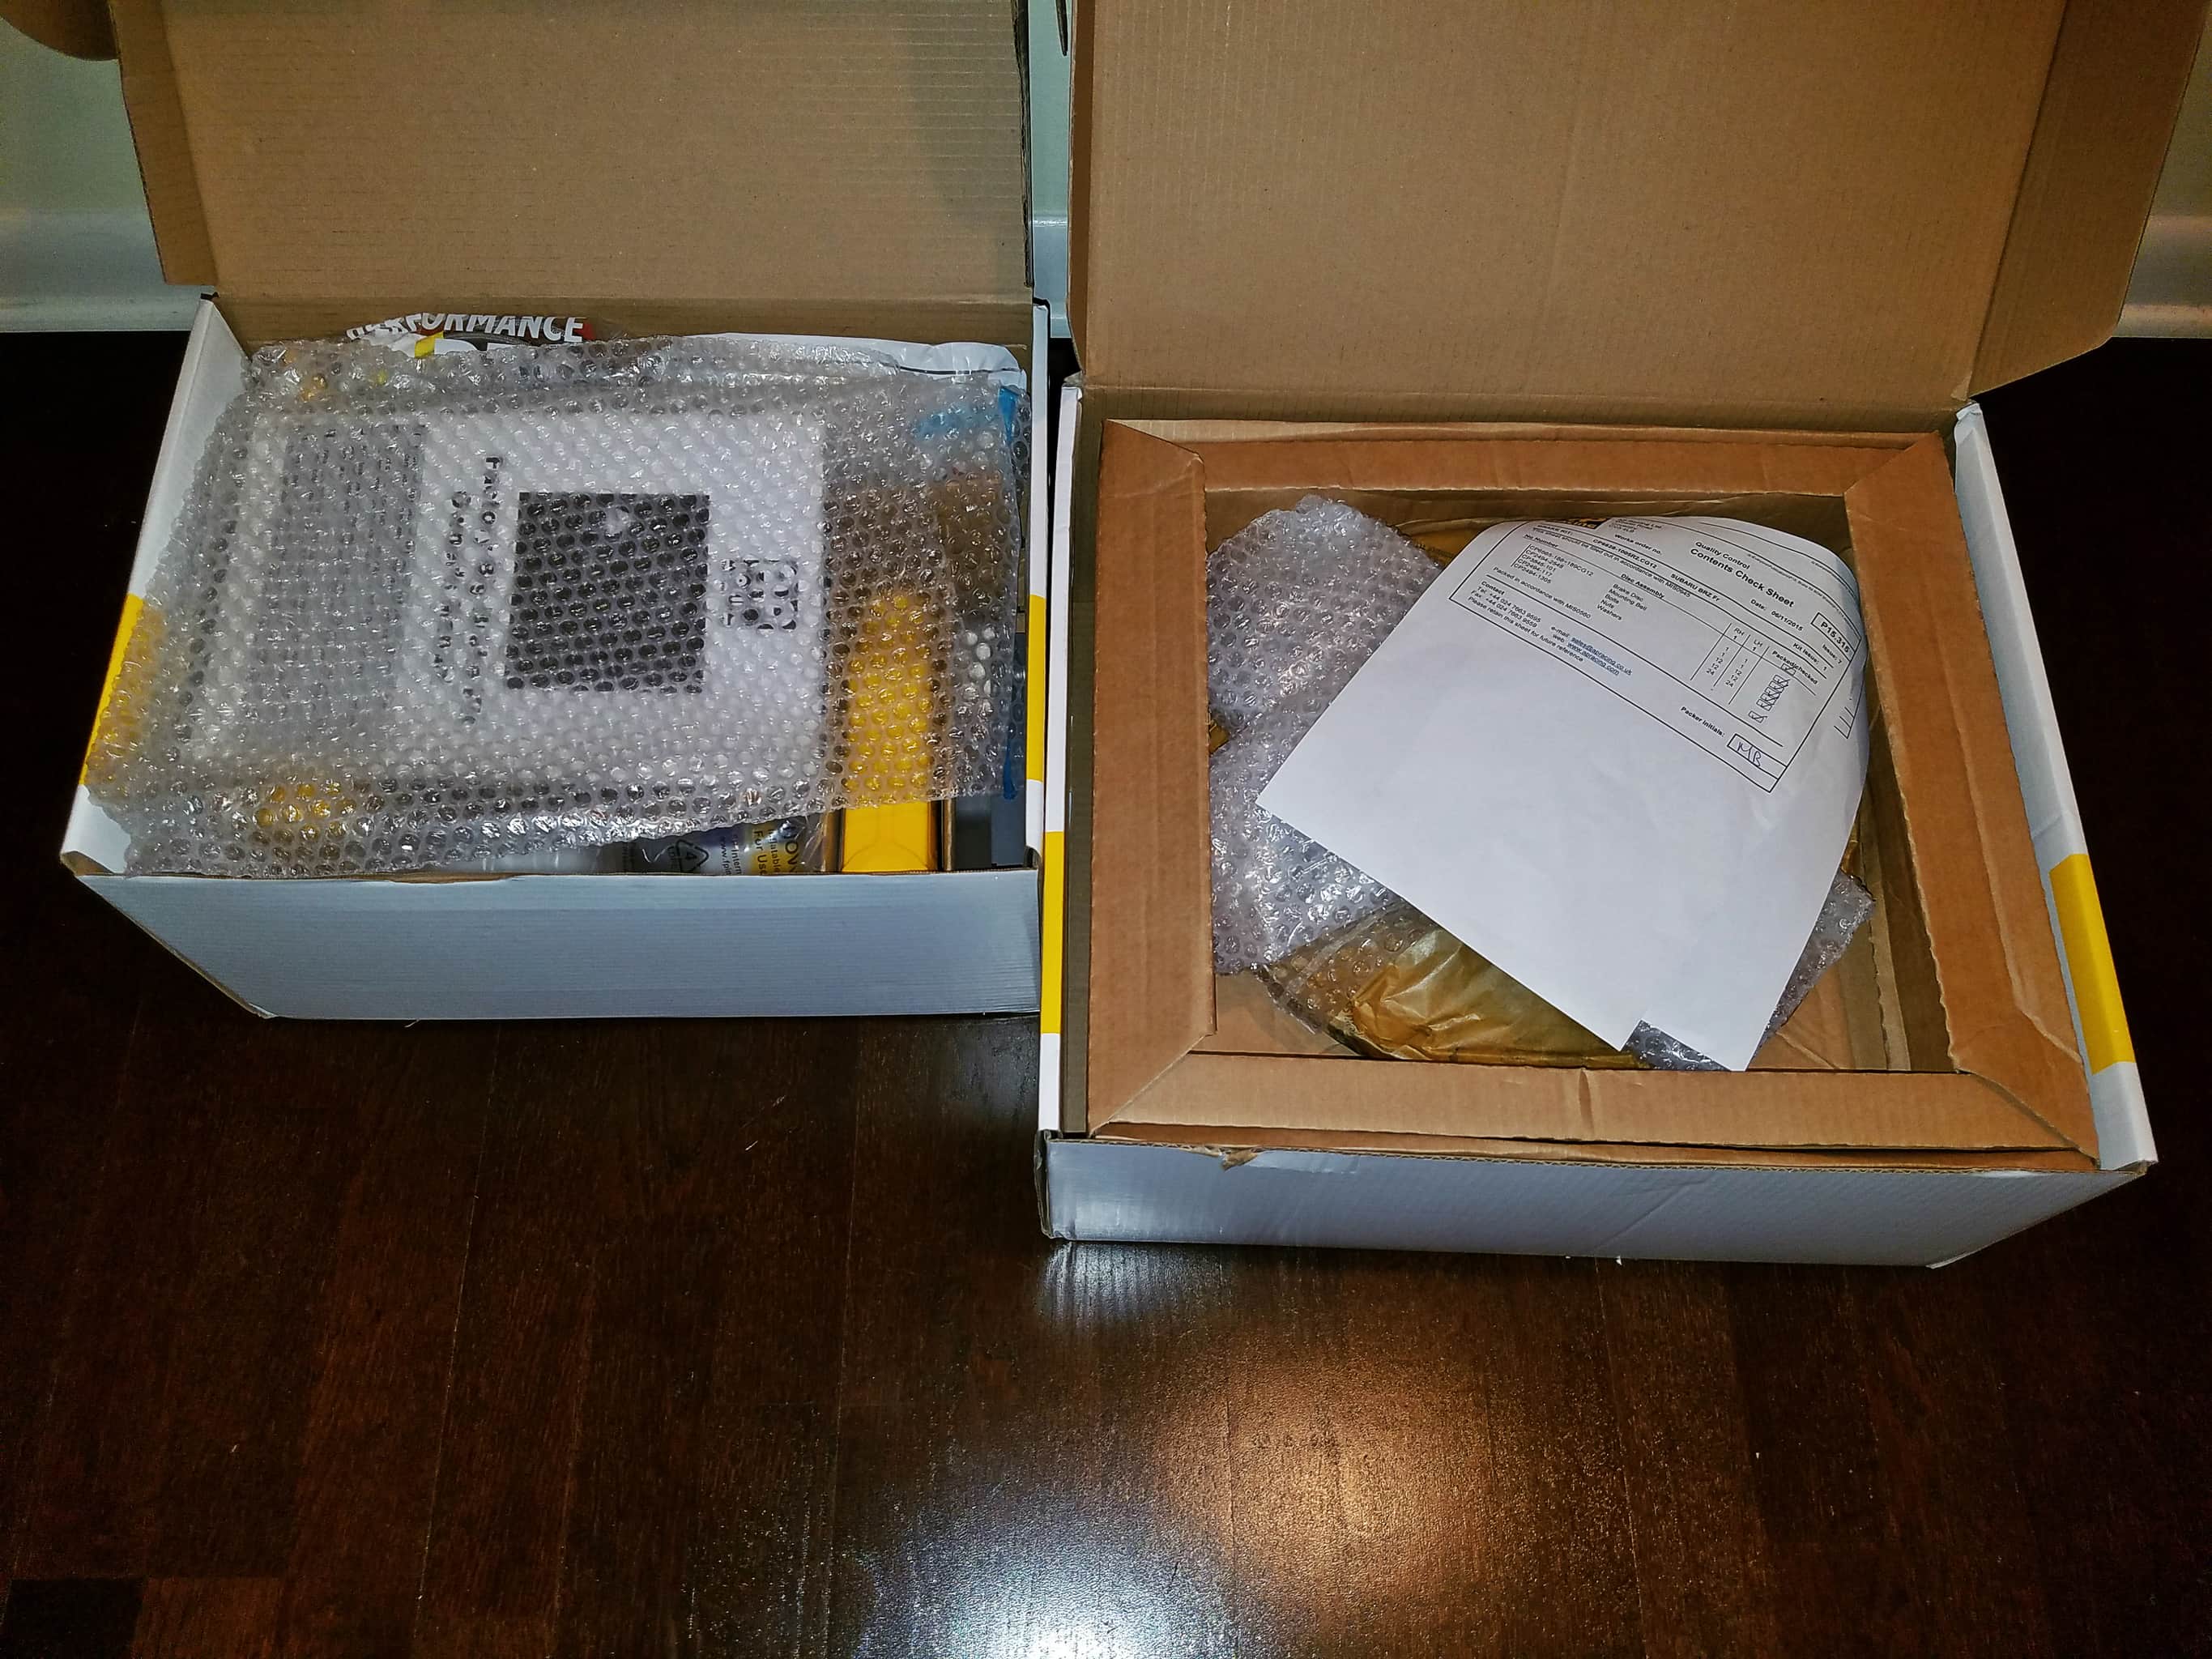
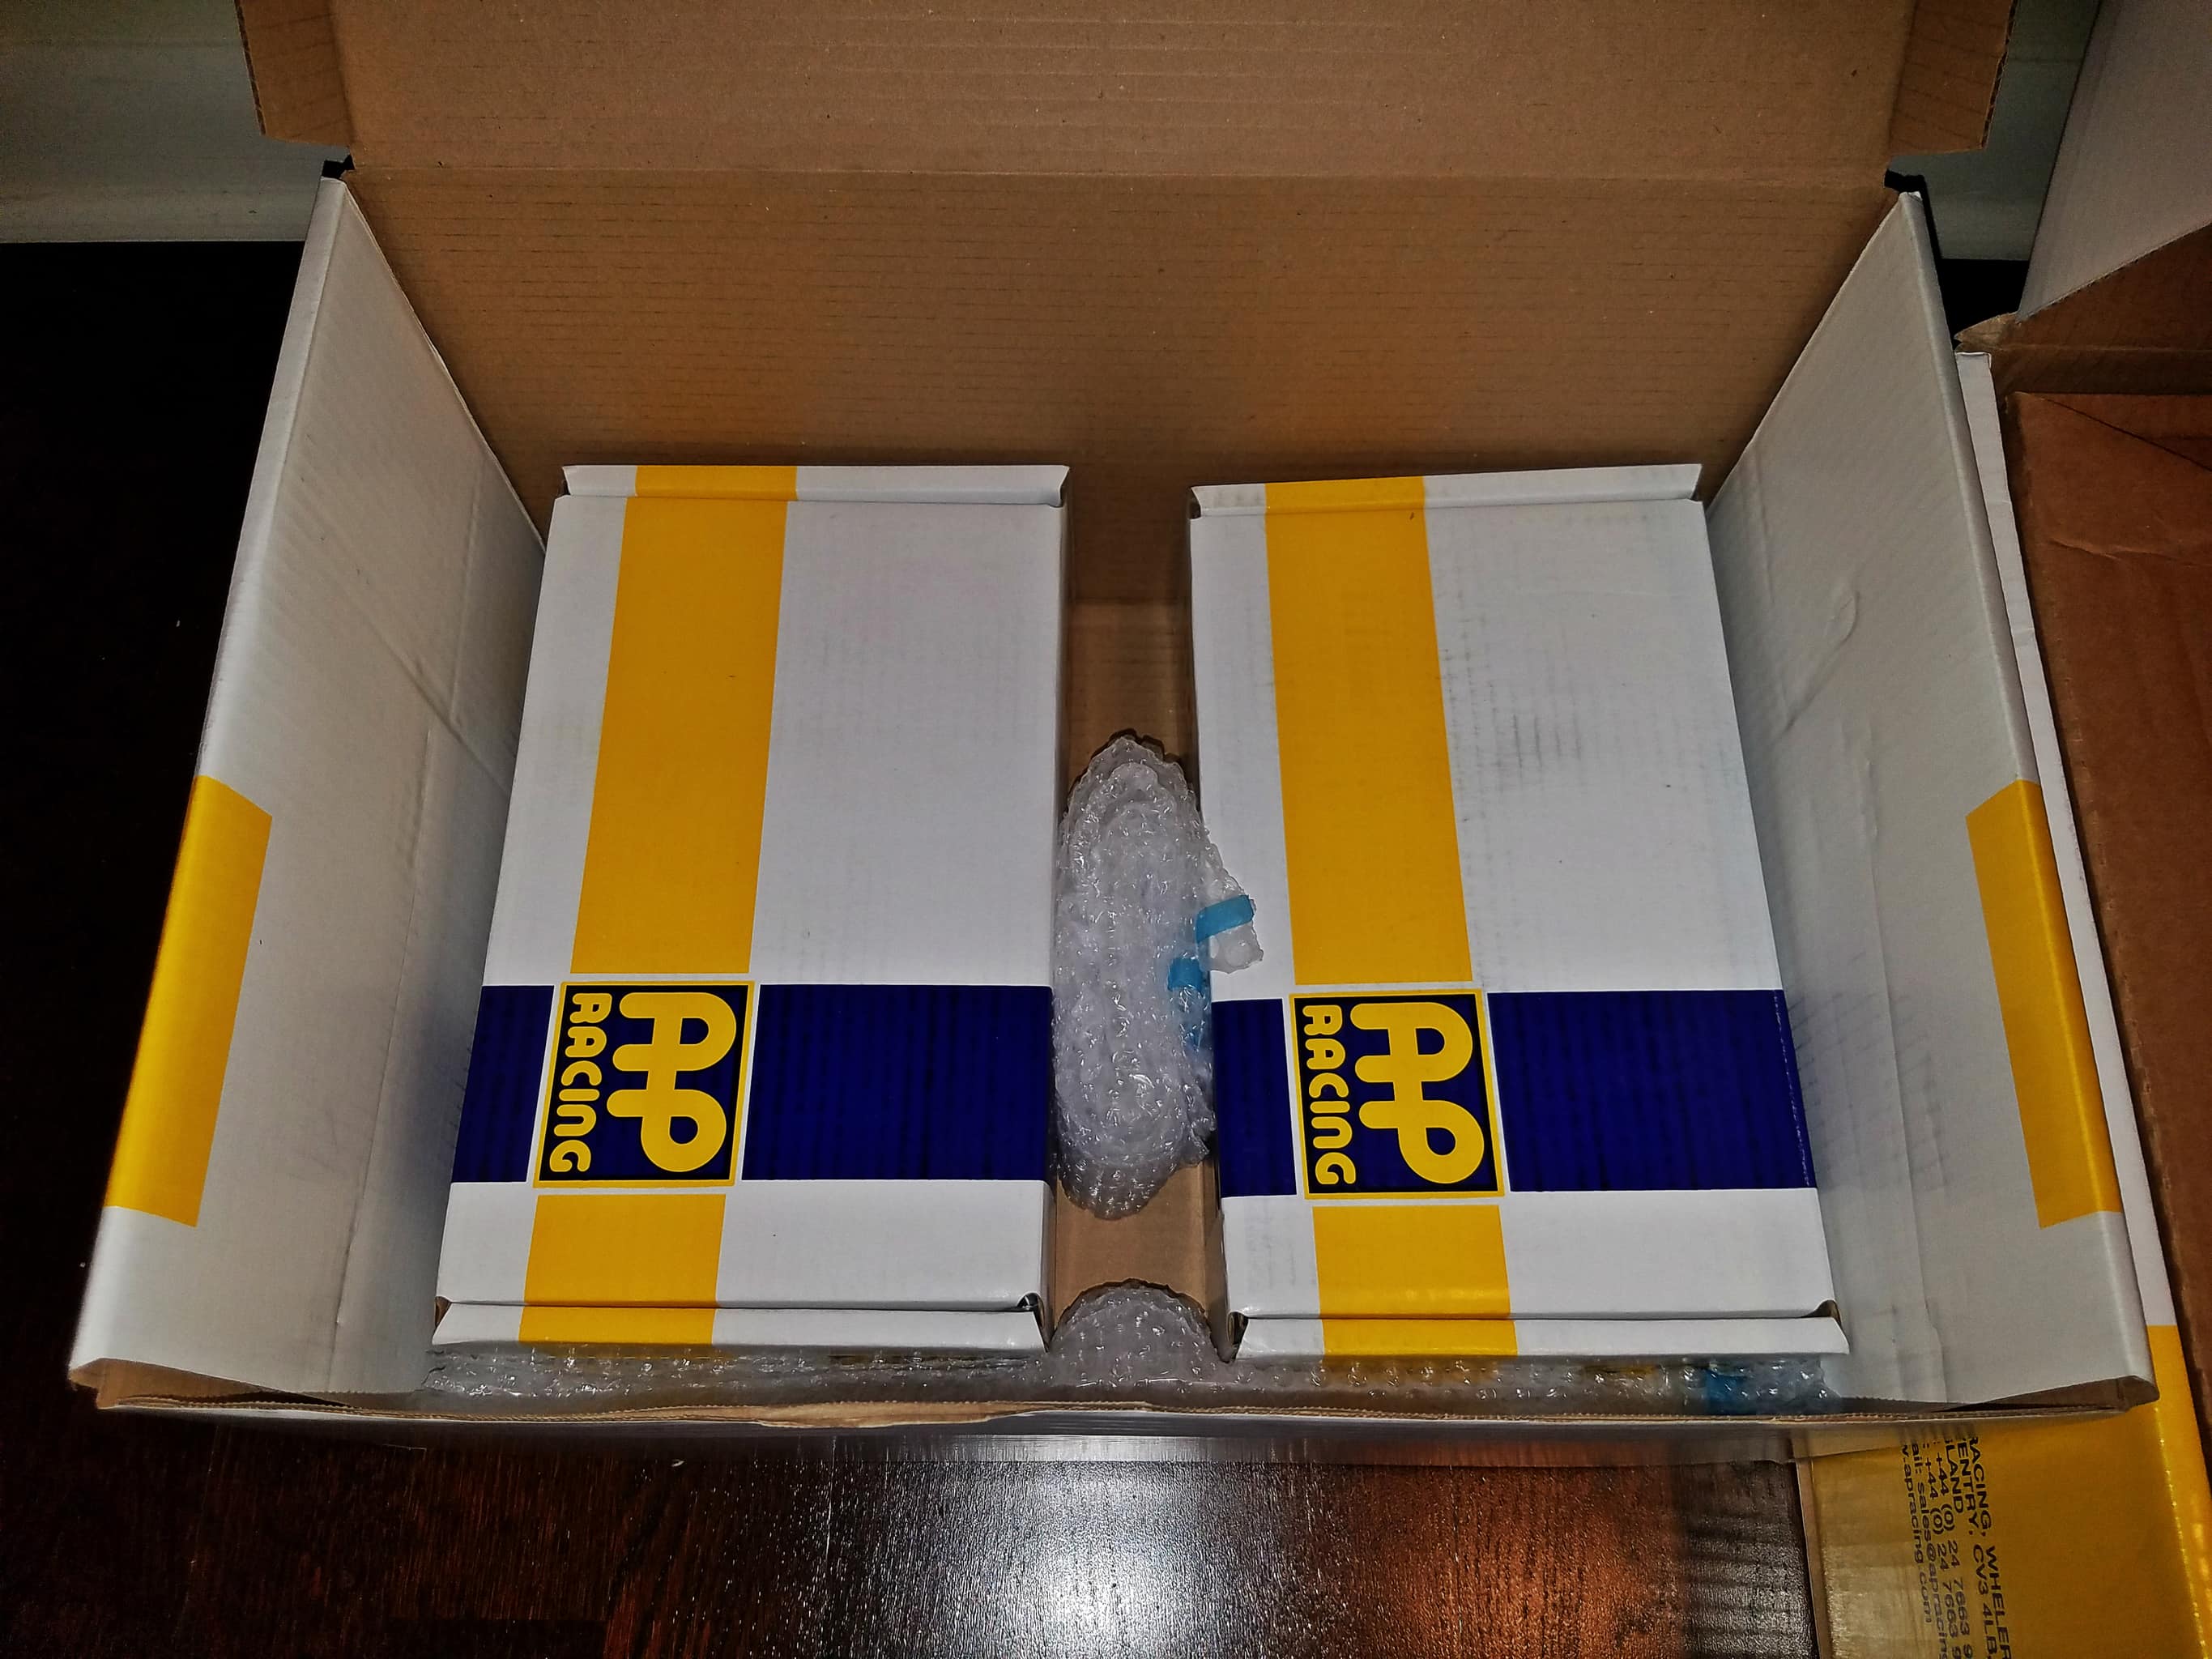
I was very impressed with how nicely packaged everything was, so this section is a bit picture-heavy in order for you to see everything as it arrived. The parts came in two separate boxes. Both were “double boxed” and smartly, the box with the rotors was packaged in a much larger box filled with foam peanuts. The rotors are much more prone to shifting around and breaking through their box, so this is a good thing. Both packages, once removed from their outer cartons, were in pristine shape.

Two-part package.
Unboxing, Part 1 complete!
Very nicely packaged products.
The box on the left contained the bulk of the kit components. The larger box on the right contained only the rotors, and the packing slip. It sounds silly to talk about the packing slip, but it’s good peace of mind to see a document that has human handwriting on it. They check off every kit component to make sure everything is in order, and then sign off on the slip. Because of this, I wasn’t too worried about any missing parts.
The rotors come individually wrapped in two layers, and are marked for left and right-hand use. The rotors are directional, due to both the J-Hook pattern, and the directional cooling vanes between the front and rear surfaces. Installed on the wrong side, they will not dissipate heat as effectively because the directional vanes are designed to suck air through the center, and expel it out of the edge of the rotor, and this only happens if they are rotating in the correct direction.
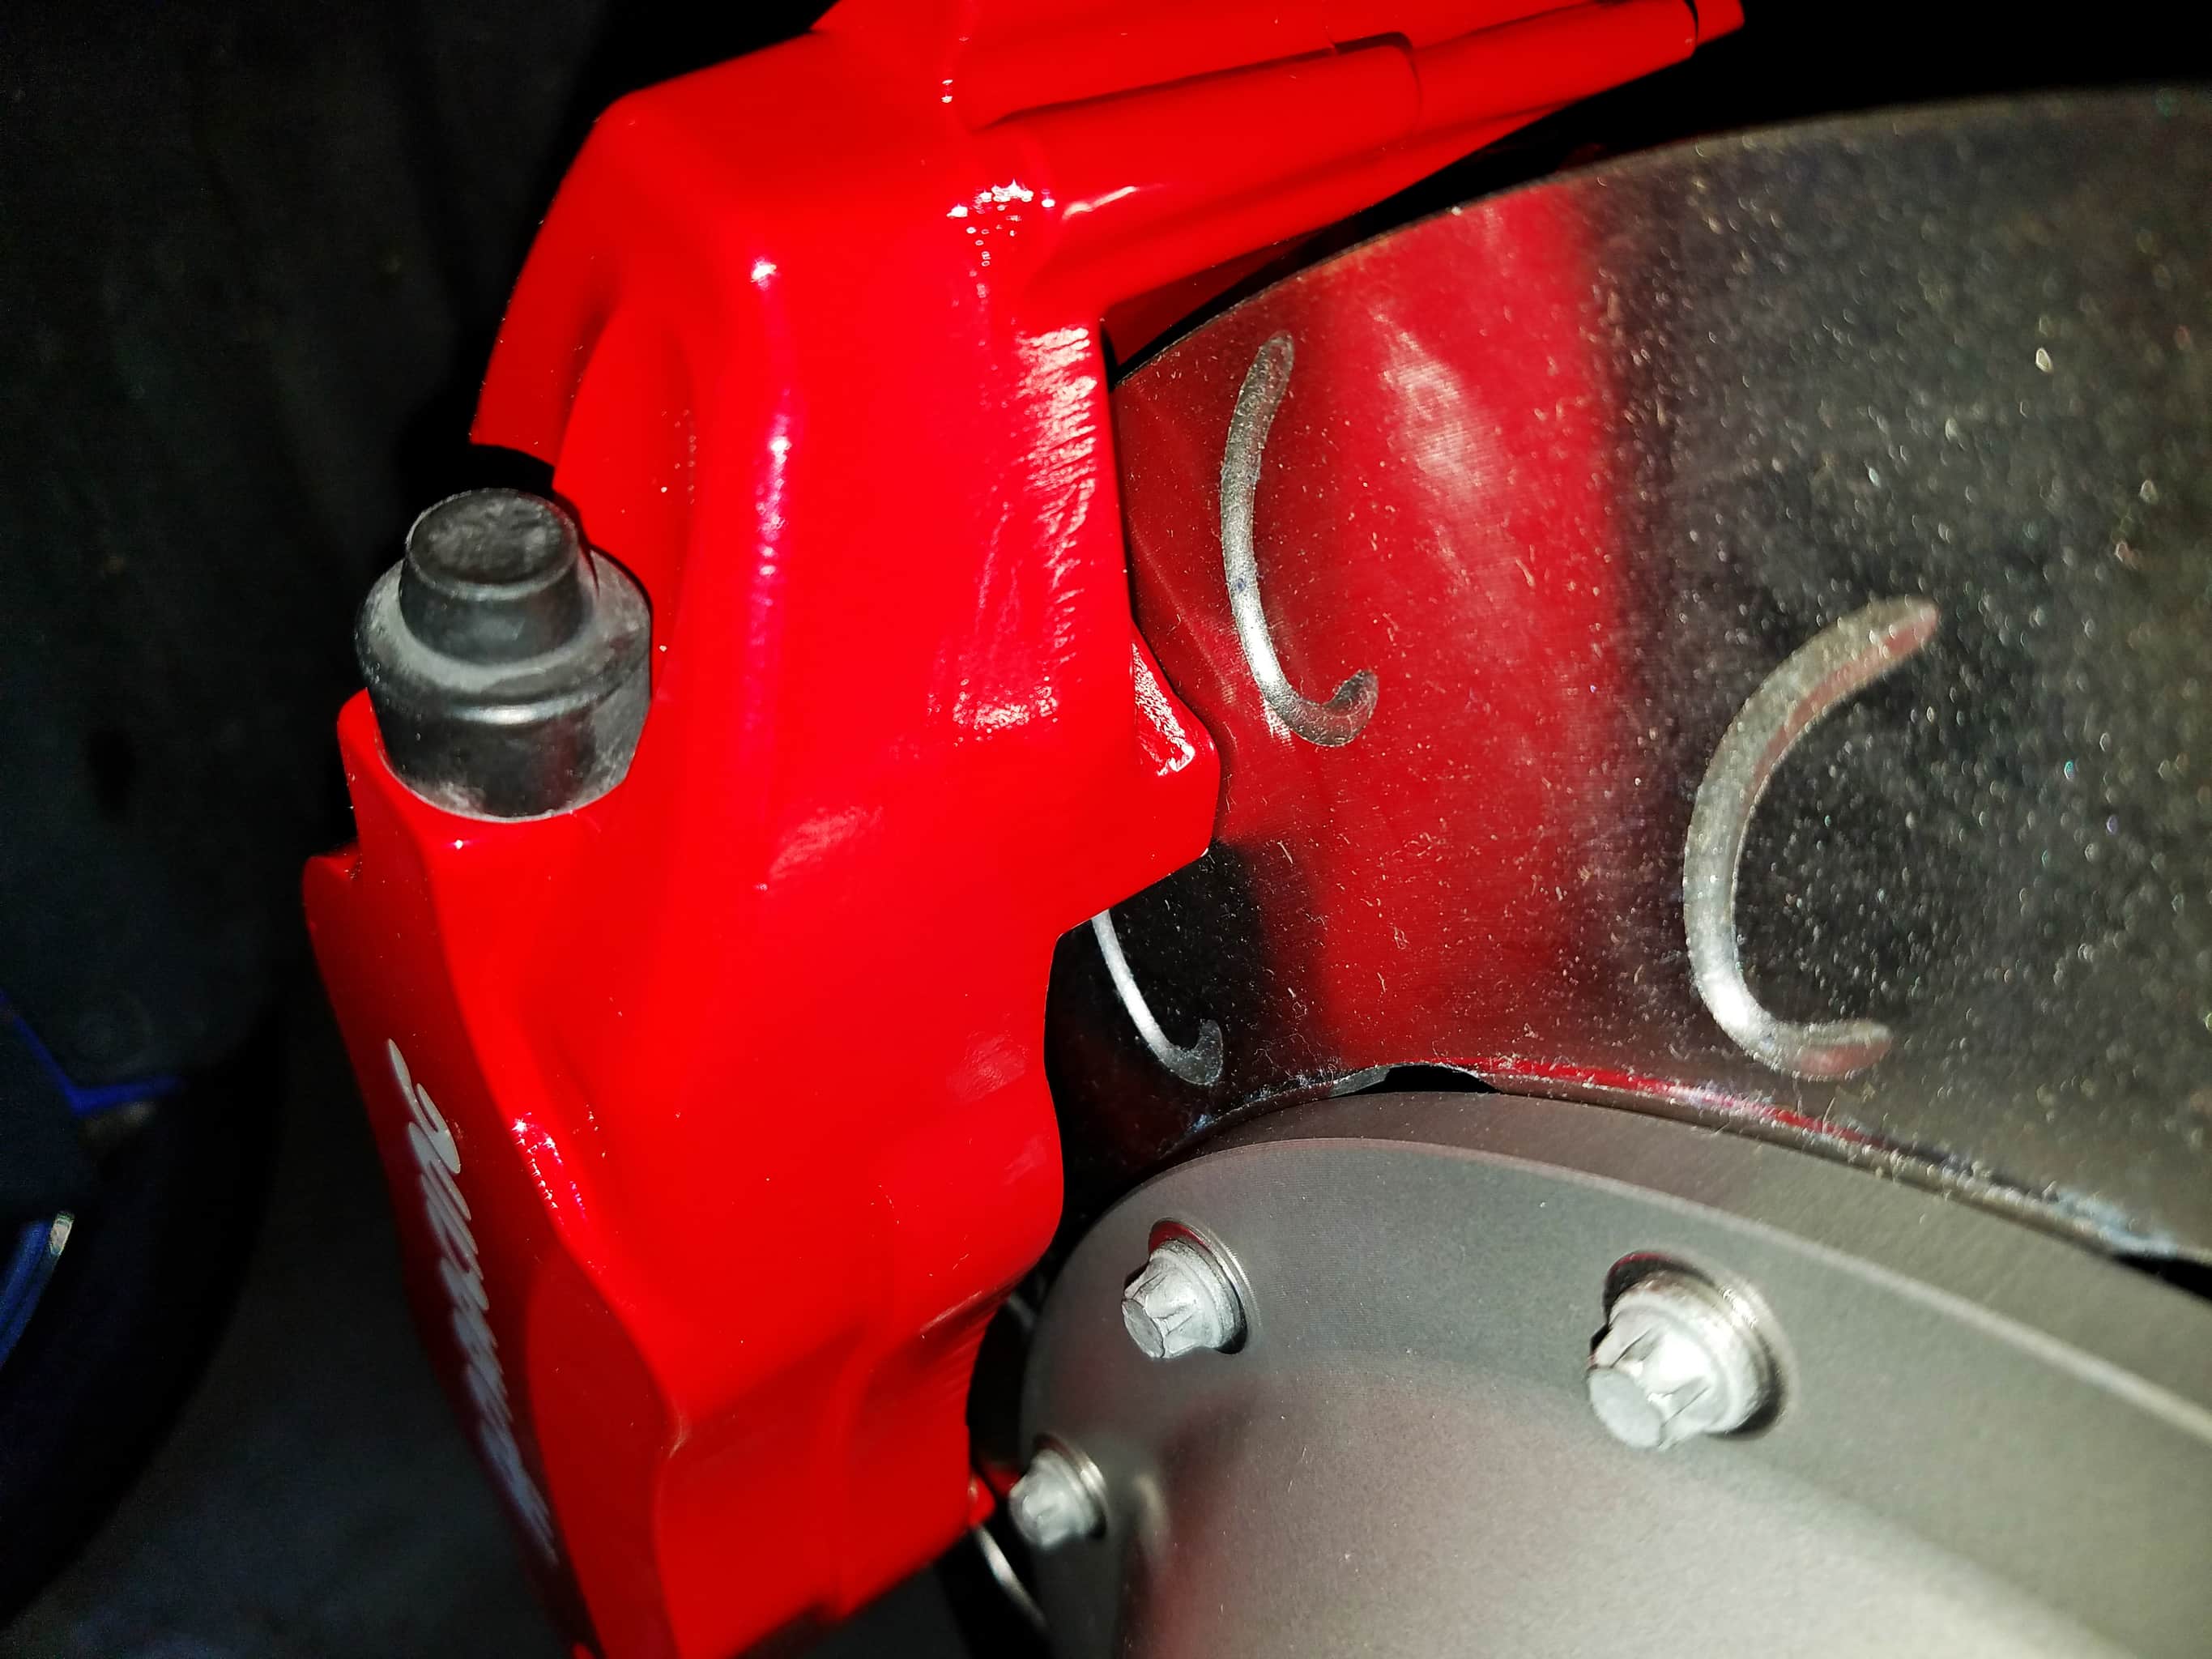
As you can see, these are beautiful, aggressive-looking, two-piece rotors with an aluminum hat. The purpose of this design is two-fold. First off, this saves weight by allowing the non-friction surface of the rotor to be made out of much lighter aluminum. The result is a rotor that is 38 mm wider in diameter, and 2 mm thicker than the stock rotor and yet weighs noticeably less. The second reason is that this design allows the outer friction surface to expand uniformly. The holes affixing the inner and outer portions of the rotor are slotted, which allows the outer ring to expand and contract, sliding through the bolts, without deforming the way a one-piece rotor would under heavy use.
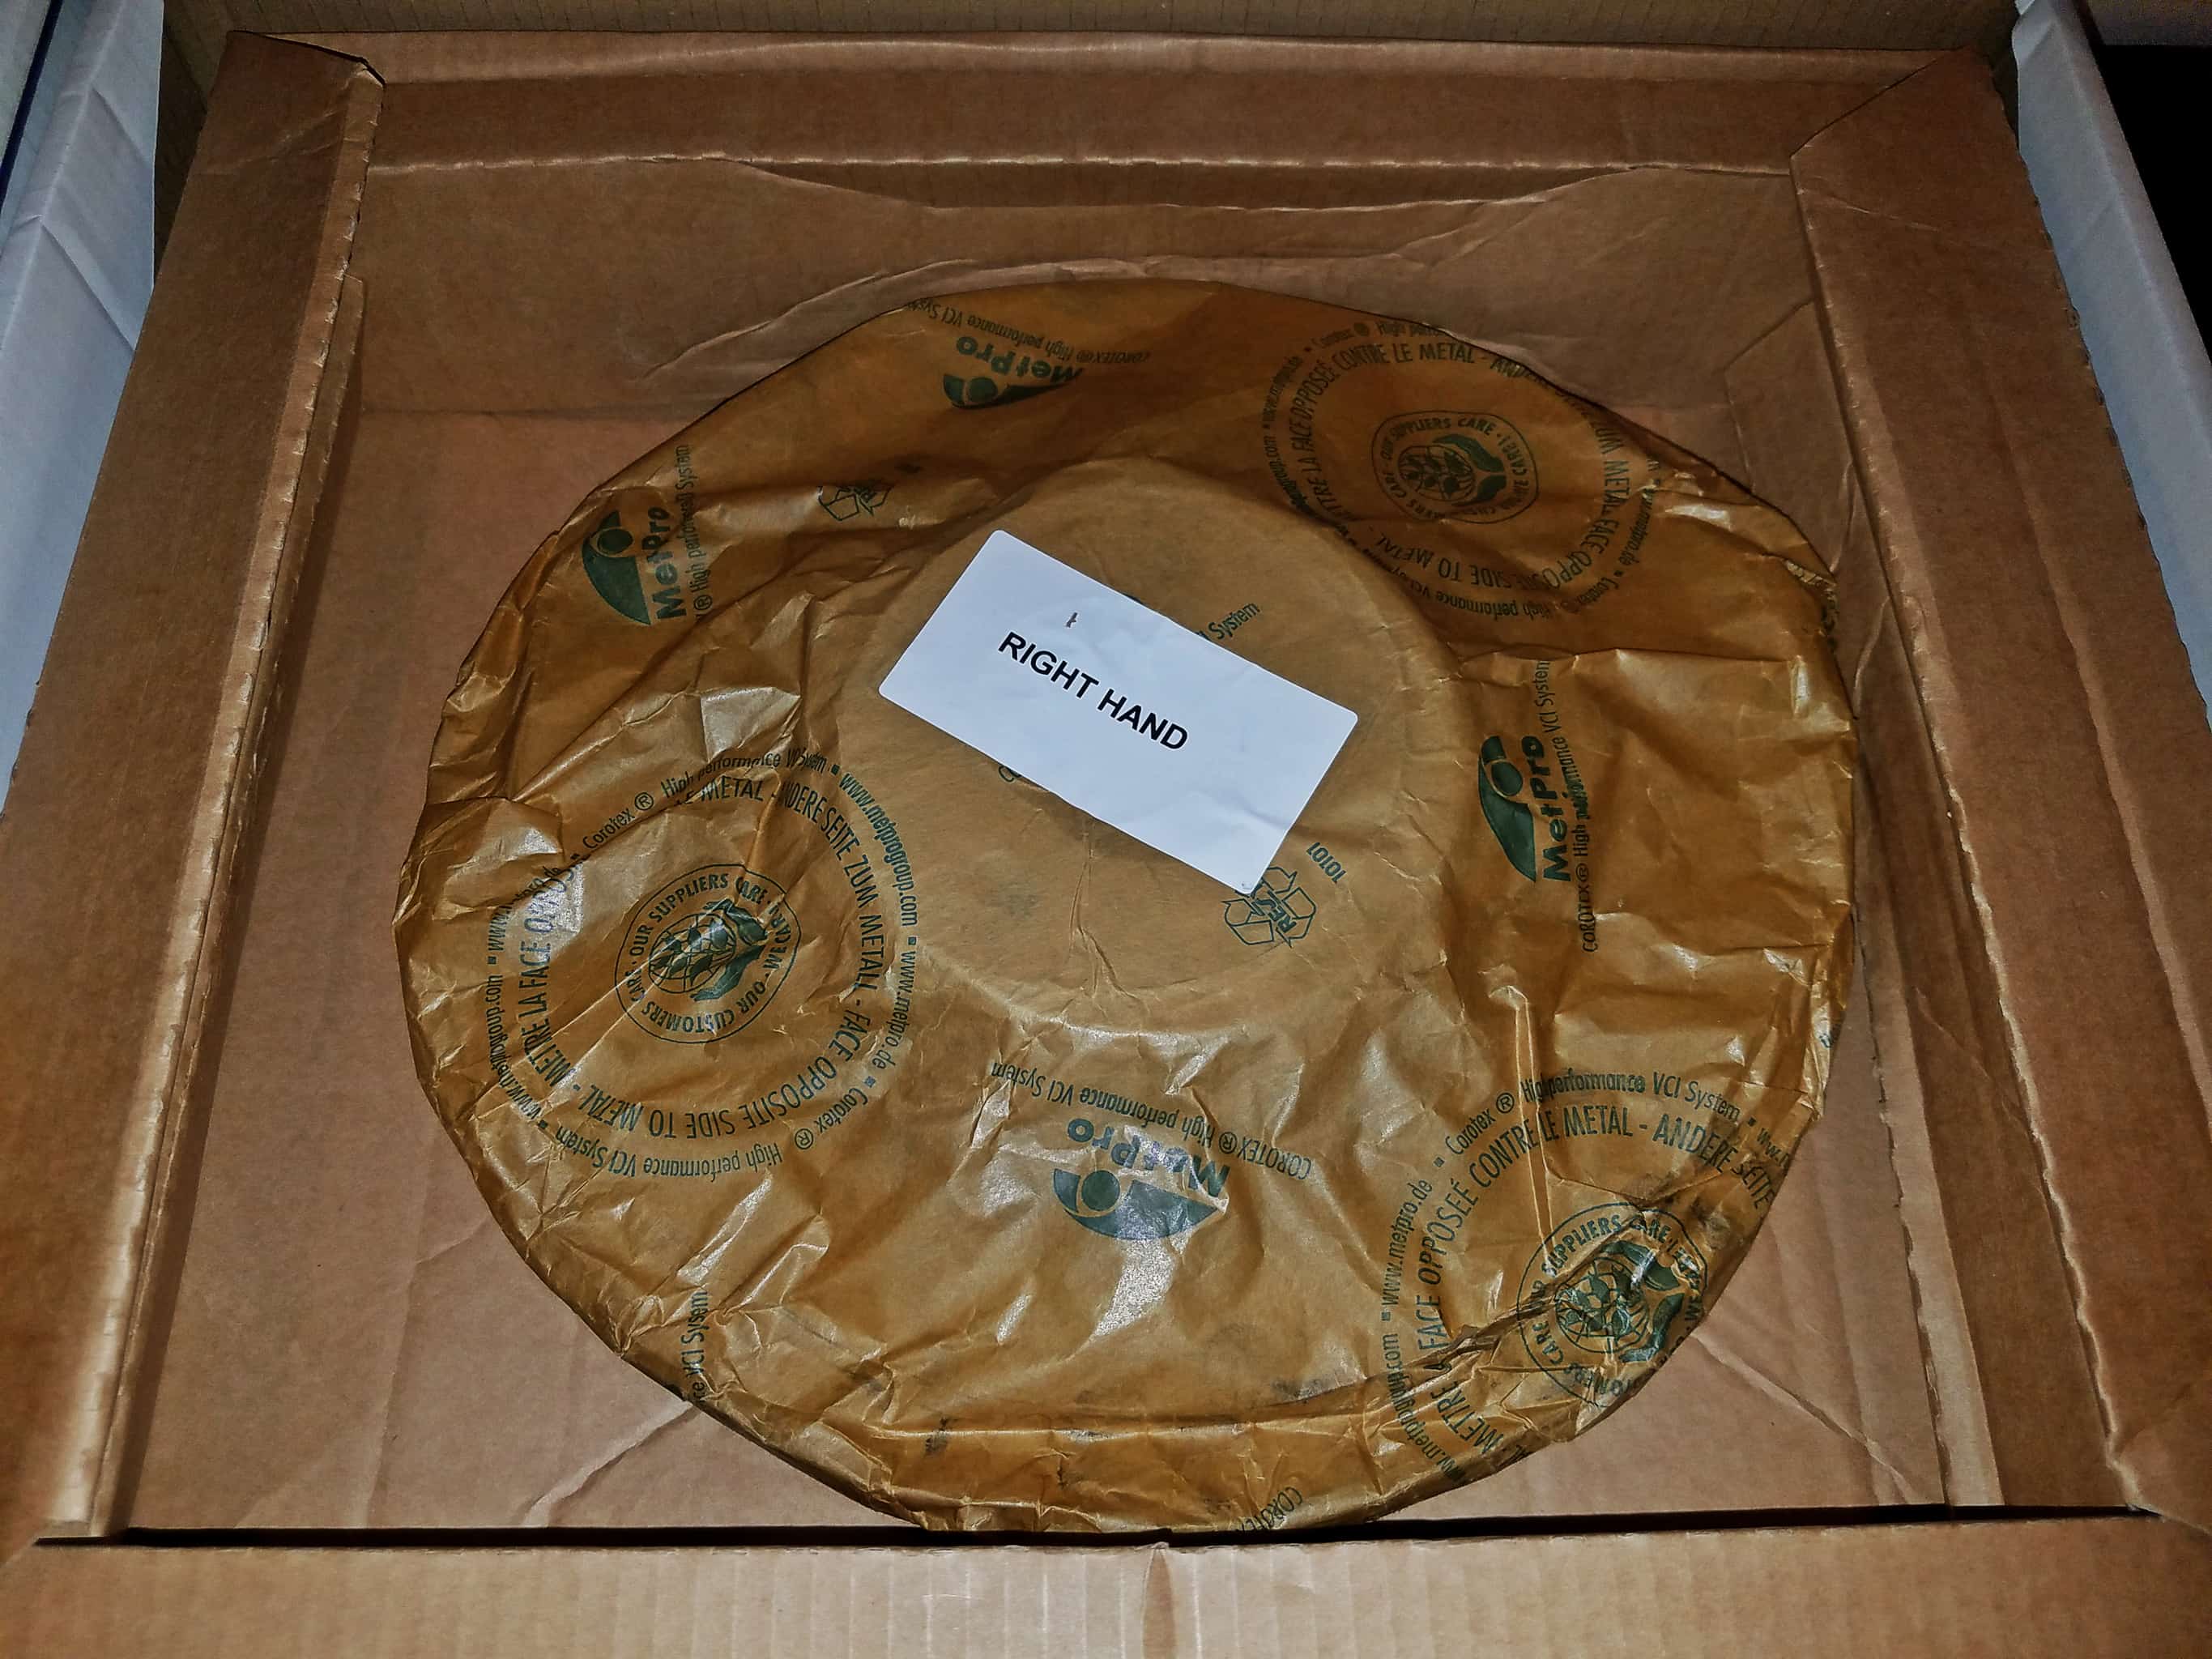
Wrapped and labeled to denote left vs. right rotors.
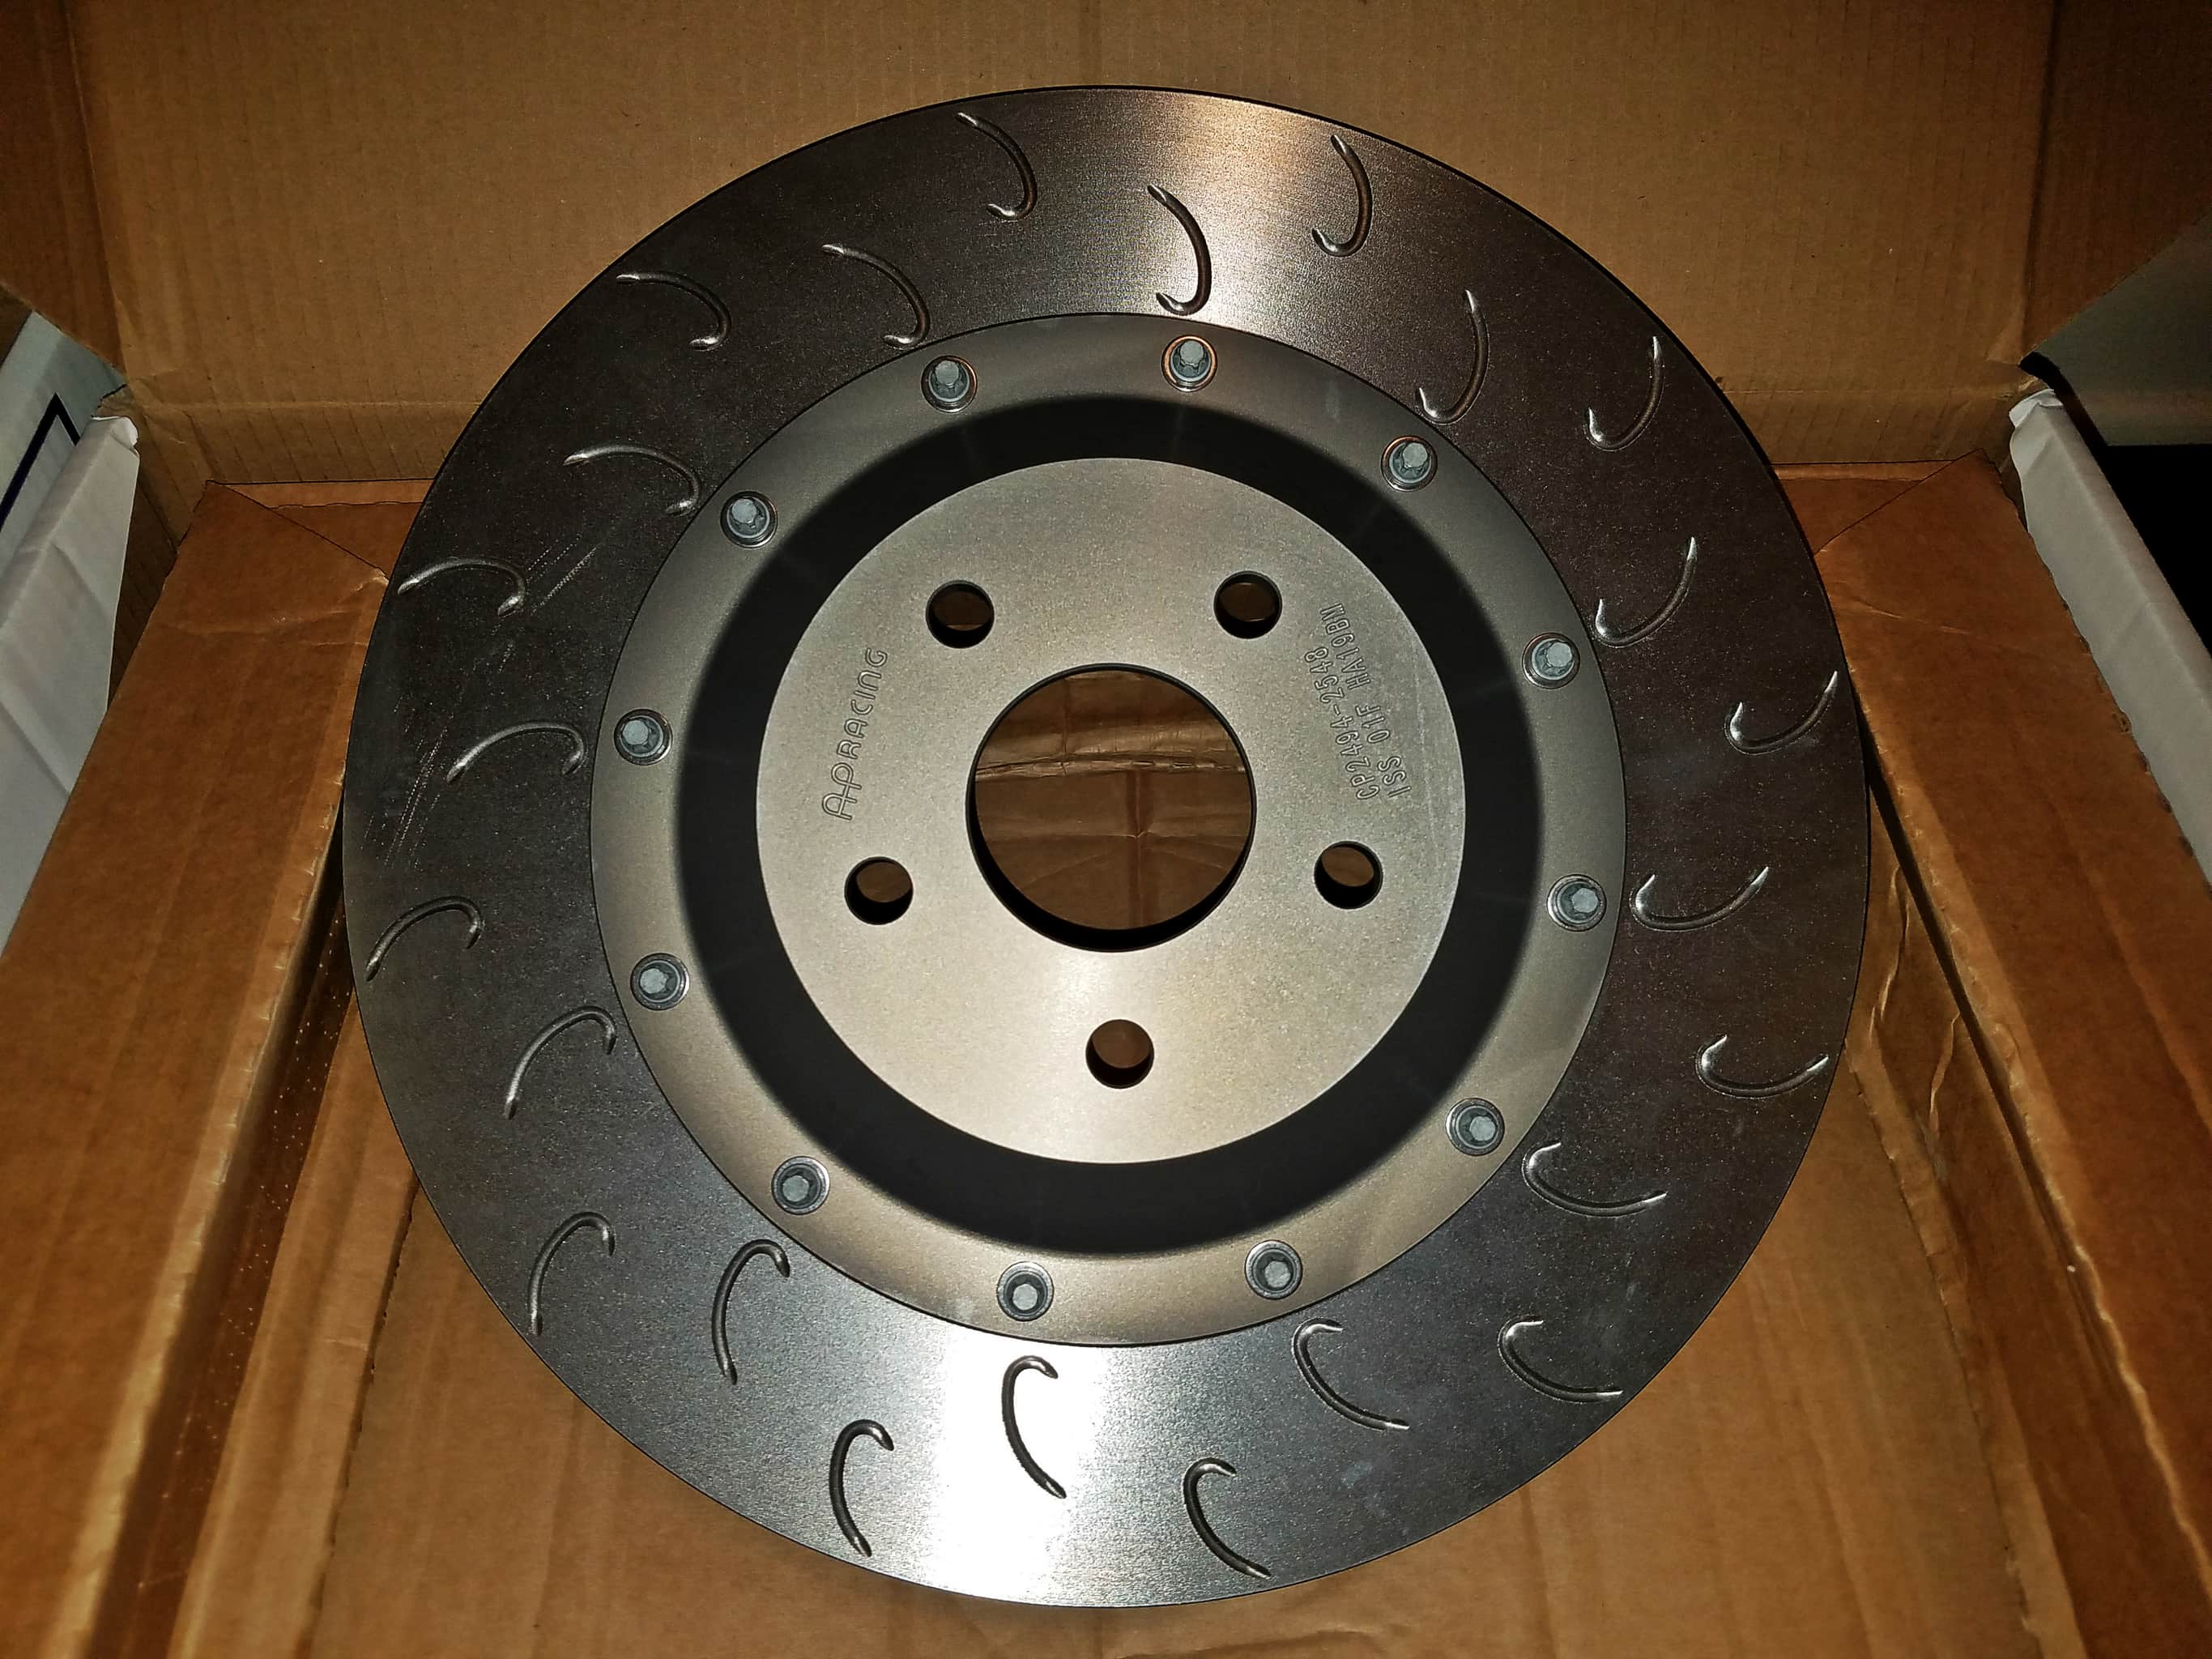
That, my friend, is one good-looking rotor.
The other box contained everything else included in the kit… and they really do include everything. You won’t need to purchase anything else in order to install this kit, provided you have the proper tools. In fact, you only re-use two parts on the car during the install: the bolt securing the brake line to your strut tower, and the retaining clip securing the brake line to the hard line. (More about that in the install section below.) Everything else is replaced with new parts, and they’re all in this box.
I want to take a moment to also point out how much the packaging of the parts in this box tickled my fancy. Take a look at the layout in the first image below. Everything is symmetrically laid out. They could have bundled the brake fluid together, and the caliper brackets as well, but no. Everything is perfectly mirrored, and while that might sound like a silly thing to care about, it shows that these people really do pay attention to details. (Another benefit to this packing method is that the box is easier to carry, without being “lopsidedly” heavy on one side… which was nice because I was dumb enough to insist on carrying both boxes around simultaneously, which was… difficult.)
Anyway, so what’s in the box? Well there was a very thick, and very thorough manual laid across the top. Across the bottom you see the two replacement caliper brackets that will secure the caliper to the hub. There are also two bottles of AP Racing 5.1 brake fluid, and there are the AP Racing pads (APF404). Up top are two baggies of parts. The baggie on the left contained Goodridge braided steel brake lines, and replacement hardware for the union bolts. The baggie on the right contained the various bolts, washers, and spacers needed to install the calipers, and they even provided a bottle of red Loctite – how thoughtful! Underneath the baggies (not pictured) are two coiled brake line protector things (you can see them in the install pictures further down.)
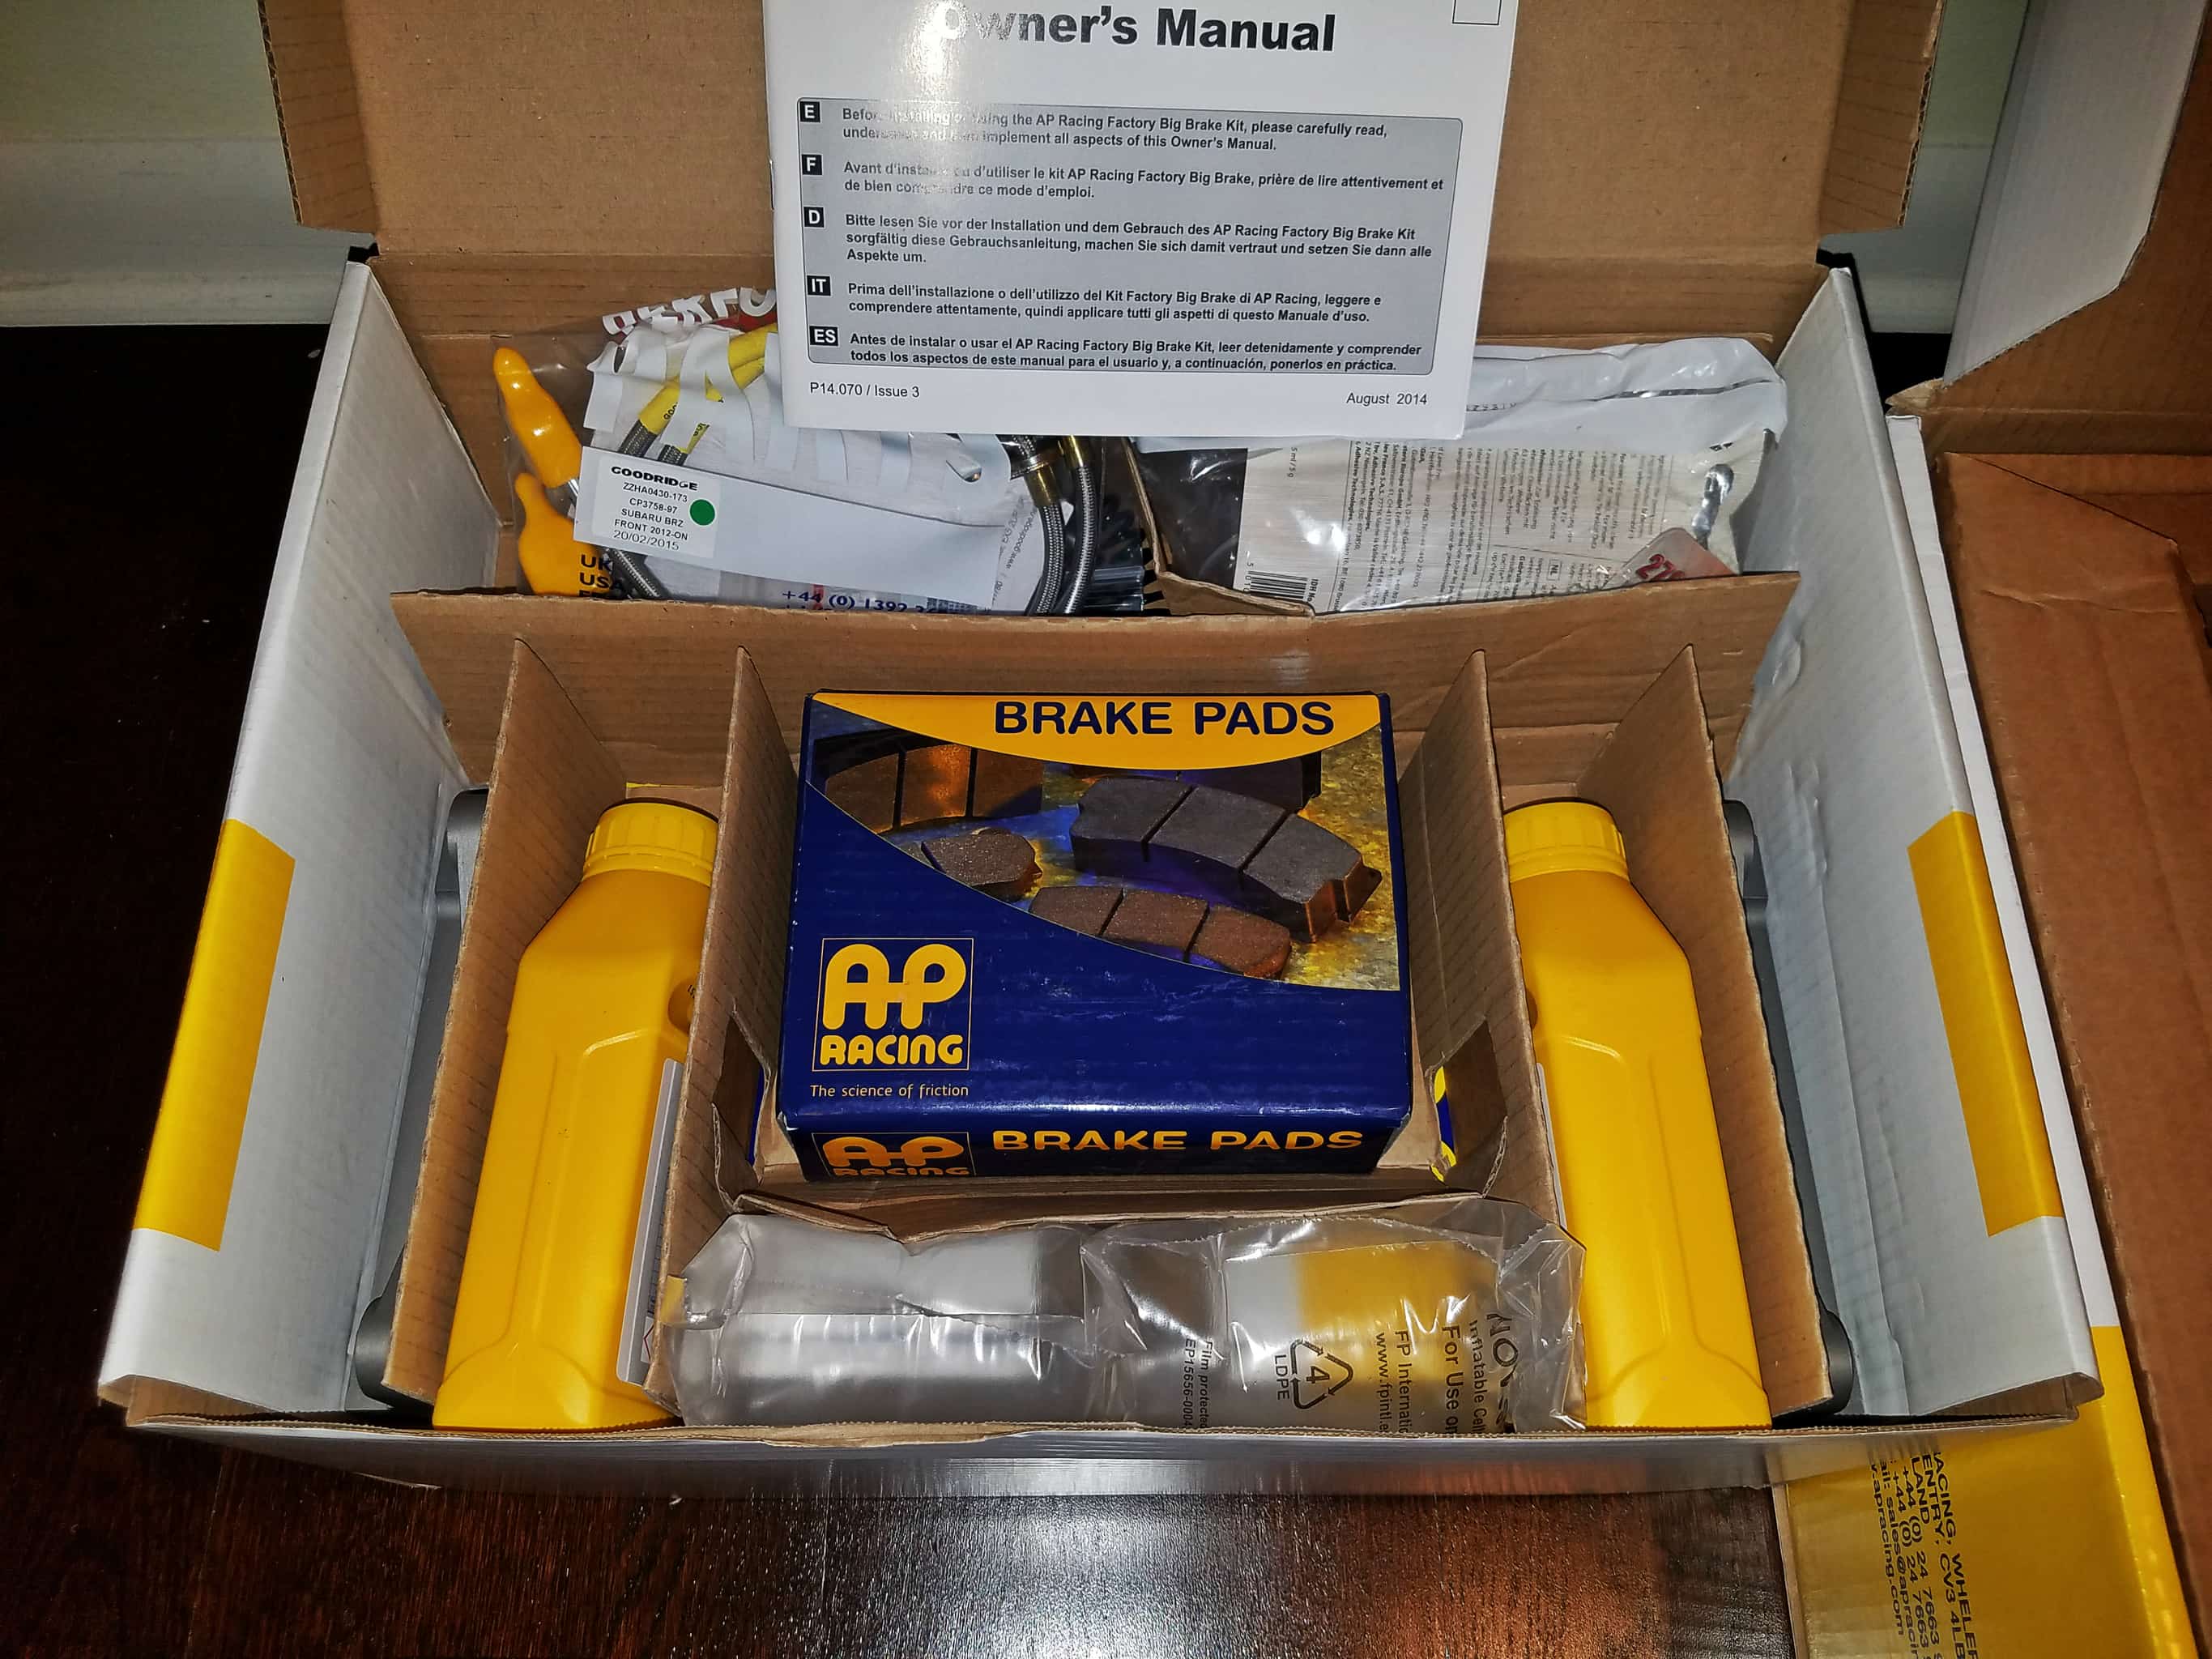
The symmetry… it’s perfect!

Stainless steel brake lines.
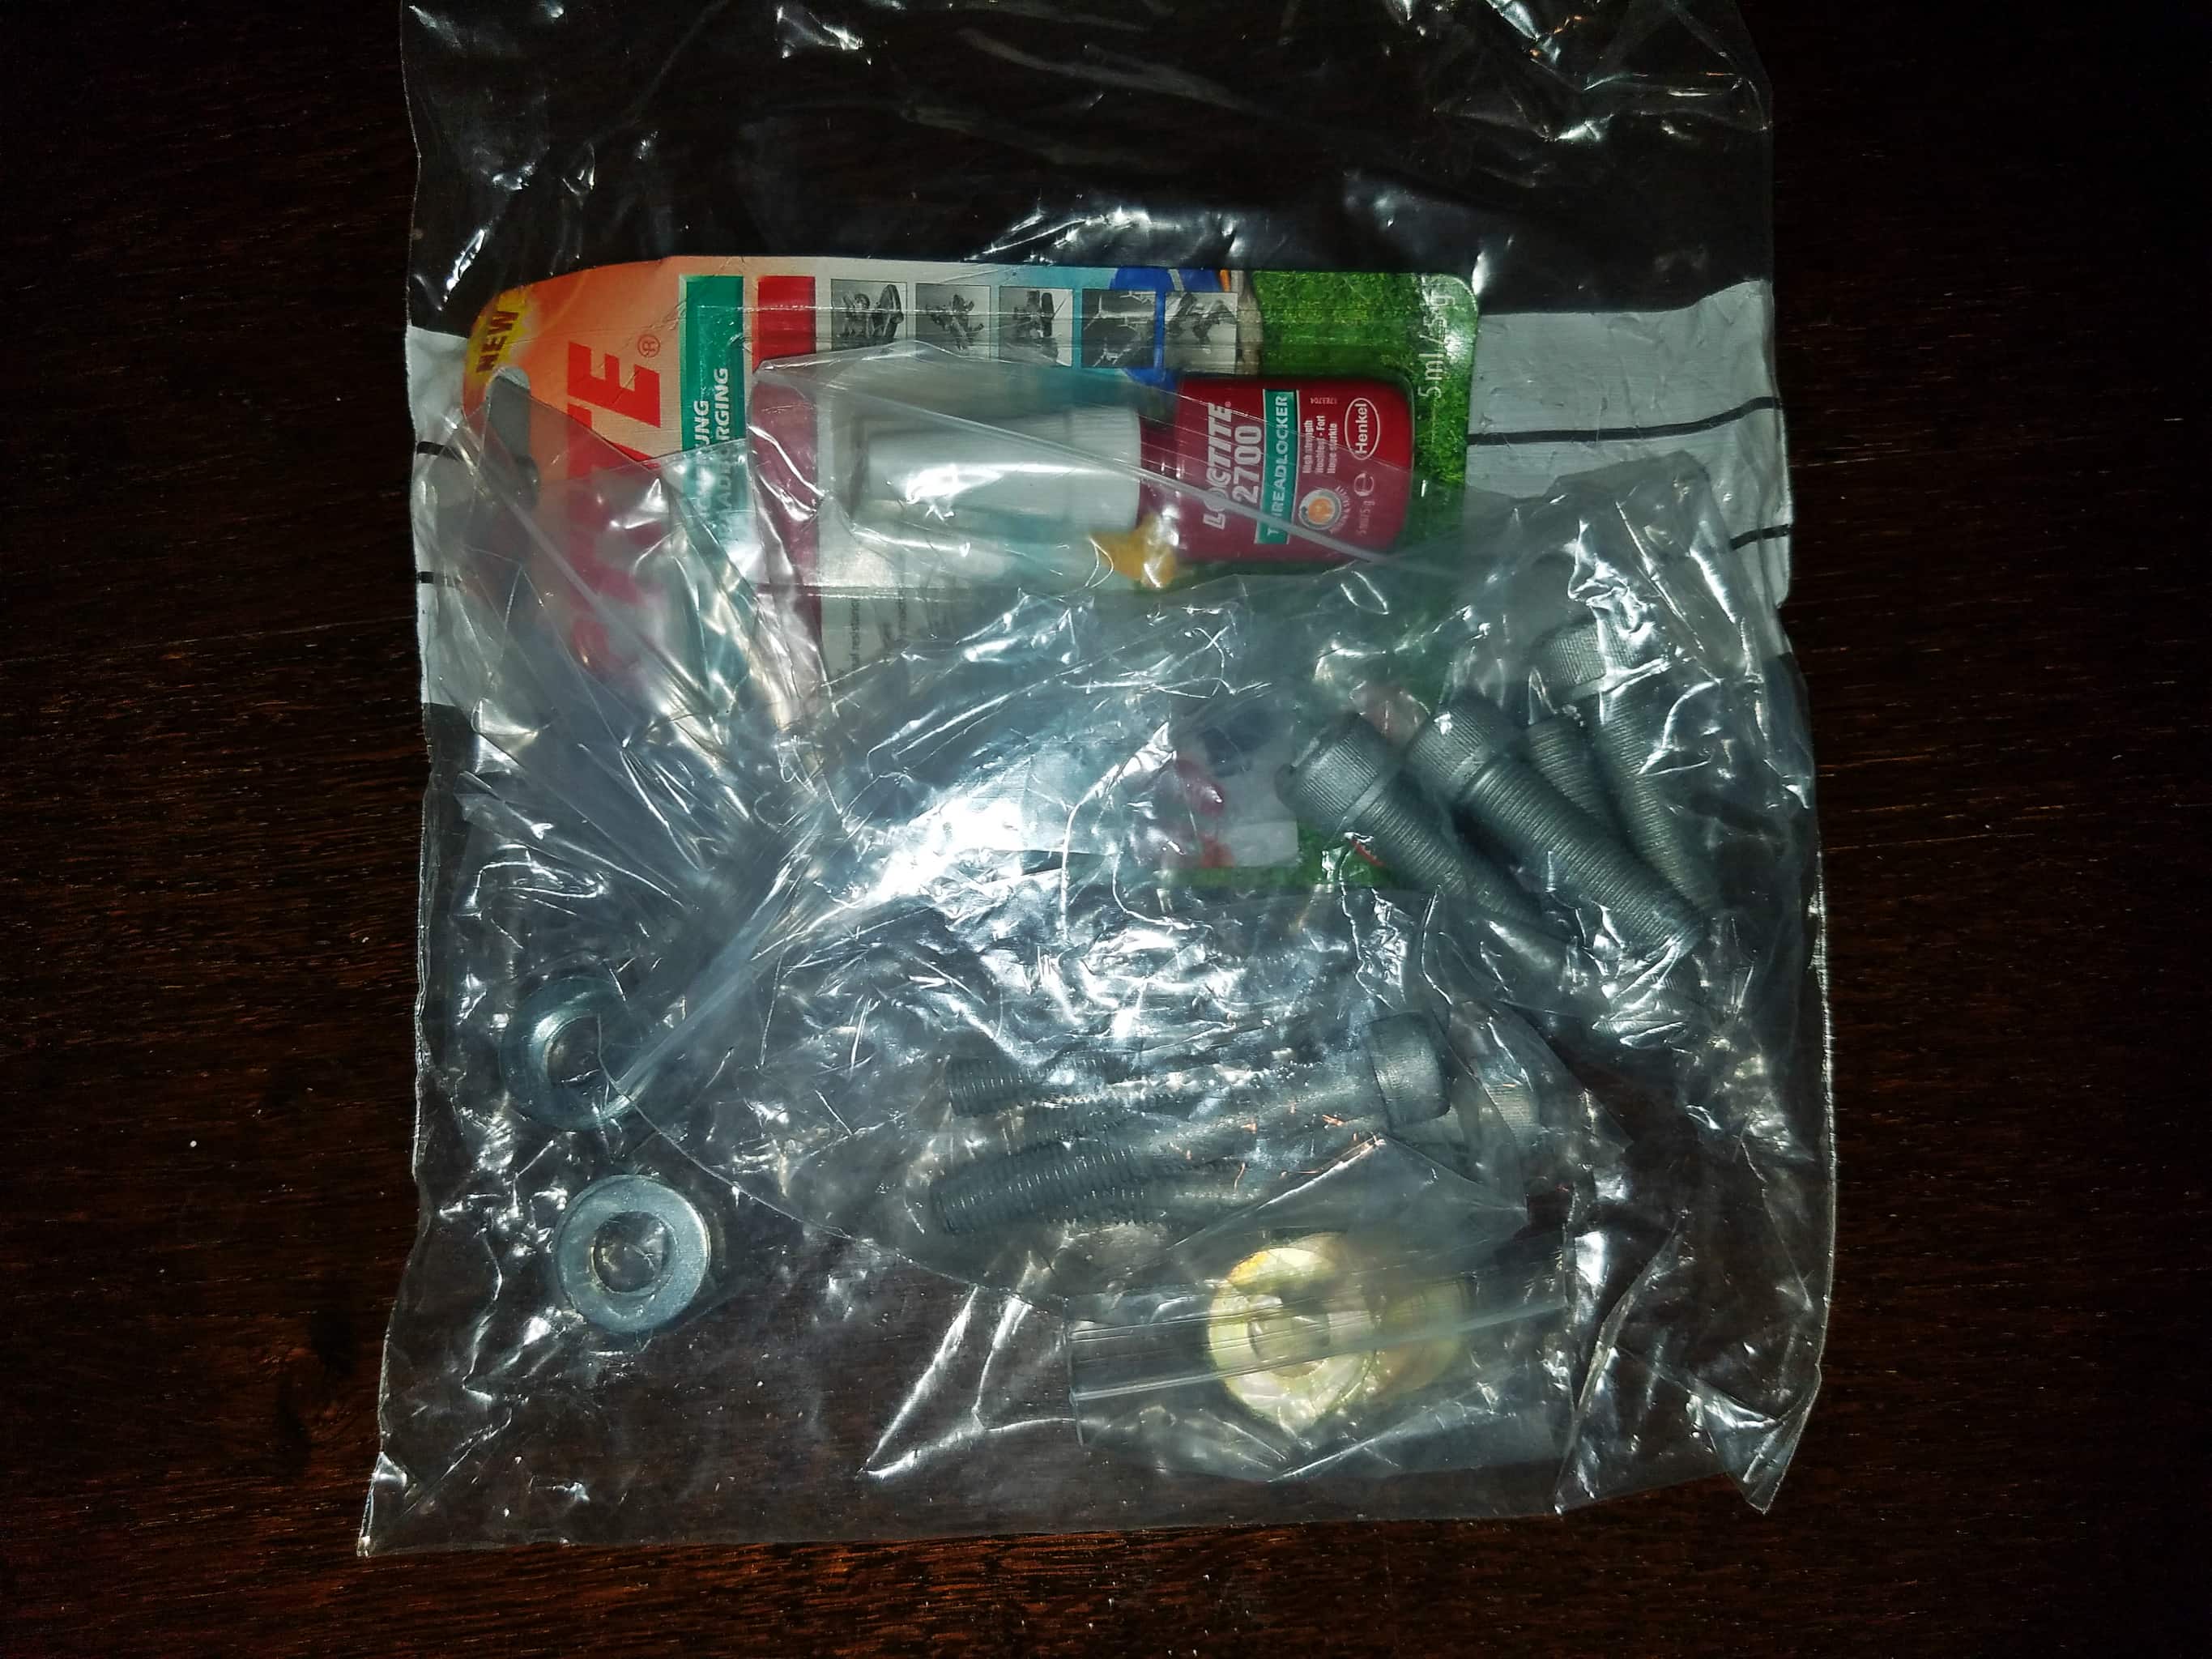
Additional hardware and red Loctite.
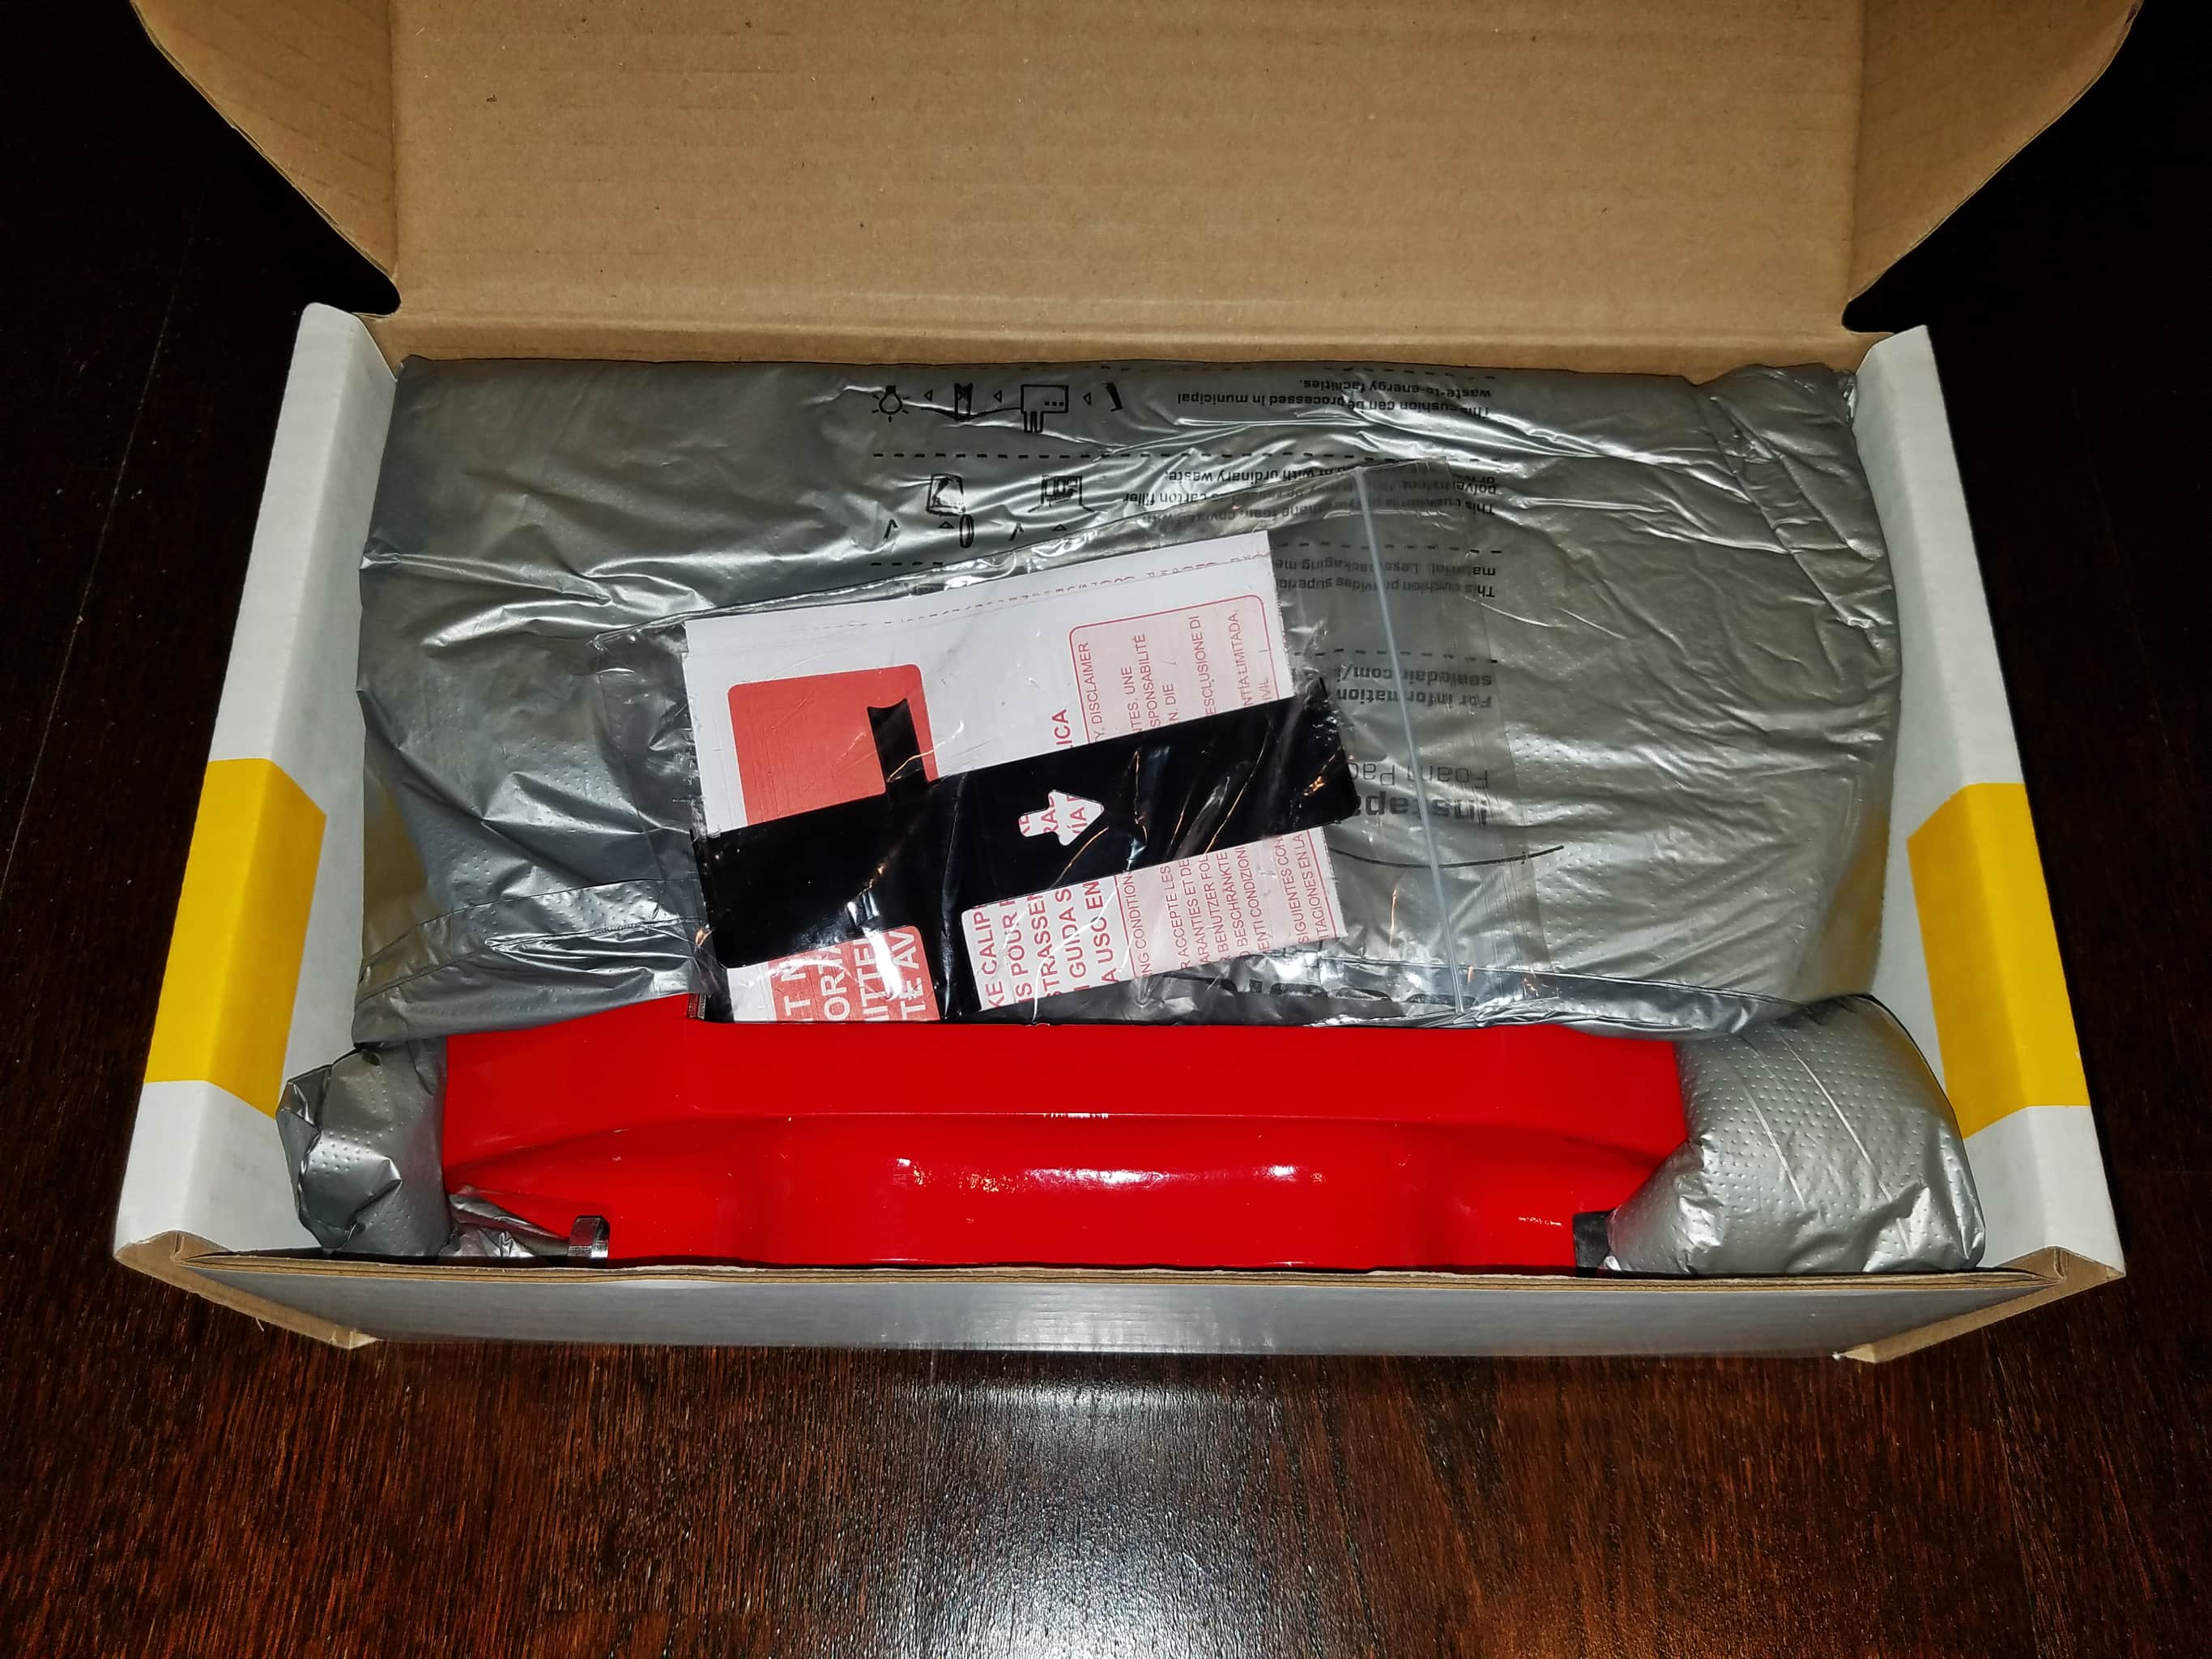
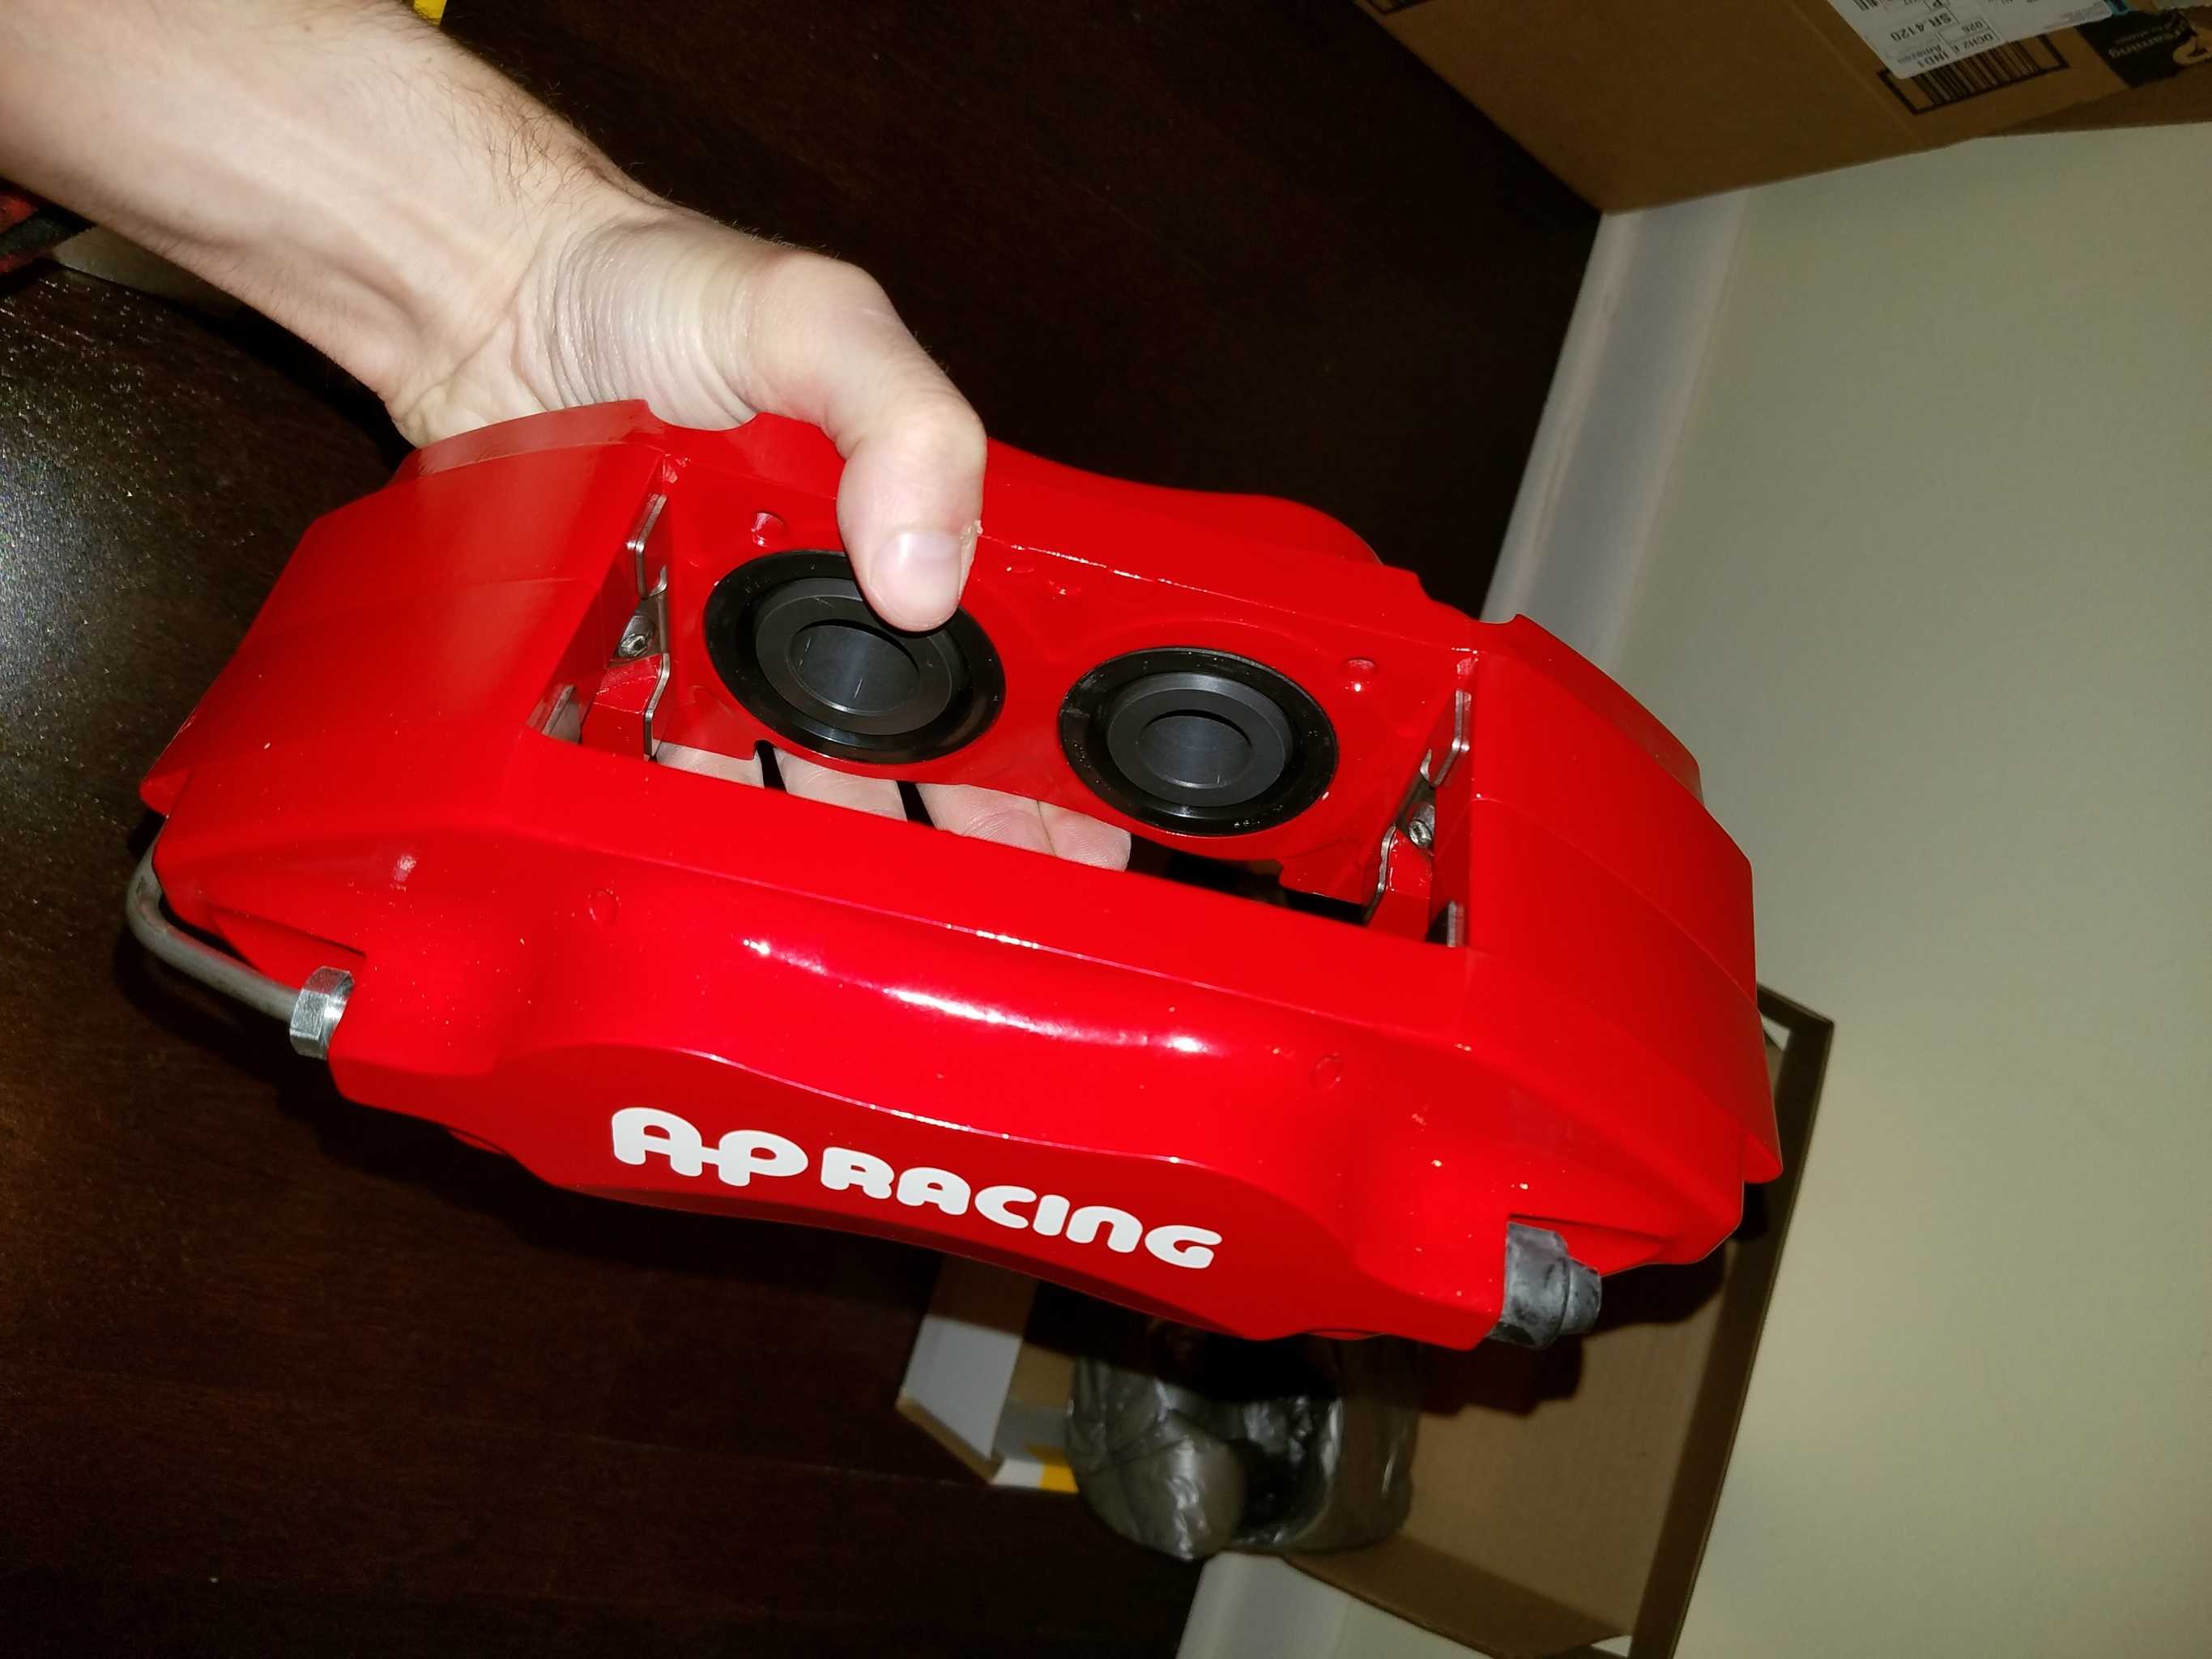
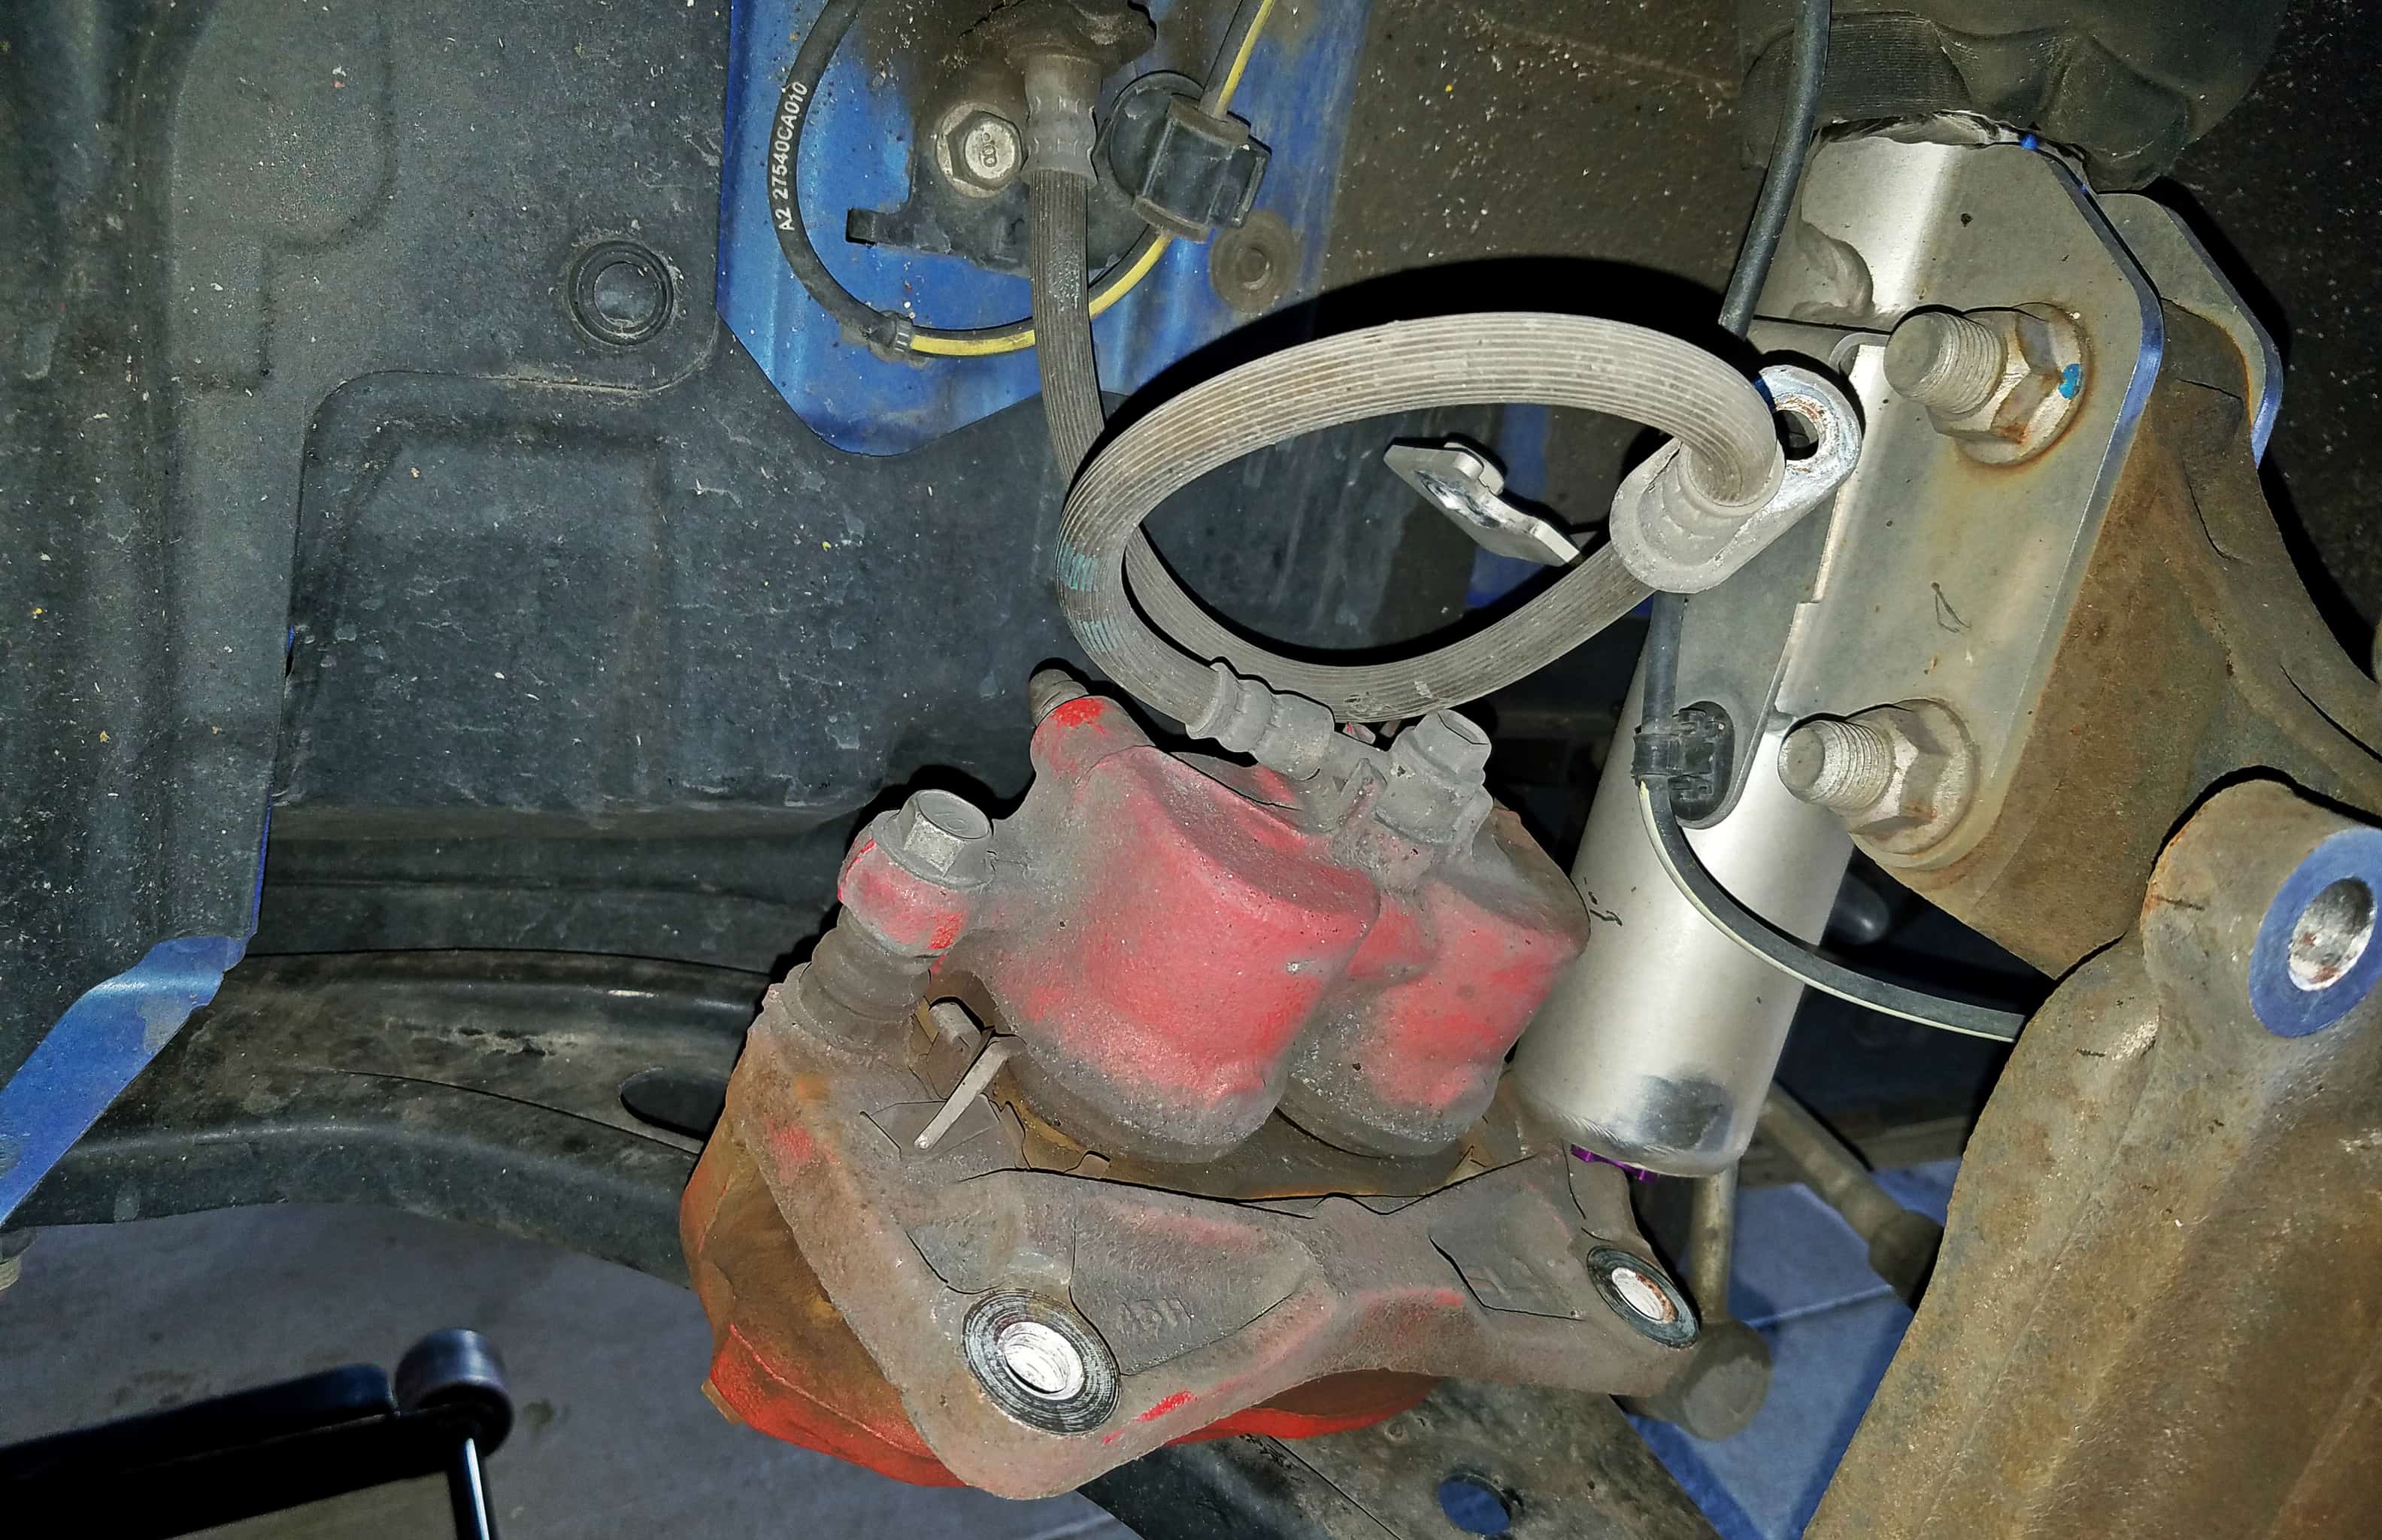
Remove all of the stuff mentioned above, and you find two even smaller boxes tucked away underneath containing the calipers. Each caliper is immobilized in a vacuum-sealed, foam wrapping to prevent it from moving around and getting scuffed or damaged. A little zip-lock bag contains the retaining pins for the brake pads, as well as a noise-reduction “plate,” for lack of a better term. This black metal plate installs between the pads and the pins, and puts pressure against the pads to keep them in place and reduce the noise they make. Take the calipers out of their wrapping and you are greeted by a brilliant red coating, with white “AP Racing” lettering on the front. The finish is quite nice, and much smoother than the “orange peeled” finish on the OEM calipers. They also have very meaty drain plug caps, which I like. The calipers aren’t labeled “left” and “right” but they are unique. Unlike the rotors, however, it would be fairly obvious if you screwed up the install. The drain plugs must be on top because air is obviously lighter than brake fluid, and you want to drain air, not fluid!
These calipers are obviously larger than the OEM calipers, but that’s not the most significant difference. The biggest difference is that these are 4-piston fixed calipers, as opposed to the OEM 2-piston floating caliper setup. What’s the difference? A floating caliper only has pistons on one side of the caliper. They press one pad against one side of the rotor and the reciprocal action is that the sliding bracket on the other side pulls the other pad against the other side of the rotor. (Picture standing inside of an upside-down box, and pushing the box forward with your hands (the pistons). You will push the box across the floor until the other side of the box pushes against your back. That’s the idea behind a floating caliper, more-or-less.) The benefits to floating calipers are that they are less expensive, and lighter. The downsides are that they can exhibit uneven wear on pads and rotors, offer sloppier feedback through the brake pedal, and can’t exert as much clamping force as quickly.
A fixed caliper has pistons on both sides, and simply squeezes both pads equally. In the box example, this would be like reaching your arms out to each side, and pushing evenly on both sides of the box. While this setup tends to be heavier, and more expensive, it wears your brake components more evenly, provides much more defined feedback through the brake pedal, and can apply more clamping force to your rotors more quickly. Oh, and did I mention heavier? My mistake! Because the AP Racing 4-piston fixed caliper still manages to be slightly lighter than the OEM 2-piston sliding caliper. Yay for optimized designs!
More boxes!!!
Well-packaged with no wiggle-room.
Big, shiny, and very RED!
Installation
There are plenty of DIYs available online that walk you through the installation of a BBK in great detail, so I’m not going to reinvent the wheel here. However, I do want to cover the highlights of the install, and share my experiences. The reason for this is that while I had changed brake pads, and had even changed a caliper once on an old car, I had never done a complete brake replacement, or a brake line replacement. This is also a much newer car, so I wanted to make sure it was done correctly, and I autocross it quite regularly so I didn’t want to screw anything up. Therefore, I think this would be a good read for those of you who perhaps might have never done this sort of job before, and want to see what it’s like for a “first-timer.” (Hint: It really isn’t that hard.)
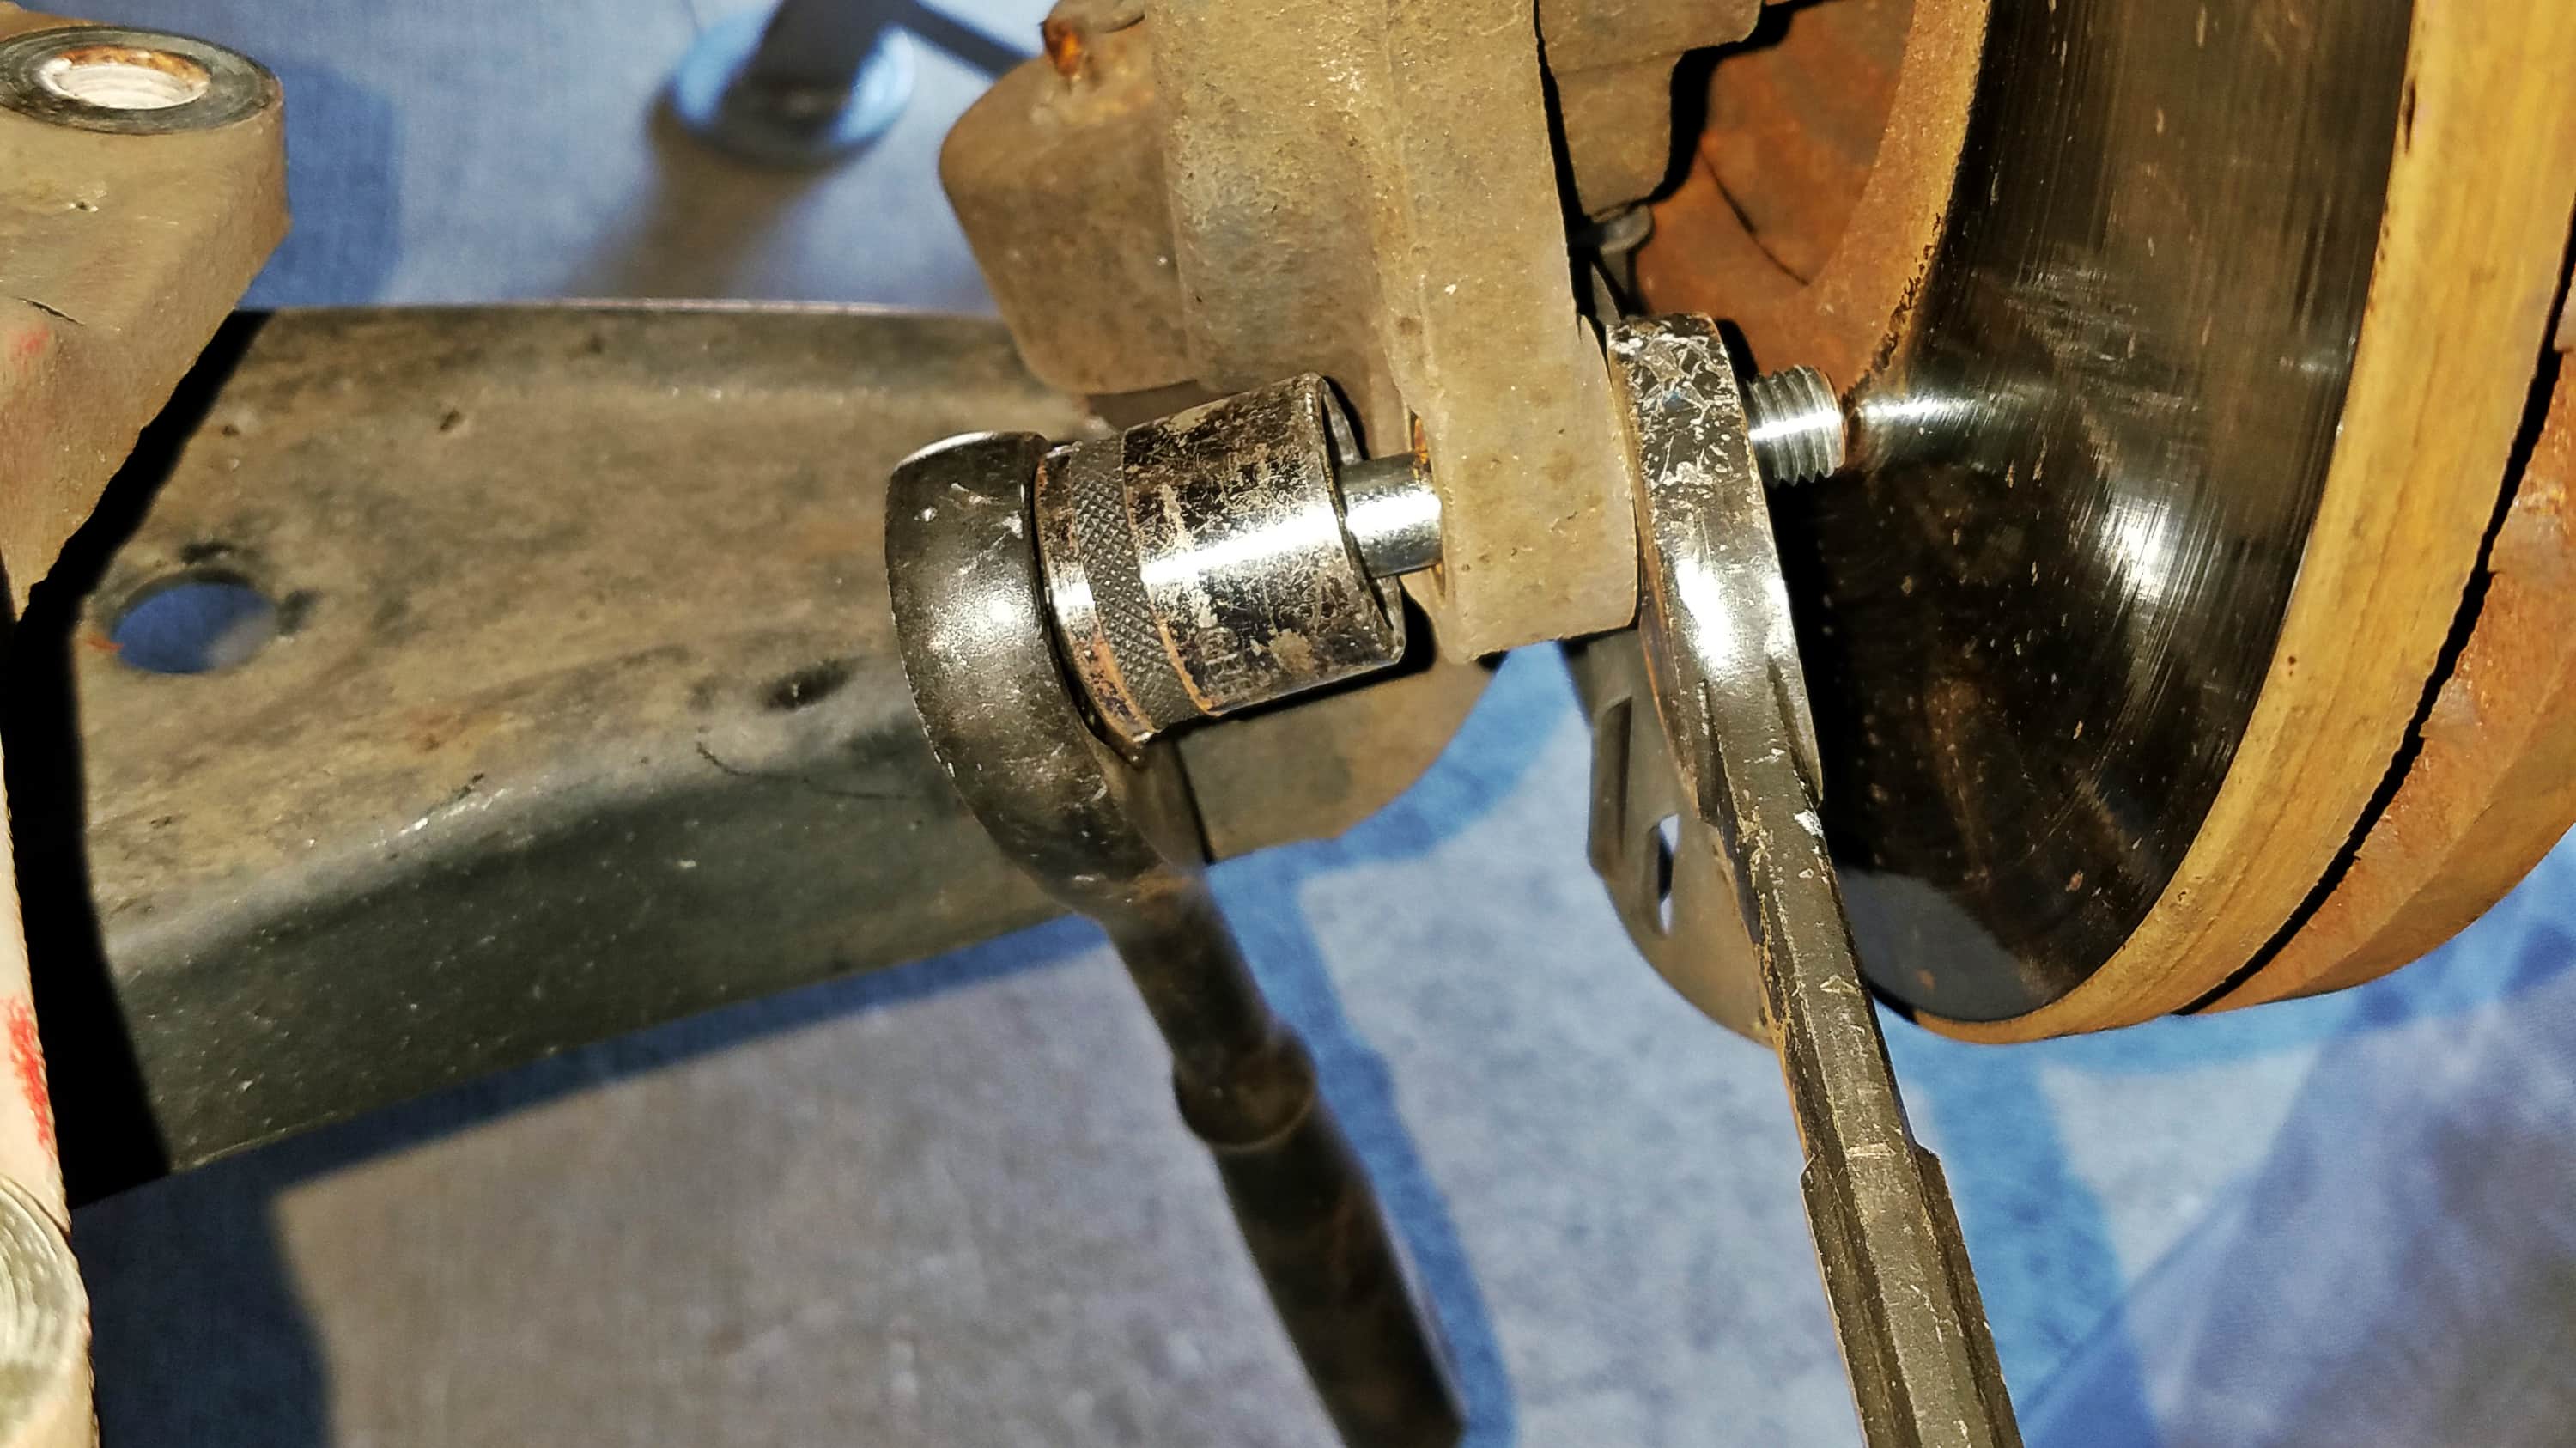
With the caliper out of the way, you can proceed to remove the rotor. Good luck. I don’t know if I just always have bad luck with rotors, but I’ve never had a rotor come off easily. In the case of both of the front rotors on this car, they didn’t come off by hand, nor did they come off after whacking the hat, or after directly whacking the crap out of the back surface of the disks (since I wasn’t going to be reusing them). So I resorted to Plan D. I ran a bolt through the lower caliper mounting point on the hub, and put that through a nut on the inside (rotor side.) I then slowly screwed it against the rotor until the force broke the rotor loose… and it took a LOT of force. So much that I was expecting the hub mount to snap off. When the rotor did finally break free, it was with an incredibly loud bang. And it still didn’t come off. I had to back the nut off, rotate the rotor a bit, and tighten it again. Overall, this step was by far the most time-consuming step of the entire install process, believe it or not. You can see exactly what I’m talking about below. If you ever do this and plan on re-using the rotors, make sure you distribute that bolt’s pressure by using something between the bolt and the rotor so that you don’t damage it.
EDIT: There are two small, threaded holes on the front of the rotor (between the studs) that you can use the screw a bolt into the rotor and force it away from the hub much more easily. I didn’t use this method because I didn’t have the correct thread/pitch bolt necessary. I found out later, however, that the bolt that secures the brake line to the hub is the perfect size for this procedure, so save yourself the headache and use those!
So with all the old stuff out of the way, it’s time to install the new stuff. First up is the new caliper bracket. As far as I could tell, these were not specific to the side of the car. Use the new bolts that the kit provides, and snug it up to the proper specs. with that done, you can install the new rotor. Remember, these are directional, so make sure you’re installing the correct one on the correct side. You are also going to want to use at least three lug nuts to firmly seat the rotor onto the hub. This is important because the rotor needs to be in the absolutely correct orientation when you fine-tune the position the caliper. With the rotor firmly seated, you can mount the caliper. The caliper is secured to the bracket with two bolts, and those should be torqued to spec as well.
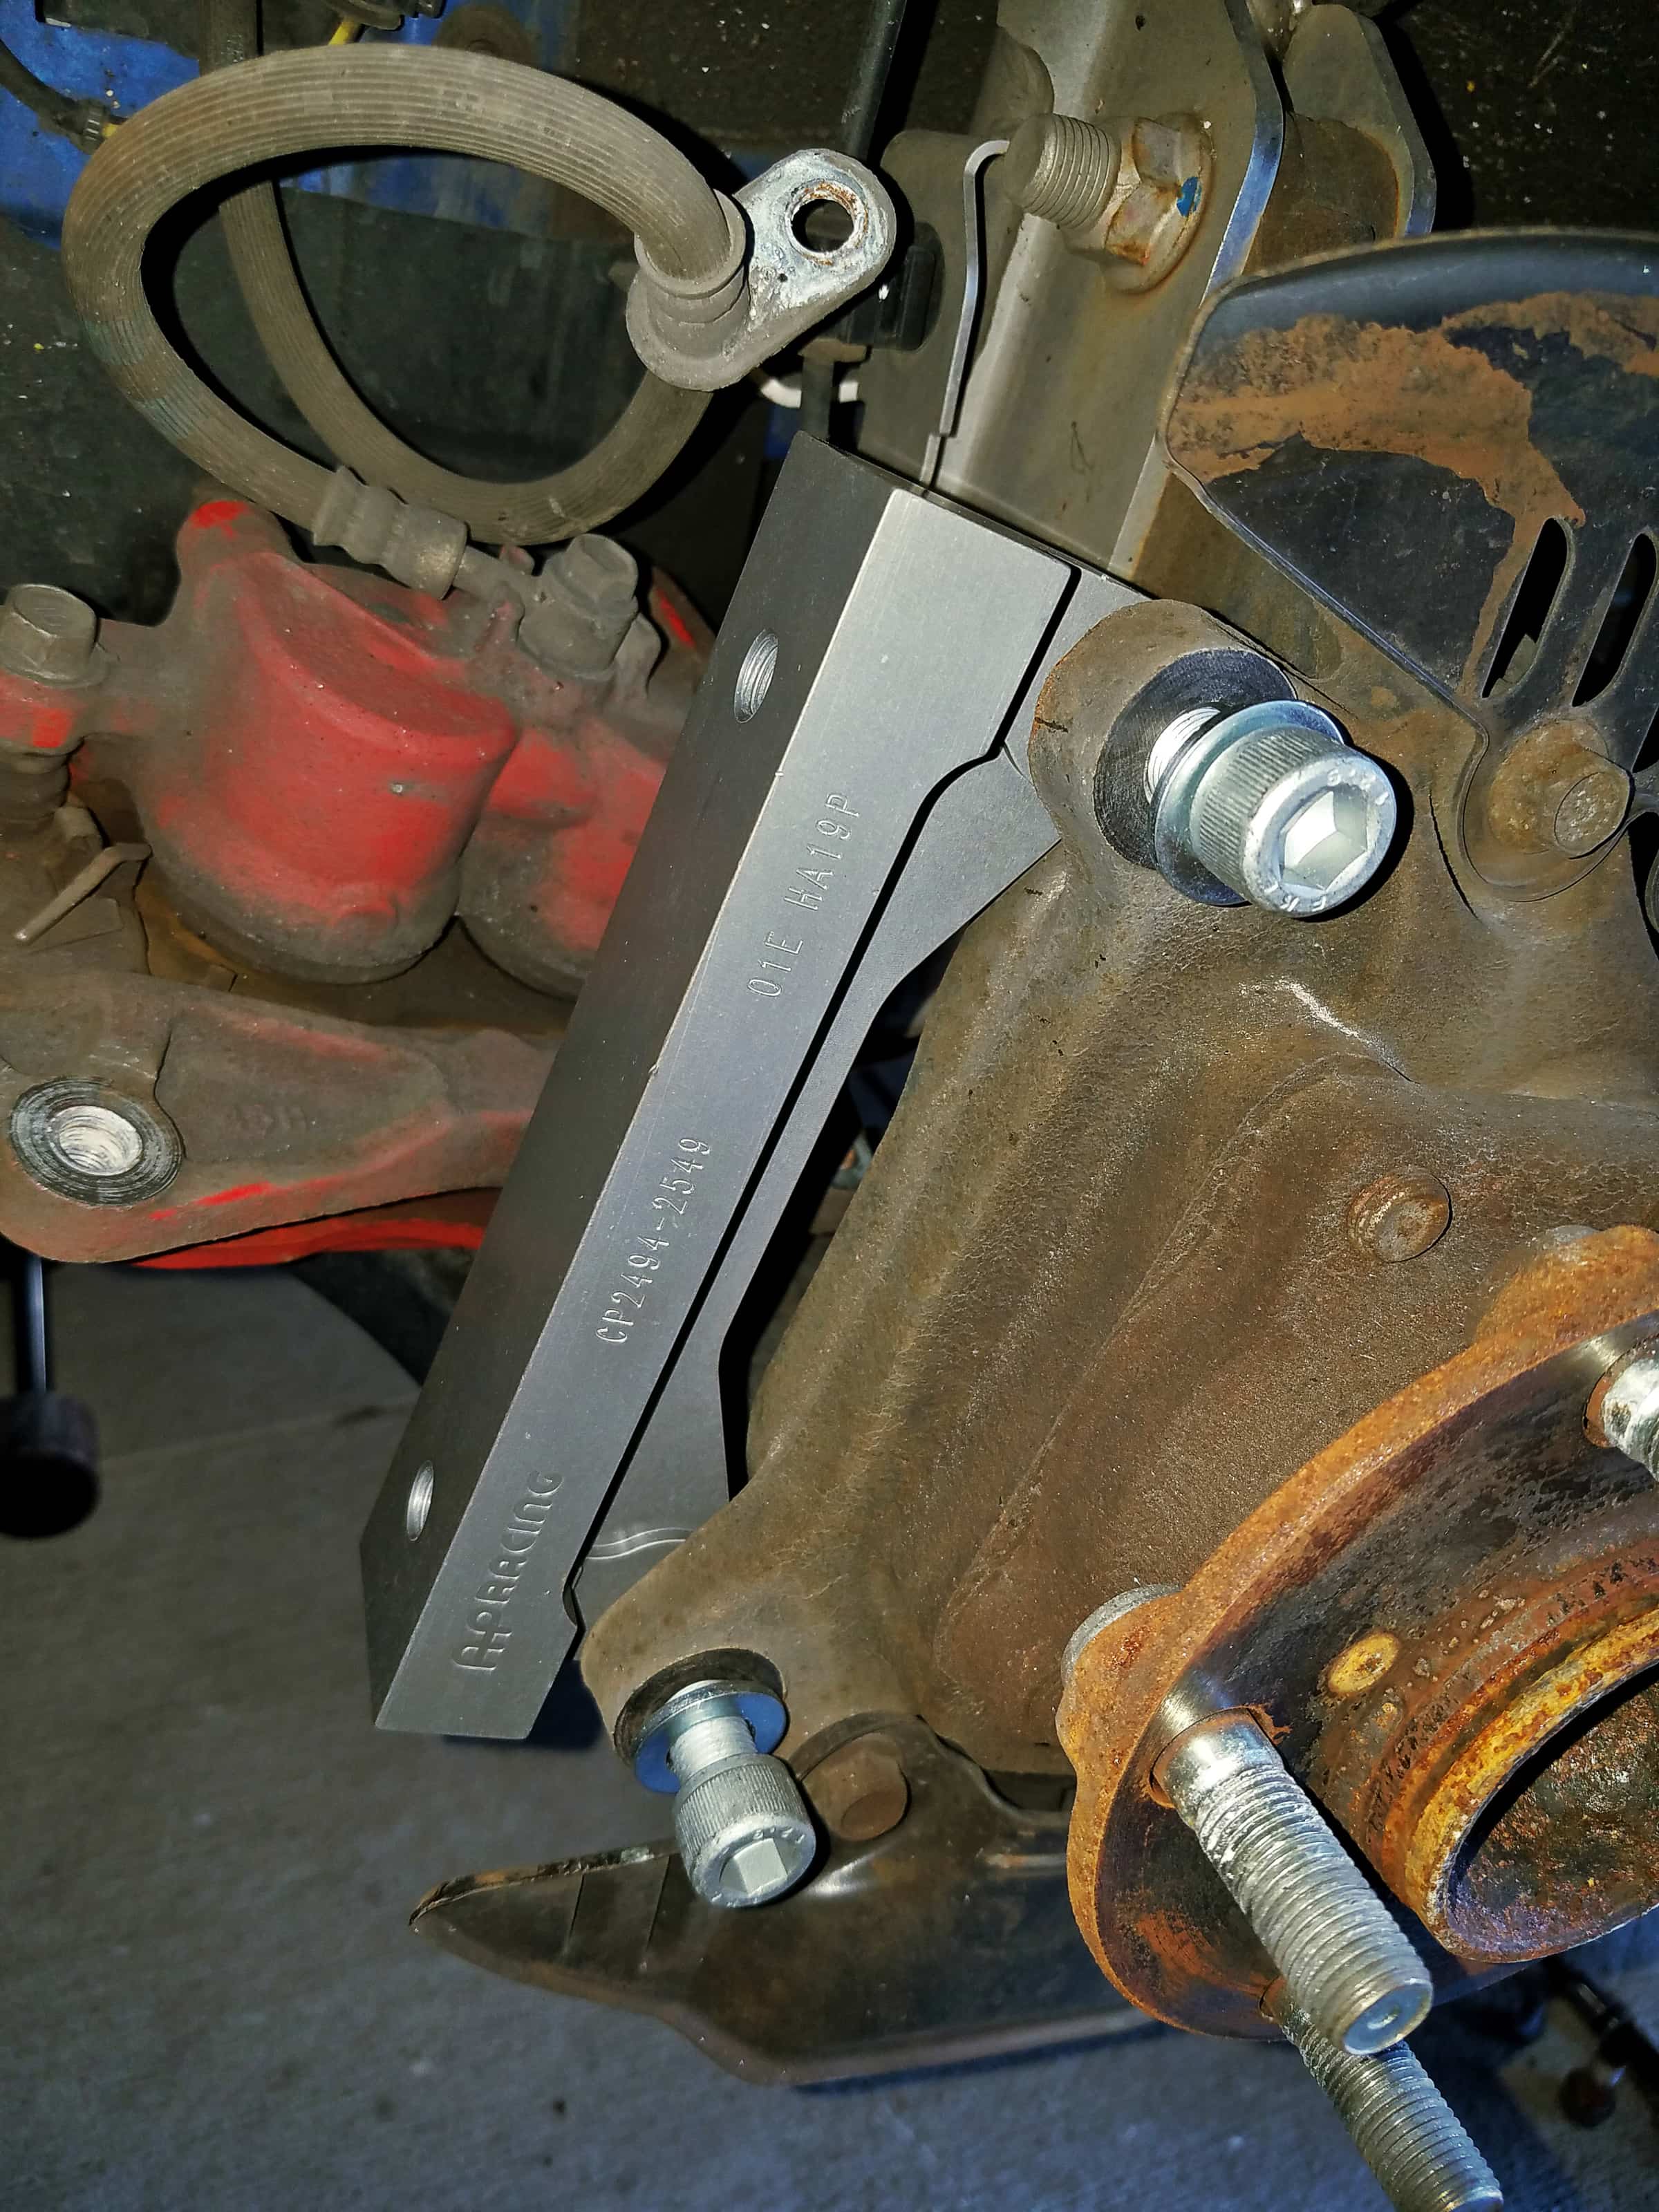
Caliper bracket.

Rotor installed with lugs.
Caliper installed.
With the caliper mounted, it’s time to check clearances. As you can see from the photos below, the tolerances are very tight. The rotor passes through portions of the caliper body that are only ~2-3 mm wider than the rotor width. This spacing needs to be evened out to ensure the rotor does not contact the caliper during operation. This is why it is important that you securely bolt the rotor to the hub with at least three lug nuts. This ensures the rotor is fully seated against the hub so that you can get the caliper clearances right. This isn’t rocket science, but if you omit this step, you might install your wheels only to discover that the rotor now grinds against the caliper.
With everything tightened up, check the clearances to each side of the rotor. If they aren’t even, you need to unbolt the caliper, remove the rotor, and unbolt the caliper bracket. A whole bunch of super-thin shims are provided with this kit. Add them between the caliper bracket and the hub, reinstall, and check the clearance. Each washer you add pulls the caliper inboard very slightly. In my case, I wound up needing one washer behind both bracket bolts on both sides of the car. Repeat this process until you’re satisfied with the caliper clearances. Once you’re happy, you need to take everything off one last time and reinstall them using the red Loctite which is also provided in the kit.
Tight clearances!
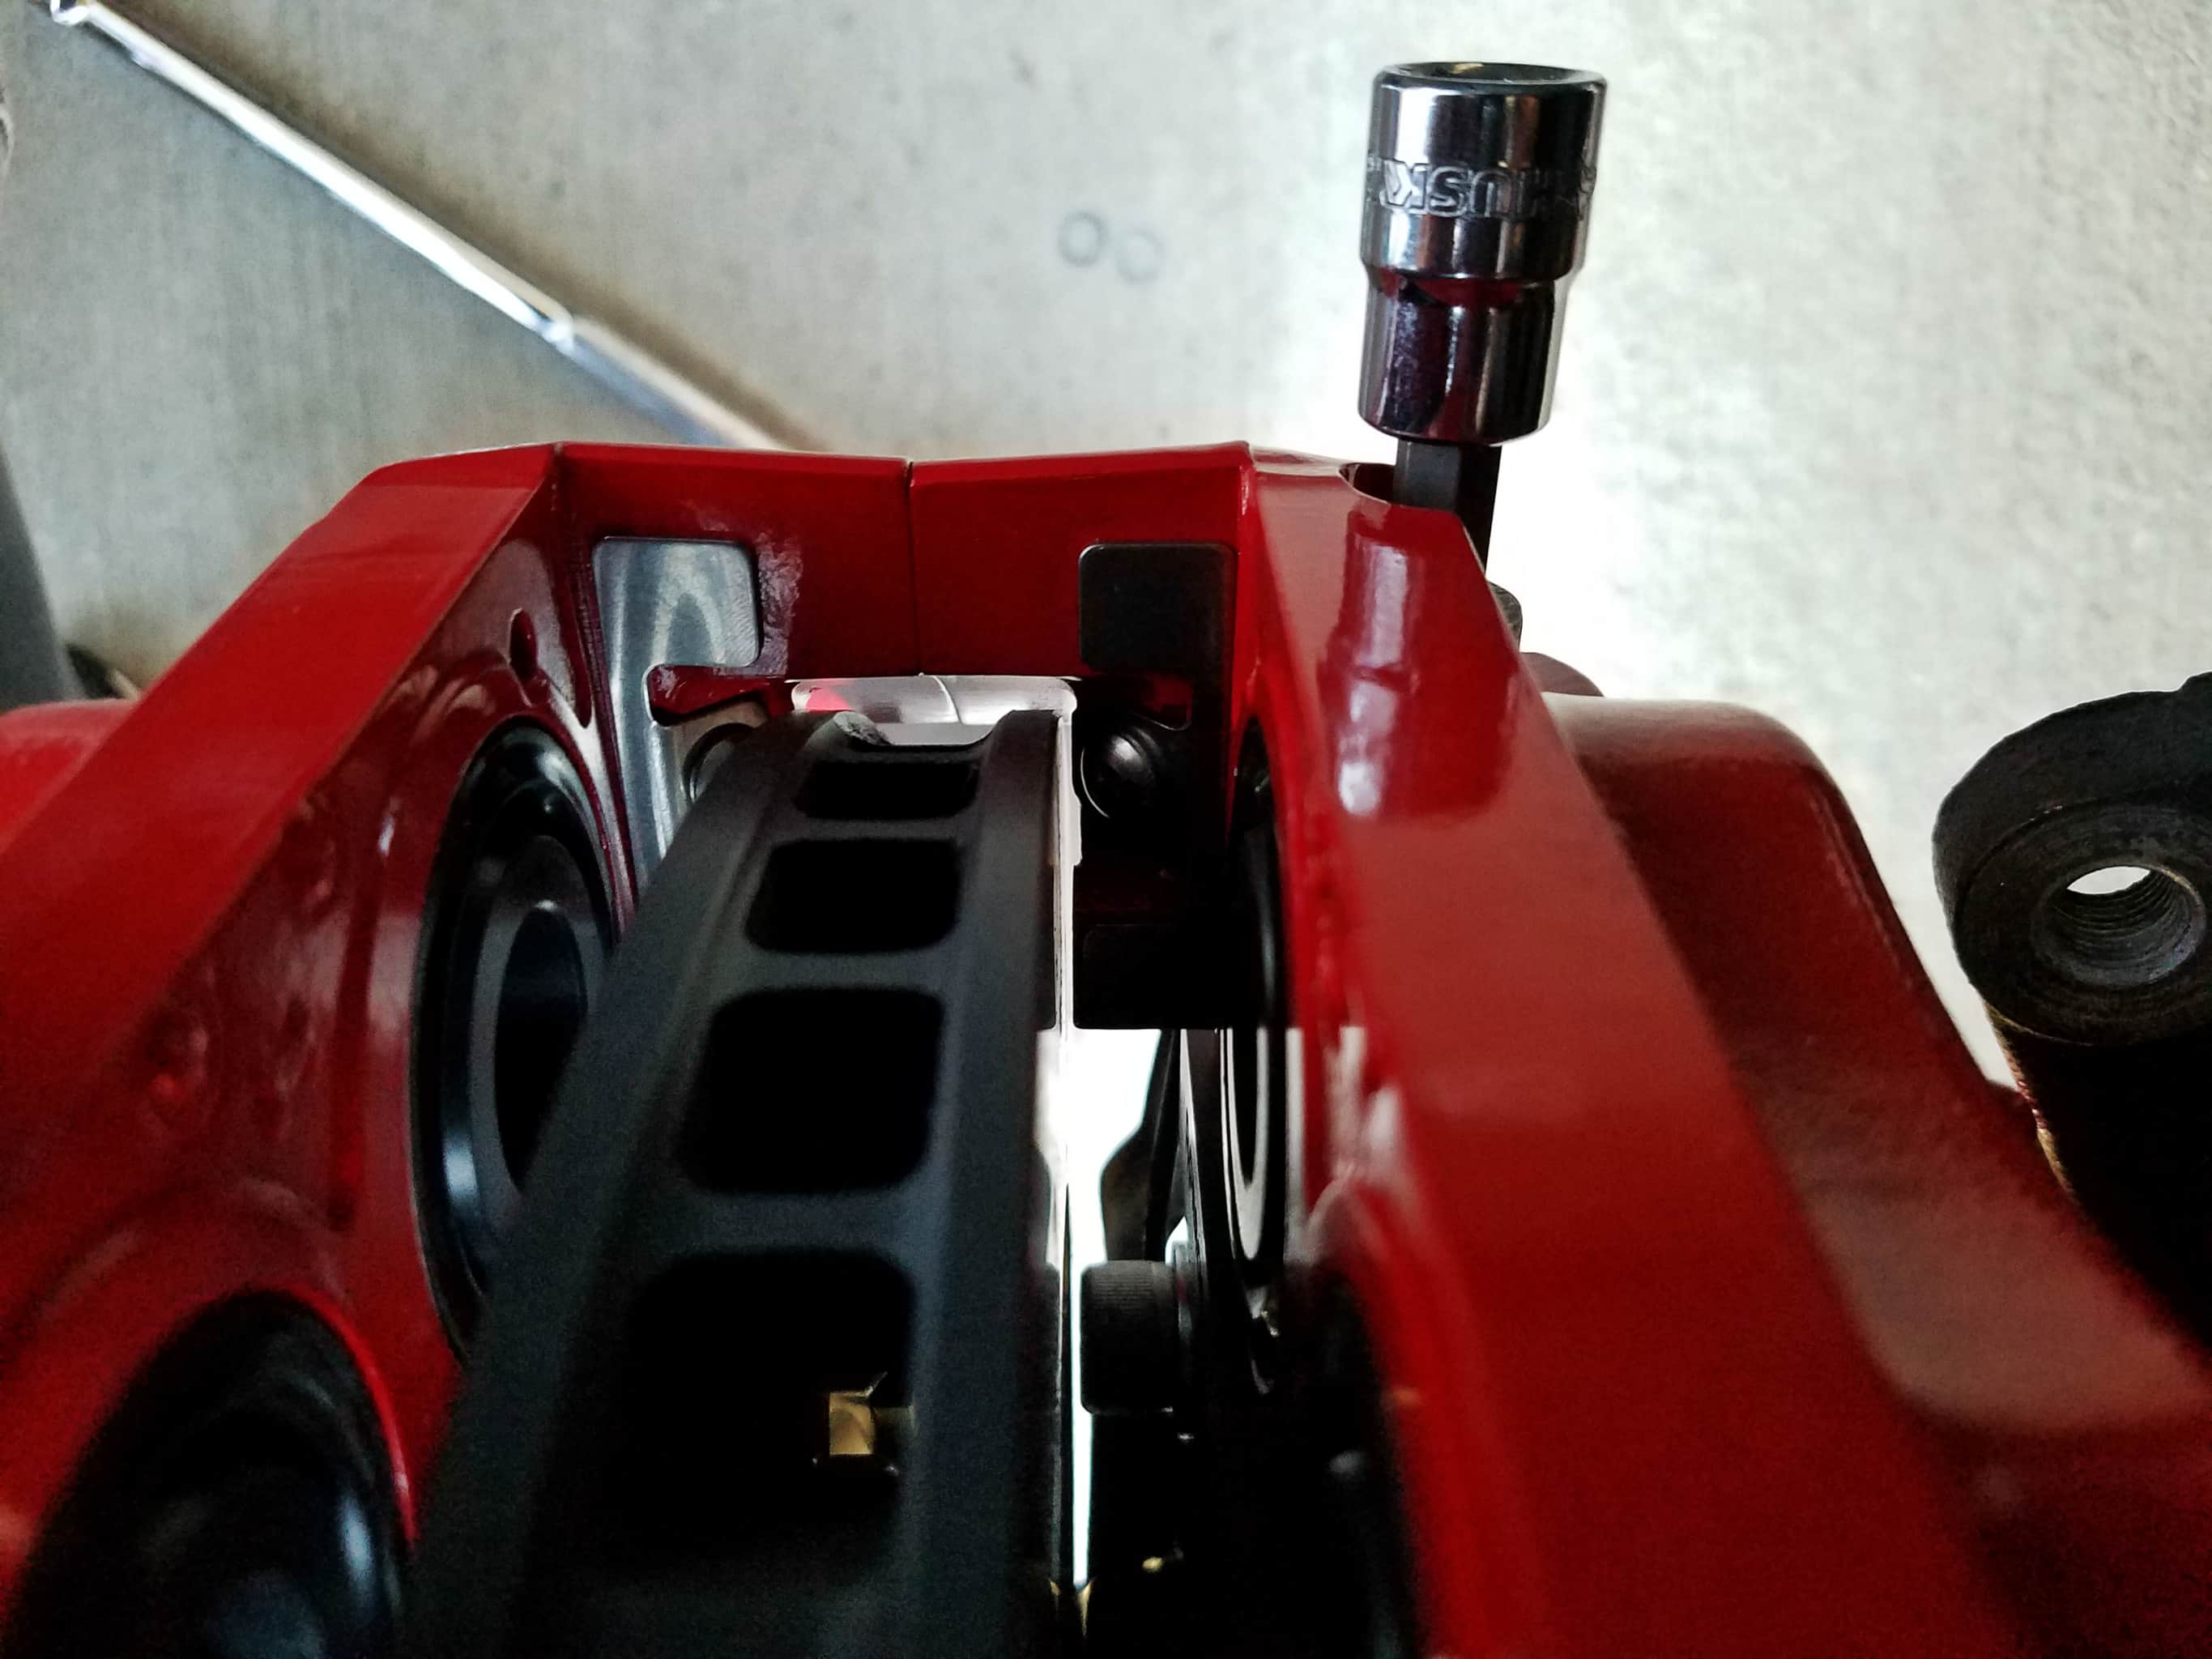
At least 1 mm of clearance on each side.
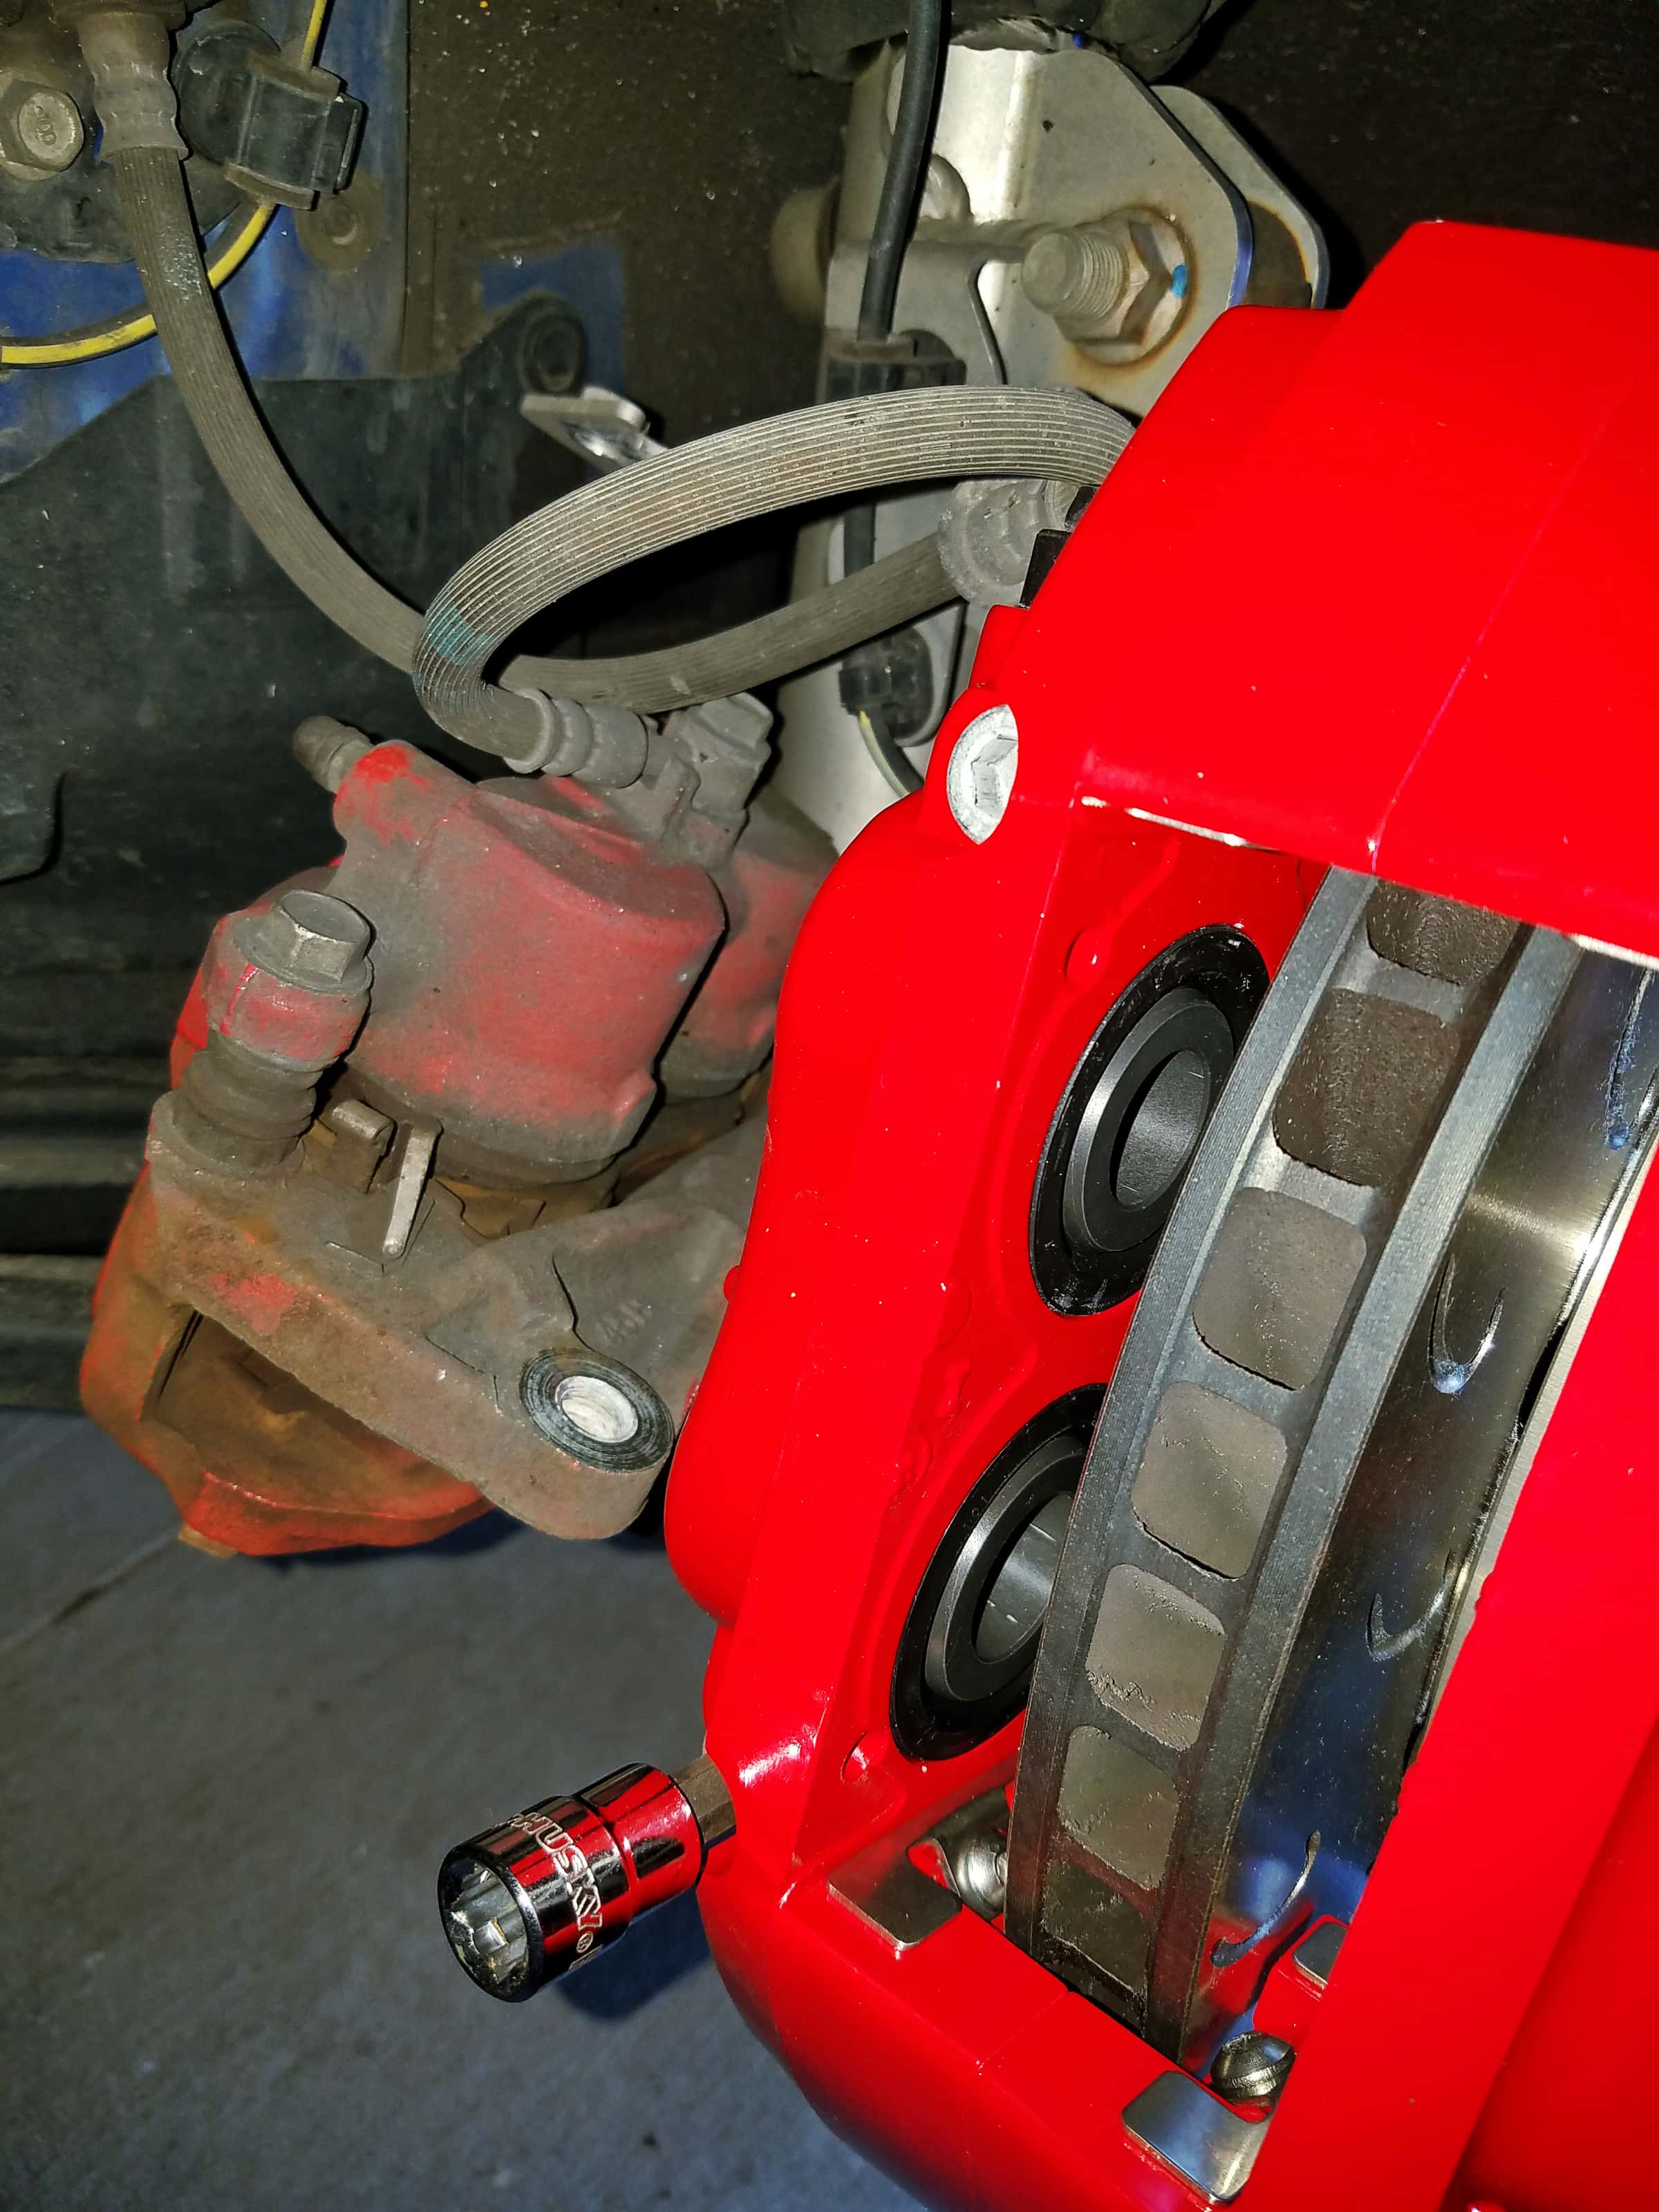
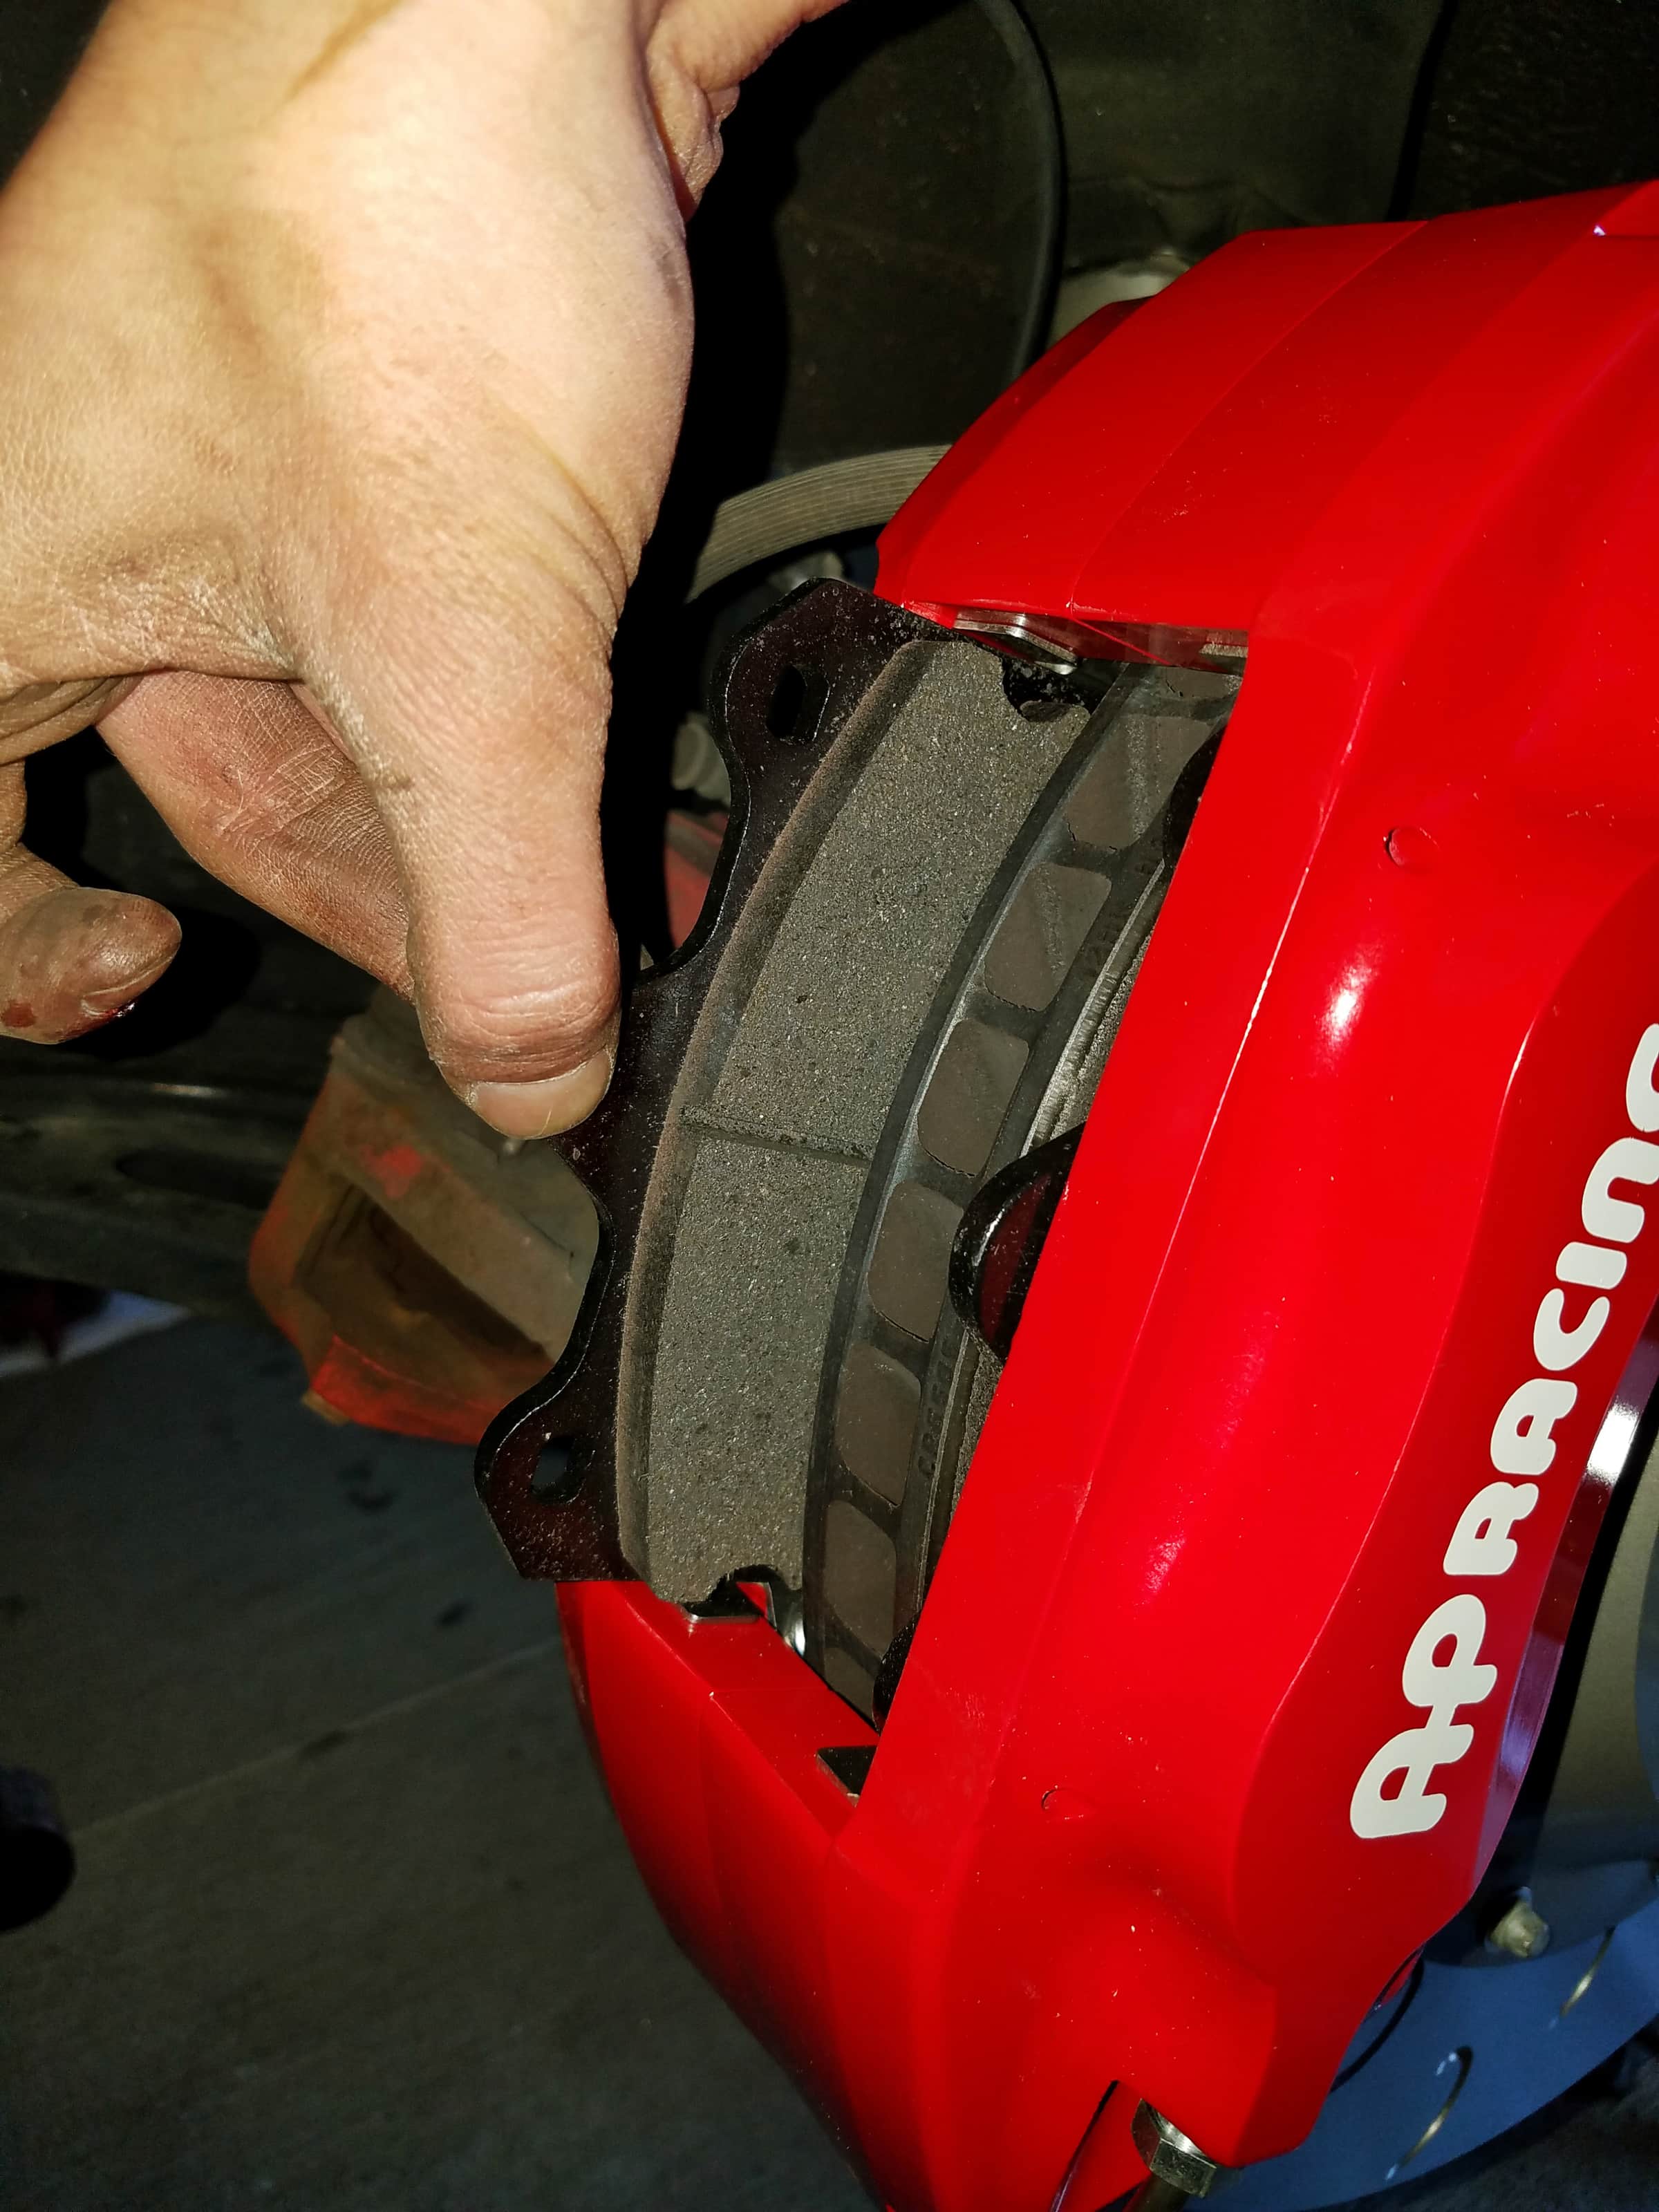
So now that everything is bolted up, and properly spaced, it’s time to continue with the install. At this point, you can drop in your new pads. Unlike most OEM calipers, these kits have a greatly simplified method of installing brake pads. You literally just slide them in. It’s impossible to make things any simpler than that! The pads are held in place by two pins. These pins slide in from the back of the caliper. Also, unlike the competition kits, you are provided with a metal “silencer” of sorts. This thin plate of metal is installed behind the pins, and acts as a spring to push against the pads. This eliminates some noise by preventing the pads from rattling around loosely in the caliper. The arrow points in the direction of rotation, so make sure they are installed correctly.
The one complaint I had with the installation of this kit was the design of the pad retaining pins. I suppose pins are “convenient” because they are pretty simple to install, but I would have much preferred if these were screws rather than pins. The pins have to be tapped into place, which is a sloppy process without exactly the right tool. I probably should have found something softer, but I wound up using my 3/8″ socket extension against the pin, and tapping it with the handle of the ratchet. You’re installing this from the inside of the caliper, so it’s an awkward position to tap, and I wound up scuffing the surface of the caliper, and chipping a bit of the red paint. Not a huge deal as it isn’t on a visible section of the caliper when installed, but it would be nice to see a “cleaner” method of doing this.
Brake pads simply slide right in!
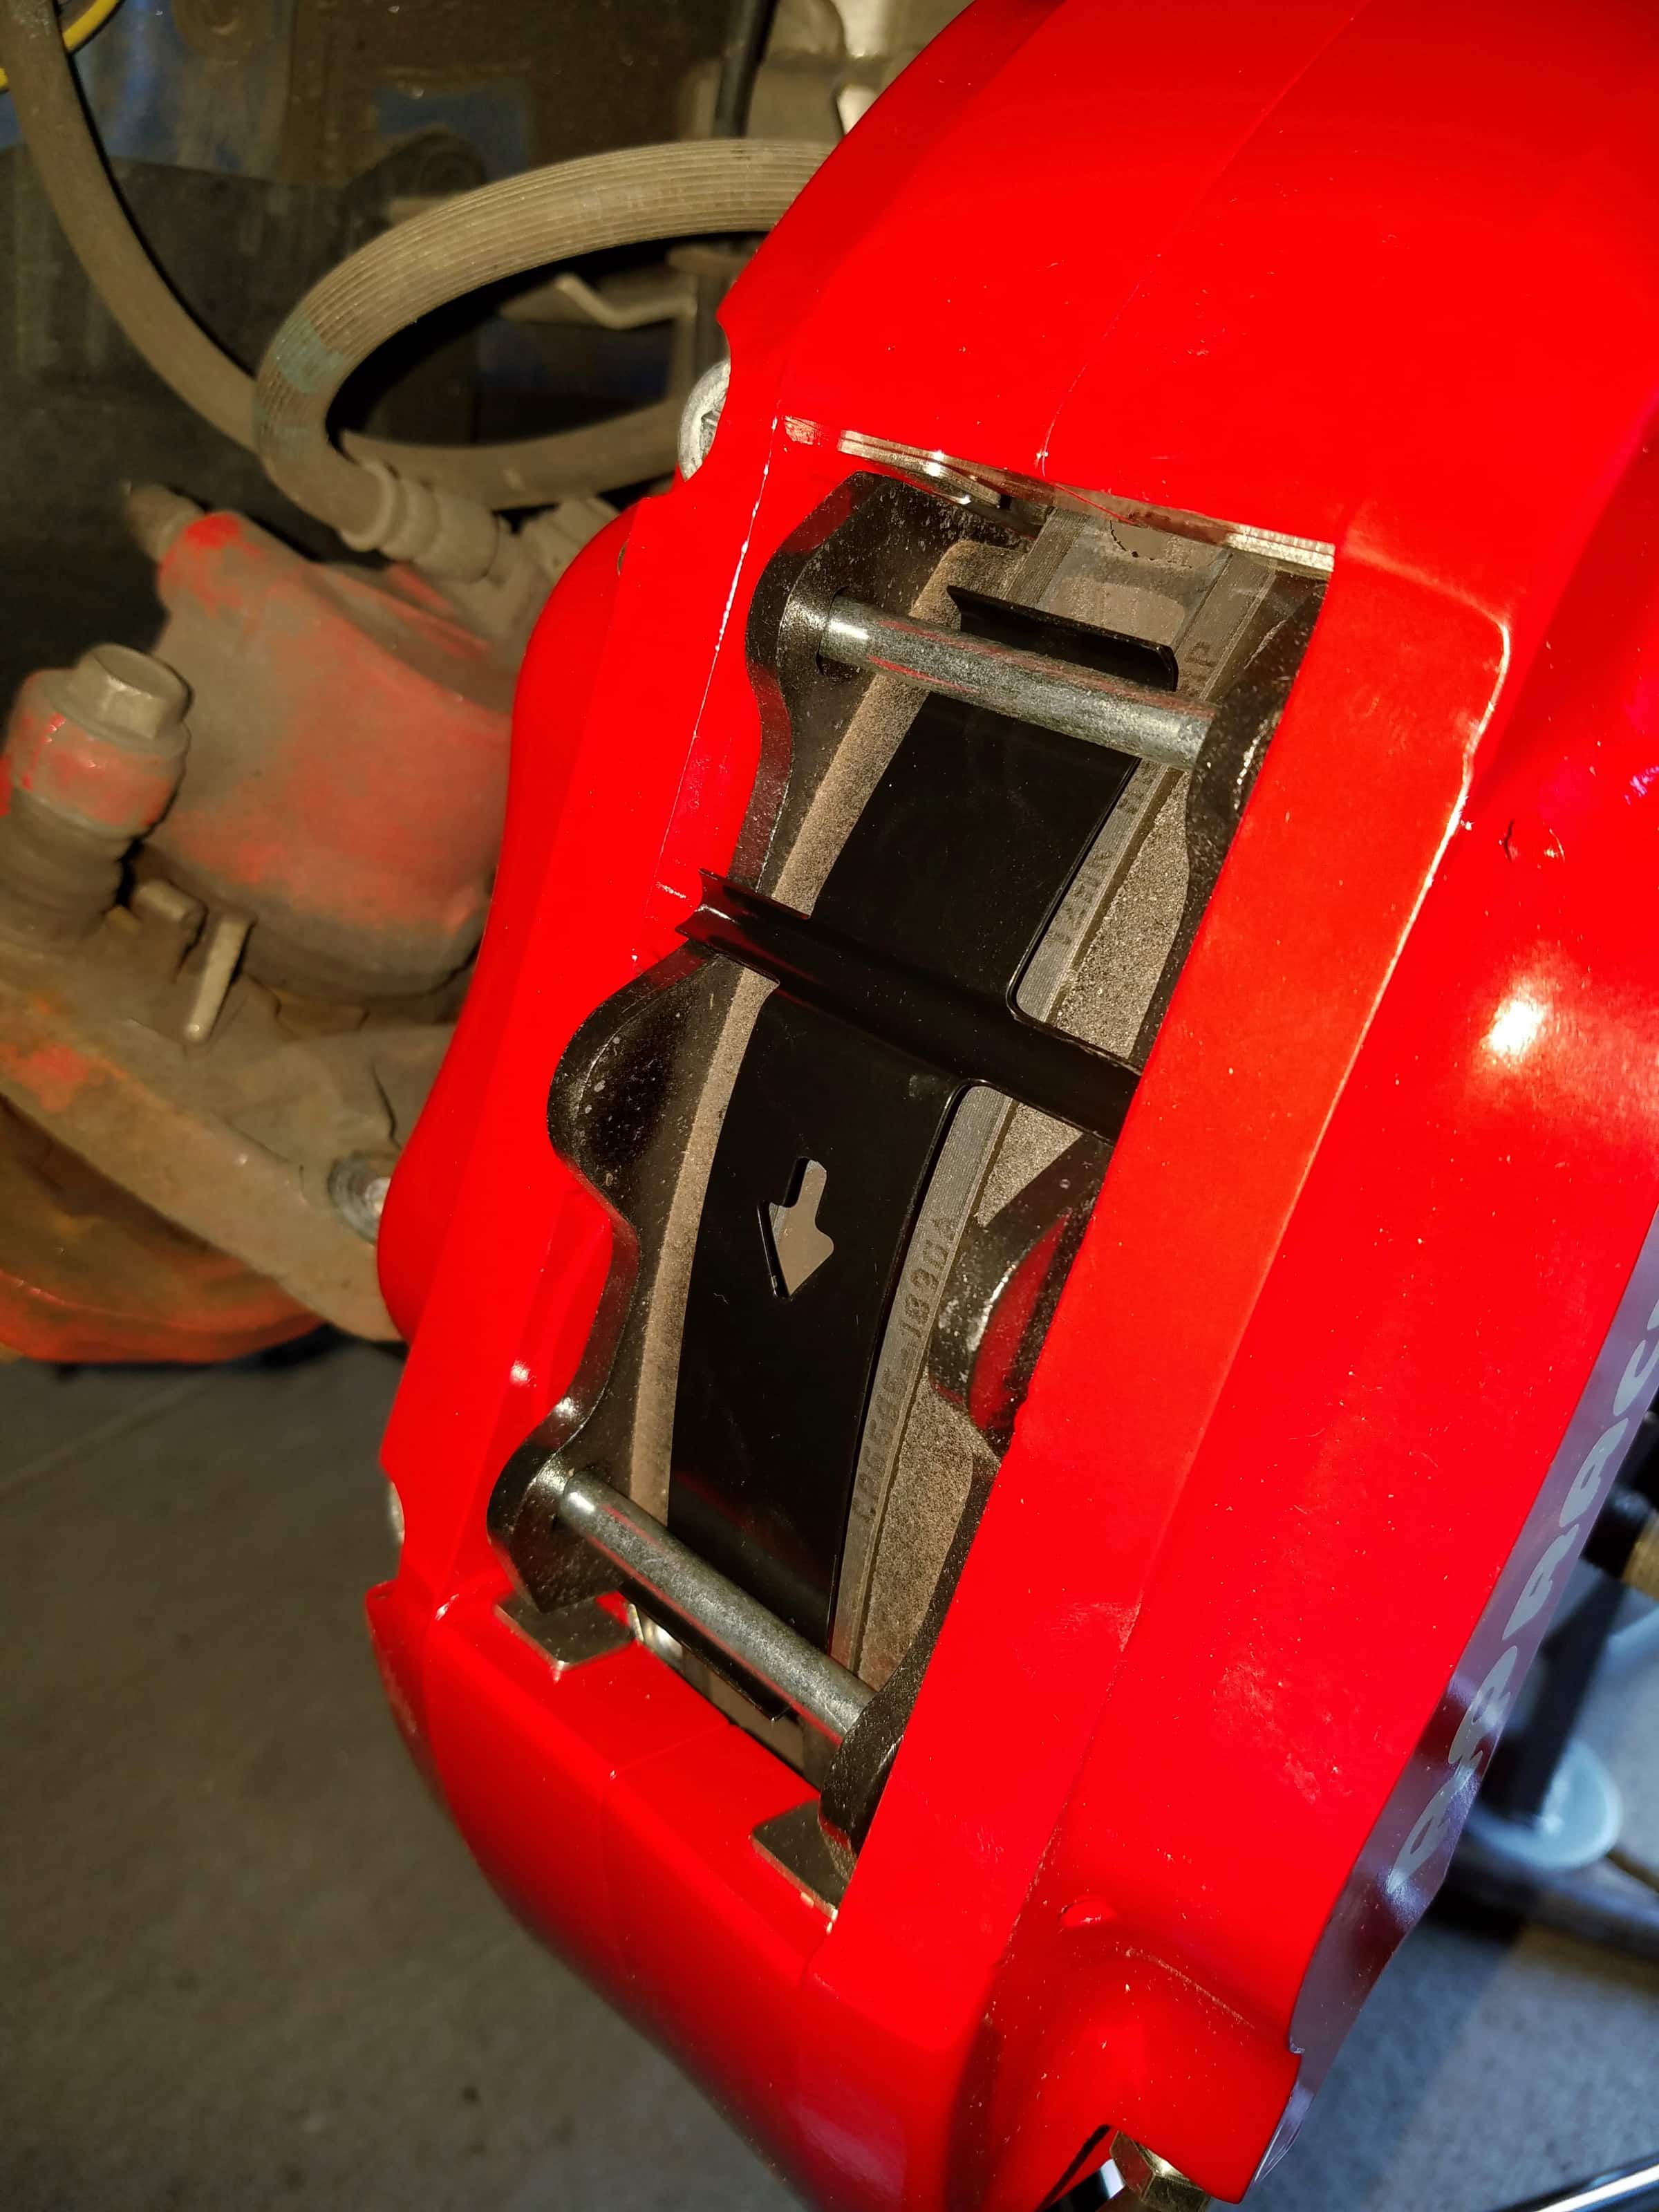
Pins and silencer installed.

Pin hammered in; paint scuffed.
All that’s left is to install the brake line! I started by installing the line on the caliper side – as I was saving the vehicle side for last to minimize the fluid mess. All new hardware is provided here. With the caliper side installed, I installed the protective sheathe (which is just coiled plastic of some sort) around the line. Install it on the bottom half, snip it at the correct length, and install the rest on the top half. That done, I bolted the line to the strut using the original bolt. The very last step was to disconnect the old line from the car, and quickly swap on the new line. Every DIY you read will recommend you get the proper tool for this job, and I wholeheartedly agree. You want a flare nut wrench. This is a normal 6-sided wrench, but with a slot cut out of it large enough to fit it around the brake line. Without this tool, you risk stripping the nut connecting the lines, as it can be screwed on pretty tight. I used a bunch of brake cleaner to clean off all the goop on the bolt. Then I unscrewed the bolt, pulled the retaining clip out with a pair of pliers, and slid the old line out. I then quickly installed the new line, pushing it up into place, installing the retaining clip, and then tightening the screw. You might need to do what I did, and use pliers to keep the OEM brake line from spinning while you break the nut loose (right photo below.)
All done! Just make sure to turn your wheel fully lock to lock to check that the brake line doesn’t bind on anything. I found that my passenger brake line tended to run up against the speed sensor wire when the wheel was turned to full lock. No matter how I adjusted the line, I couldn’t rectify that, so I’m just going to leave it and hopefully it won’t cause me any issues down the line.
The last step in this entire process is of course to bleed your brakes. I bled the front brakes the day of this install, but did a full bleed of the entire system the weekend after in order to replace the two-year-old fluid. I won’t go into details of how to perform a bleed, as there are countless resources for that online, but I will say this: BUY A POWER BLEEDER. It cost me $75 for a Motiv Power Bleeder and drain bottle, and it was money well-spent. I can’t believe I ever bothered with the cumbersome two-person “pedal method” of bleeding the brakes. This tool makes it so easy I might just bleed the brakes once a week now!
Results
It took me a few weeks to write this review because after installing these brakes, I ran into an issue that wound up being entirely my fault, and I needed to get that sorted out before I could give a more definitive opinion. As mentioned earlier, this is NOT a competition kit. This is a kit meant to be an OEM replacement, with the ability to much better handle an occasional track day, or other more aggressive use. As such, I had mistakenly assumed that the pads that came with this kit would be road pads that were similar to the Hawk 5.0 pads I currently had on the car. I installed this kit the day before an autocross event (yes, I’m impatient), so I didn’t have much time to experiment with them other than performing the bed-in procedure on the day of the autocross event.
Bed-in should have been my first hint of the problem I would run into, but I didn’t think much of it at the time. When the brakes got hot towards the end of the bed-in process, the pads became incredibly grippy. Much more grippy than the Hawk 5.0 Street Performance pads I’d been using previously, and this made front wheel lockup very easy to achieve. This isn’t bad; this is good, as it means the brakes work. Later on, in autocross, I ran into some fairly noticeable ABS issues where the ABS would kick in under hard braking before every turn. At first I assumed that the front brakes were just stopping much better as a result of the new pads, but that wound up being only half the issue. On the street, I noticed that hitting the brakes hard caused the ABS to kick in a bit earlier than I felt it should be activating. I finally put two-and-two together, and pulled the ABS fuses on the car to perform an experiment which confirmed my suspicions. The REAR tires were locking up prematurely.
Wait, what??? That doesn’t make any sense, right? Well actually, it makes plenty of sense. The mistake I had made, was to assume that the pads that came with the BBK were evenly matched to the Hawk 5.0 pads that I had left installed at the rear of the car. This wound up being a big no-no. The APF404 pads that came with this kit have less initial bite when cold compared to the Hawks, but the front brakes quickly surpass the old Hawks once the temperatures heat up. As such, on the street (and on the first few turns at autocross) the rear brakes had a tendency to lock up before the cold front brakes, preventing the fronts from reaching their full potential before the ABS would kick in, which resulted in slightly longer stopping distances. Once warmed up, the fronts would out-brake the rears before locking up, which also could result in slightly longer stopping distances that I would get if the rears were allowed to work to their full potential.
In the end it took me a few weeks before I was able to find time to order and install a new set of rear pads and rotors. I had some back-and-forth discussion with Essex Parts Services about which brake pads I should use to match the fronts, and was assured that the Ferodo DS2500 pads were an almost identical compound to the front APF404 pads, so those are what I ordered, along with some Centric rotors.
With that issue rectified, I can confirm that the brakes work beautifully. The brakes offer a bit more ultimate stopping power (though this isn’t necessarily a result of the BBK itself, but more a result of the pads that work better when warmed up), and though the pads do have a bit less initial bite when cold, they are still more than capable of locking up the wheels with just a hair more pedal travel than before. The brake pedal has a slightly more confident feel during my autocross runs, if that makes sense, which I attribute to the fact that the front calipers are no longer the floating style design, which tends to have sloppier feedback. Overall, even though I have yet to push these brakes to the limit on a track, they still feel like an improvement over the stock brakes, and they feel more confident when hauling the car down from speed at autocross (unlike most local autocrosses, our Chicago region events are hosted on a very large lot, so we regularly reach 50-70 MPH at multiple points on our courses.)
Wheel Fitment
I’ve now tried three different wheels with these brakes, and they all clear. There are my summer wheels (HRE FF15, 18×9+40) which you can see in the lead photo. Then there are my winter wheels, the STi wheels that came with my Series.Blue (17×7+48). Lastly, there are my autocross wheels (949Racing 6UL 17×9+40), which you can see in the photo below. All three of them clear this BBK, so I don’t think I’d have issues fitting any reasonably-sized wheel. One thing that will NOT clear them is my stock spare tire. I intend to buy a 30mm hubcentric spacer for the spare to allow it to clear the brakes for short-term use in an emergency, so that should solve that problem.

Funny Sounds
First off, no, there is no squeaking and squealing out of these brakes at all in normal use with the pads I currently have installed – so that’s good. However, there are two new noises that accompany this BBK.
Noise #1: When I reverse my car, I get a rather distinct *thunk* noise from the front brakes. Unlike the OEM brakes which hold the brake pads firmly in place with the use of a bunch of metal brackets, aftermarket BBKs such as this one simply allow you to slide brake pads in and out. The metal clip I mentioned earlier serves to apply some pressure to the pads to keep them from rattling, but when you reverse the rotation of the rotor and lightly touch the brakes, the pads shift in the opposite direction, resulting in an audible clunk. In normal driving, you never hear any clunking, rattling, or other noises. Just when initially tapping the brakes, after changing directions, will you hear that sound.
Noise #2: When driving with the windows down near a curb, or a concrete divider, or some other sort of hard, vertical barrier to reflect noise, you can hear a very faint clicking sound. It’s hard to describe exactly what it sounds like. I’d say almost like a playing card in bicycle spokes, but MUCH fainter (barely audible), or maybe like that kind of buzzing that high-tension power lines make when it’s humid out – but again very faint. The sound gets a tiny bit louder when you apply the brakes. You don’t hear it with the windows up, and most of the time I don’t hear it with the windows down either. It isn’t annoying at all, just an interesting new noise. My understanding is that it has to do with the J-Hook grooves in the rotor and how they interact with the pads, though I’ve also heard that it could be the inside edge of the pads tapping up against the spokes that connect the rotor to the hat. In any event, it’s a normal sound, and not something to worry about.
Good Looks
I love how these brakes look. The OEM brakes were nice, but these really pop. The J-Hook rotors look interesting and aggressive, and the calipers look great, with a nice, smooth, bright red finish (unlike the orange-peeled OEM finish in a duller red), and pretty, white AP Racing lettering. They do a much better job of filling out the wheels on my car, which means my 18″ summer wheels don’t make my brakes look puny and stupid any more! I thought maybe I was the only one to notice how much nicer they looked, but literally the DAY AFTER I installed them, I ran into my parking neighbor in our underground garage, and the first thing he said was that he loved my new brakes – without my having mentioned anything about it to him.
Here are a few pretty pictures to demonstrate the new look:


Overall, I’m quite thrilled with this new setup. They’ve improved the pedal feel of the car. They’ve made it super-easy to swap brake pads in the future. They’ve significantly improved the thermal capacity of my brake setup, and as a result, they’ve reduced the workload, stress, and overall wear and tear on my pads and rotors by distributing the work over a larger area. Oh, and they look great too! My only issue now is that I can’t help but stare at my rear brakes and wish I could afford the rear BBK, but those will likely stay stock for the foreseeable future. Oh well!